
Oyster Blade: The delicious cut of steak you’ve never heard of

Oyster Blade: Get to know your new favorite steak cut

We love a lesser-known cut of beef. Tri-tip, for example — one of the most delicious of all steaks and a prized treasure to any Californian — away from the West coast, is often dismissed as a curious cut with no real culinary value (how dare they). Until the last few years, flank and skirt steaks were both scoffed at as cheap, tough cuts, hardly worthy of the time spent to prepare them. It’s hard to believe this blasphemy, yet somehow, it’s true. Underappreciated, shier types of steak often fly under the radar for decades without anyone pausing to appreciate their unique character and flavors. We say it’s time to end this nonsense.

Enter the Oyster Blade. Commonly brushed aside due to its center vein of connective tissue, this flavorful piece of meat is one of the best steak cuts in town. Similar to the flat iron, the oyster blade differs only in the way it’s butchered. A flat iron comes from the meat being cut along the long grain from the top and undersides of the gristle. When the meat is cut across its grain, the gristle line lies in the middle of the steak, and that is an oyster blade cut. Both cuts come from below the shoulder blade and are tremendously flavorful and savory.

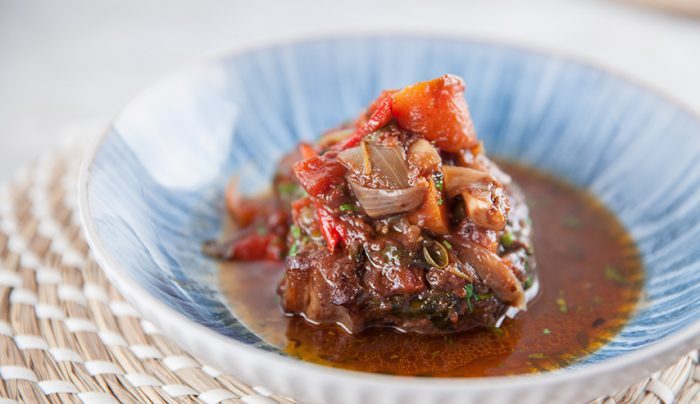
Because of its signature line of gristle, oyster blades are too often overlooked. But if you know how to prepare this delicious cut of beef, your flavor reward will be immense. Like most lean cuts, the Oyster can be tough, but only when prepared incorrectly. While it can be deliciously pan-seared or grilled, our favorite preparation is a slow-cooked braise. Giving this flavorful cut of beef time to release its meaty flavor will give you one of the most savory stews or roasts you’ve ever prepared.

Oyster Blade braise recipe

Good Chef Bad Chef

(From Good Chef Bad Chef)

Ingredients:

  • 1 – 1 1/2 cup lbs Oyster Blade steak
  • 3 anchovies
  • 2 tablespoons capers
  • 1/2 cup extra virgin olive oil
  • 3 garlic cloves, roughly chopped
  • 1 1/2 large onions, chopped
  • 2 carrots, peeled and cut into chunks
  • 2 sticks celery, cut into chunks
  • 1 red chili, cut into chunks
  • 1 bunch thyme, roughly chopped
  • 1 bunch basil, roughly chopped
  • 2 bay leaves
  • 6-7 tablespoons butter
  • 14 ounce can whole tomatoes
  • 14 ounce can diced tomatoes
  • 1 cup red wine
  • 1/2 cup port
  • 1 bunch parsley, roughly chopped (optional garnish)

Method:

  1. Preheat oven to 350F
  2. Season meat well with salt and pepper. Heat an oven proof pan over medium high heat, then add steak, fat side down with a little oil. Once seared, remove the steak from the pan and set aside.
  3. Add the vegetables to the with 2-3 tablespoons of oil, anchovies, herbs, and capers. Stir in the vegetables and sautee 3-5 minutes.
  4. Add butter and stir through. Add tomatoes, red wine and return meat to the pan. Deglaze the pan with port.
  5. Place a sheet of parchment paper over the mixture and put an oven proof lid on the pot.
  6. Cook in the oven for 2-3 hours, or until the meat is tender.

Editors' Recommendations

Lindsay Parrill
Lindsay is a graduate of California Culinary Academy, Le Cordon Bleu, San Francisco, from where she holds a degree in…
You should never buy these 8 foods at Trader Joe’s — here’s why
As much as we love Trader Joe's, there are a few bad eggs to be found on the shelves
Trader Joe's sign

Ah, Trader Joe's — the trendy tiki-themed grocery store that somehow simultaneously attracts grandmothers and hipsters, soccer moms and angsty teens, broke college kids and polished executives. There seems to be something for absolutely everyone at this popular grocer, from its signature sweet treats like Cookie Butter to a surprisingly vast and affordable selection of wines.
The charms of Trader Joe's are not lost on us, either. We love the kitschy decor, the friendly (if slightly overenthusiastic) staff in their tropical shirts, and the thrifty alternatives to pricier name-brand products.
Unfortunately, though, as we've all learned, nothing in life is ever perfect. And our beloved Trader Joe's is no exception. While there are many fabulous Trader Joe's products and ingredients to be found, there are a few failures peppered throughout the shelves as well. Here are a few things to cross off this week's Trader Joe's grocery list.

Pre-cut fruits and vegetables
Trader Joe's alone certainly isn't to blame for these popular little packages, but they do have an abundance of them. And while pre-prepped items are, admittedly, a tremendous time saver, it's just not worth it. Unfortunately, for all the time saved, you're sacrificing both extra money and all of the ingredient's flavor. All produce is at its best when it's been freshly cut. Left to sit on the shelf in plastic packaging, fruits and vegetables can become watery and lifeless, losing their best texture and taste. What's worse is you're paying far more for less of a subpar product than if you just buy the ingredient whole. It's best to invest in some great knives and do the work yourself.

Read more
The secret to tasty, crispy bacon is something you already have in your pantry
The secret to perfect bacon has been right under your nose this whole time
Bacon frying in pan

It's pretty universally agreed that bacon is delicious. There are very few dishes (if any?) that can't be improved by a few crispy, savory, meaty slices of this porky treat. Slip a few pieces into a sandwich, crumble them up and sprinkle over salad for a noticeable improvement. Dip the stuff in chocolate, for crying out loud. We'll take it any way we can get it. Even the grease it leaves behind is something of a magical ingredient in and of itself. There's no denying that bacon is wonderful. A true gift. But what if we told you that there's a secret to even tastier, crispier bacon? Impossible, you may say. And yet, it's true. And the secret weapon is something we guarantee you have in your cupboard at this very moment. Plain ol' fashioned all-purpose flour.

Why does flour make bacon crispy?
By cooking bacon that has been dredged in flour first, you're doing a few things to help improve both its flavor and texture. Firstly, the coating of flour will help dry the bacon and absorb excess moisture, which is one of the keys of properly browned meats. Flour also provides a protective coating, helping to keep the bacon from overcooking. Another added perk of flouring first is that the flour will weigh the bacon down so that it fries flat and won't curl up on you, which can be terribly annoying when you're trying to get that perfect breakfast-in-bed shot for Instagram.

Read more
You’re probably not using the broiler setting on your oven, but it’s a game-changer — here’s why
What is a broiler, you ask? Only the best oven setting you're not using.
Pizzas on oven racks

In the summertime, we talk an awful lot about grilling. And who can blame us? Grilling is a hoot, and grilled foods are spectacularly delicious. But for many reasons, grilling isn't always an option. Perhaps you haven't yet been inspired to buy a grill for yourself, or you live in a place that's especially rainy with no covered patio. Maybe you had a particularly embarrassing experience years ago that involved burning off your eyebrows, and you've been too scared to pick up the tongs ever since. Whatever the reason, it's okay. There is another option. In fact, it's likely something you already have in your kitchen and may not even be aware of. It's your broiler setting.
In addition to being a fantastic substitute for a grill, your broiler can also do a multitude of other impressive culinary tasks, from cooking to crisping to browning to brûléeing. So it's in your best interest to learn how to use this handy tool as soon as possible.
Broilers come standard with almost every oven on the market, be it gas or electric. In most cases, the broiler will be on the inside of your oven, the heat coming directly from the top. You'll access the broiler's heat by placing one of your oven racks on the highest setting — usually two to three inches from the broiler. In other cases, the broiler may be located in a drawer at the bottom of the oven and will work similarly, but with less control as to how closely your food can be placed to the heat source. Either way, it should be fairly obvious when you give your oven a quick inspection. So in case you've ever wondered what that button is for, or, if you're just noticing it for the first time since you moved in, this is how to use your broiler.

Cook
A broiler is, essentially, an upside-down grill inside your oven. If you know your way around a grill and think about it this way, cooking with the broiler will become quite simple. It gives off very high heat, so it's designed to cook quickly. Anything that cooks well on fast, high heat will do well in the broiler. Things like thin cuts of meat, smaller vegetables, and even pizza all cook beautifully this way. Simply adjust your settings according to your ingredients.

Read more