When you are dressing for a job interview, a formal event, or anything where you need to make an impression, you are likely going to reach for your best suit and tie. When I used to sell suits, there was no more asked question from a guy buying a suit than, “How do I tie a tie?” It feels like a failure of our society to have a situation where men don’t know how to tie a tie, but I am here to rescue as many men as I can find. Instead of standing in front of a mirror and teaching one man at a time how to look their best at the office or the interview, I am, instead, going to teach you right here, right now.
So, without further ado, here is the tie knowledge I have. No more excuses, buy the tie and practice until you look like Harvey Specter.
Four-in-Hand knot

The Four-in-Hand is most likely the simplest tie knot you’ll have in your arsenal and the first one you should learn when picking up ties for the first time. These knots began (at least, it’s believed) when people said that carriage drivers used to tie their reins in their hands the same way or that they wore their scarves in this fashion. One of the other accepted origins is that the members of the Four-in-Hand Club in London pioneered this tie knot.
Origins aside, when I am teaching a young man his first knot, this is the easiest to pick up. So the best starting point. It doesn’t look like the reins of a horse, but it is also a bit less formal.
Here’s how to tie a Four-in-Hand knot:
- Pop your collar and wrap the tie around your neck.
- Line up the two ends of your tie.
- Tug the wider end down toward your waistline; the narrower, upward on your chest.
- Cross the wider end of the tie in front of the narrower, then bring it back around to the front. (You’ll be able to see the back of the wider end of the tie.)
- Loop the wide end of the tie around the narrower end again, but this time, bring it up under the narrow end near the shirt’s top button.
- Drop it through the loop that has been formed, and tug it down towards your waistline.
- Adjust.
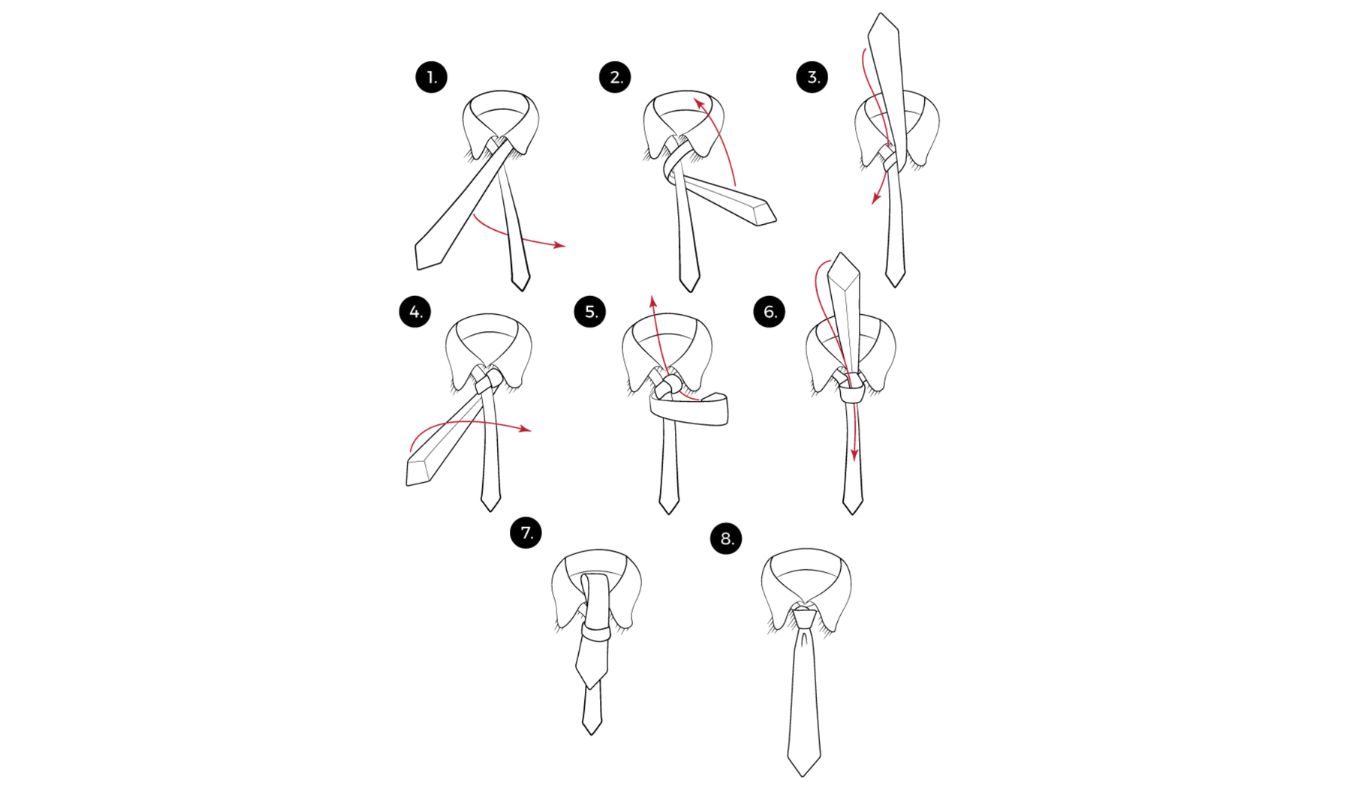
The Pratt knot
Looking for a knot that’s a bit more polished than the Four-in-Hand but not as bulky as a Windsor (see below)? Meet the Pratt knot. Any images you see of me on this site, there is a 95% chance this is the knot I am sporting. It is simple, like the four-in-hand, and more formal and symmetrical like some of the others you will see soon.
This midcentury creation, courtesy of U.S. Chamber of Commerce employee Jerry Pratt, delivers a symmetrical, fuller knot that works with sports coats and most business attire. Plus, it’s a smart choice if you’re working with a shorter tie or if you’re on the taller side, as it uses less material than some of the bigger knots.
- Begin with the backside of your tie facing forward, wide end under the small end, up to the center.
- Move under toward the neck loop and through on the same side.
- Cross the wide end over the small end to the other side.
- Up through the neck loop from underneath.
- Down through the loop that you’ve just created in the front.
- Tighten the knot by pulling down on the wide end.
- Slide the knot up and adjust.
The Kelvin knot

The Kelvin knot, named after the 19th-century mathematical physicist Lord Kelvin, delivers a compact, clean look. It’s closely related to the Four-in-Hand but offers a slightly different profile. It’s a solid choice for everyday wear when you want a neat knot without the bulk. There are a lot of loops and knot building with this tie, so it works great if you’re a shorter gentleman who needs to eat up tie length.
Here’s how to tie the Kelvin knot:
- Start with the tie on its backside (seam facing out).
- Place the wide end under the small end.
- Cross the wide end over the small end.
- Bring the wide end under the small end to the reverse side.
- Cross the wide end over the small end again.
- Bring the wide end up into the neck loop from underneath.
- Bring the wide end down through the loop you’ve just created in the front.
- Tighten the knot by pulling down on the wide end.
- Push the knot up to adjust.
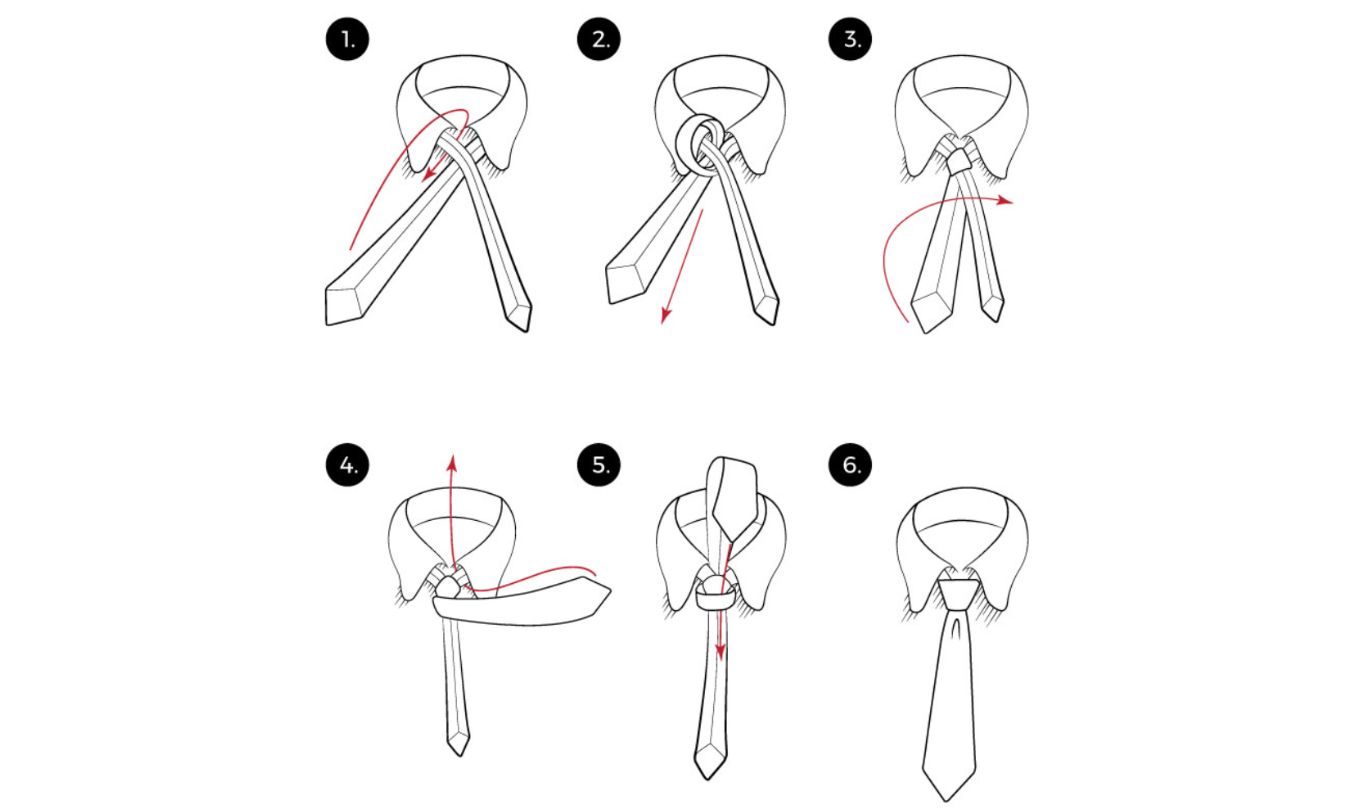
The Windsor knot

Most of the time, men’s fashion follows the military, but in the case of the Windsor knot (sometimes called the Full Windsor, or misleadingly the Double Windsor), the military followed fashion. Prince Edward VIII and his shirtmaker pioneered the use of thicker fabrics in his ties, creating a thicker and broader tie knot. As people began learning how to tie a tie to look like his, they called it the Windsor. Even the English military got into it, as the Royal Air Force adopted the knot. Depending on the cut of your best suit and the shape of your shirt collar, you may want to use this bulkier knot that speaks to power. Of course, when a knot is made famous by a notorious member of the royal family who abdicated the throne for love, you can bet the knot will always hold up to scrutiny.
If you are going to learn one tie knot, this is the most classic one and the one that every man should have in their arsenal. I spent a fair amount of time working through the frustrations of men who only knew the four-in-hand to get them to the more formal Windsor.
Here’s how to tie a Windsor knot:
- Again, line up the two ends of your tie, bringing the wider end closer to your waist and the narrower end up near the middle of your chest.
- Bring the wider end across the front, but this time, pull it under the narrow end, up toward the collar button.
- Wrap the wide end under the narrow end yet again, but this time drop it over the top of the tie and tug it to the opposite side.
- The back of the wide end of the tie should be facing you in the mirror now.
- Take it back across the narrow end and bring it up under the loops that have formed, pointing up toward your chin.
- Tug the wide end down through the loop that has formed, and tidy up the knot.
- Adjust
The Half-Windsor knot
Sometimes, you want something symmetrical like the Windsor but smaller or narrower than Prince Edward’s brainchild. This is why I would sometimes adopt the Half-Windsor knot, which simply takes one less step than its wider brother. It is smaller and fits very well with most shirts in your closet. Offering more body than the four-in-hand but not quite the bulk of the Windsor, the Half-Windsor is a knot with heft for many. This is a great in-between for someone who wants to avoid learning multiple knots.
Here’s how to tie a Half-Windsor knot:
- Line up the two ends of the tie, with the wider end closer to the waist and the narrower end closer to the center of your chest.
- Just like the Windsor, bring the wider end across the front and pull it under the narrow end, up toward your chin.
- Bring it back down and under the narrow end, so the back of the tie is facing front.
- Cross the wide end back over the narrow side, tucking the end of the tie up behind the back of the tie, past the collar button, then plunge the tip down through the just-formed loop.
- Adjust.
The Eldredge knot

The Eldredge knot is the most stylish (and most complex) knot on our list, and unlike most knots, you tie it using the smaller end of the tie. It’s also one of the more modern tie knots, first appearing in 2007. This knot makes a statement. It’s larger than the Windsor and features an intricate tapered fishtail braid-like pattern.
I will be honest, I am not a fan. Call me crotchety, call me a purist, call me old-fashioned, but I don’t like overly complicated tie knots. In my opinion, if you get too flashy with the tie, you can draw too much attention away from who you are and what you can offer, and redirect it to your tie. However, if you are someone who LOVES making a statement, this is the tie knot for you. Because making a statement is what this tie does.
Here’s how to tie the Eldredge knot:
- Start with the tie around your neck, facing outward (seam facing in), not reversed like previous knots.
- Place the small end over the wide end.
- Bring the small end under the wide end and to the other side.
- Bring the small end up to the center.
- Bring the small end toward the neck loop.
- Bring the small end through the neck loop and to the reverse side.
- Cross the small end across the front of the wide end.
- Bring the small end up into the neck loop from underneath.
- Bring the small end down to the left and around the back of the wide end.
- Bring the small end up to the center.
- Bring the small end towards the neck loop.
- Bring the small end down through the neck loop and to the other side.
- Bring the small end up to the center.
- Bring the small end towards the neck loop.
- Bring the small end down through the neck loop and to the other side. Keep this part loose.
- Cross the small end across the front and through the loop made in the previous step.
- Pull the small end to tighten.
- Tuck the rest of the small end behind the neck loop.
Nearly 20 steps…need a break?
Bow tie

How about some more military history? The bow tie is derived from the cravat, which is the French word for “Croat.” That is the name for the Croatian Army, which used fabric to close the tops of their shirts. They can be formal or jaunty, but a great (and well-tied) bow tie is a mark of sartorial proficiency. This one tip helps us: Don’t look in the mirror, don’t get hung up on the width of the fabric, and pretend you’re tying your shoes. This may be the most frustrating sartorial task to learn, but it will elevate every aspect of your professional and formal wardrobe.
Remember when I said every man should know how to tie a Windsor? Yeah, throw that damn pretied bow tie in the donation bin and add some class to your tie collection. Tying a bow tie is on a lot of lists of the top 20 things all men should know how to do. Like changing a tire, building a fire, and performing CPR, the bow tie is a must.
Here’s how to tie a bowtie:
- Line up the two ends of the tie evenly.
- Cross one side over the other.
- Bring one end up under the other, past the collar button.
- Hold the opposite end up so that you are staring at the mid-point of the bow (or a target mid-point if it’s a straight bow tie).
- Drop the first end down over the front (you’ll have perpendicular “butterflies” at this point).
- Bring that first end under the second, and tuck it into the loop that’s been formed behind the second.
- Adjust.
A brief history of the necktie

While I said earlier that the necktie can be traced back to ancient Chinese warriors, what we think of as the modern necktie has a much more recent history, and we can thank the French for bringing us the necktie as we know it today. According to Modern Tie, the French enlisted Croatian mercenaries to help them win the 30 Years’ War, and those mercenaries used neckerchiefs as part of their uniform (see our entry on bow ties above). The French King Louis XIV liked the look of the knotted neckerchiefs and began wearing them himself, eventually making them mandatory for members of the court, which then caused the craze to spread throughout Europe.
Eventually, scarves started to become more popular neckwear, and ties evolved into the longer articles we know today (presumably, tie design no longer mattered to the French king since he didn’t have a neck to tie a tie around anymore, thanks to his date with the guillotine). The tie continued to evolve into the 20th century, and a New York tie maker named Jesse Langford invented a new method for tie-making, which is still used today.
Here is what others are asking
Still have questions? More heroics from a style expert.
Which tie knot is best for wedding attire?
You’ll find experts on both sides of this one. A bow tie is often the go-to for formal, black-tie events. But for most weddings, a Windsor or Half-Windsor knot is a solid choice. Ultimately, it comes down to what you feel most comfortable and confident wearing.
But there is one exception to this rule: Texture matters. Keep the knitted, flannel, and other casual fabrics with your sports coat and opt for your silk ties for the big day.
What tie knot works for short or tall individuals?
The average tie comes in at just under sixty inches, which is perfect for the average guy. Now, I am 6’5″, which means I am not an average guy. But that is why I go for the Pratt knot or the four-in-hand, since they use less of the tie length to create. For the shorter guy, go for those more intricate knots that use up the fabric.
Having said that, if you go too bulky with the knot and you’re a short guy, it can overwhelm your head size and make you look smaller in general. When in doubt, custom ties are also a thing.
How do you tie a tie quickly in a time crunch?
Here is the truth: don’t procrastinate. Looking your best takes time. It doesn’t have to take forever, but it is better to be a few minutes late than it is to be on time and looking a mess. Having said that, once you get comfortable with any of these ties (except the Eldridge) none of these should take longer than a minute to knock out.
How do you tie a tie for a child?
Keep it easy with the four-in-hand or the Half Windsor. Smaller knots to keep compatible with the child’s smaller stature.
What’s the most professional-looking knot?
Again, with the exception of the Eldridge, which should be kept to more of a cocktail environment, any of these ties are perfectly acceptable in the business world. It is less about the tie knot choice and more about wearing it well and tying it correctly.
You now know (mostly) everything I know about tying ties, and which you should choose. That doesn’t mean I can’t still nerd out about ties or anything else style. So