Jumping into the world of mountain biking can be a bit daunting. First, you must figure out what type of mountain bike you need. Does mountain biking mean long XC rides for you, or are you a bike park sort of person?
Perhaps you do find the right bike for you, now you need to consider all the mountain biking gear that comes along with it. Helmets, sunglasses, shoes, apparel — it can seem like a bit much.
When you think you finally have everything sorted, and you are ready to hit the trails, you have the realization that you need to set up your new bike’s suspension. If you’re new to mountain biking, this is probably something you don’t know about. Plus, any exploration into the subject can have you reading what can seem like a foreign language.
So let’s break down setting up mountain bike suspension, getting into the “how” and the “what” of the process. The only tools you will need are a shock pump, measuring tape, and your body weight.
Different mountain bike suspension companies have different setup procedures and processes for setting up bike suspension. Even within the same brand, one bike shock may have fewer settings and adjustments than another. Typically, we see higher-end bike suspension having the most adjustability while lower-end models only have a few adjustable aspects. For this article, I will focus on the three areas of adjustability that you will find on most mountain bike suspensions: sag, compression, and rebound.

Mountain biking suspension setup
The front suspension on your mountain bike, also known as the bike’s fork, is the place to start. A beautiful thing about starting here is that if you ride a hardtail, your work is already half done.
Finding your sag
Getting the bike’s sag setting is our first step. Sag, simply put, is how much your mountain bike’s suspension compresses beneath your body weight. While it may vary from mountain bike suspension company to company, the front suspension setup usually wants between 15% and 20% sag. Pro tip: Set your sag with all your mountain biking gear on.
Step 1: Add the proper amount of air pressure with your shock pump. On a leg of the bike fork should be a chart that shows how much PSI to put in relative to your body weight. Remember to cycle through the fork’s suspension several times by pushing down on the handlebars before you move on.
Step 2: Now with the bike leaning up against a wall, carefully climb on, using the wall to balance, so only your body weight compresses into the bike’s fork. This will move the rubber ring on the fork’s stanchion.
Step 3: Carefully climb off so you don’t unnecessarily compress the fork even more, moving the rubber ring. Measure how much the rubber ring moved and compare it to the rest of the length of the stanchion. Add air or take some out to get your desired number within the 15% to 20% range.
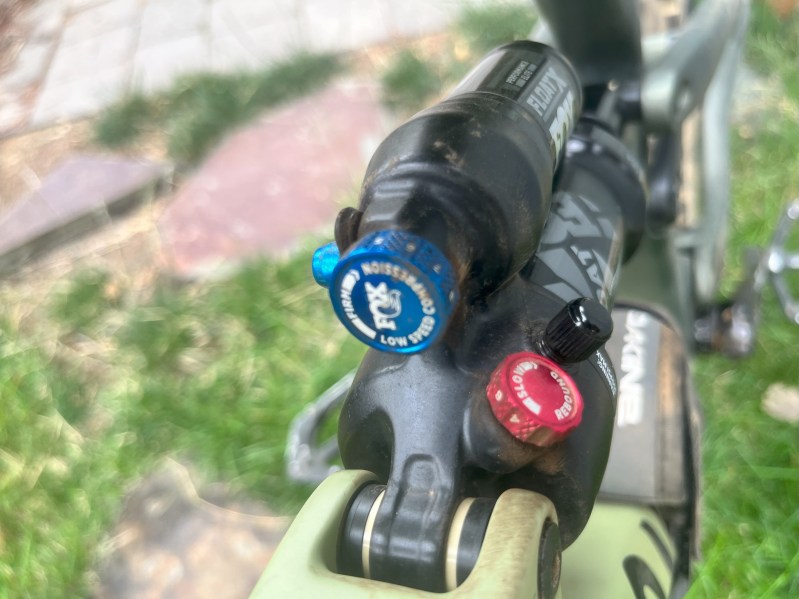
Adjusting your rebound
Mountain biking doesn’t have anything to do with basketball except for this shared word: rebound. The rebound refers to how fast your mountain bike’s suspension will return to its full travel.
When the rebound is closed, or slow, your bike’s fork can’t extend enough from successive impacts. The fork’s suspension can back up and pack down, resulting in no support at all. On the other hand, a completely open, or fast, rebound can make your bike feel like it’s out of control, hopping down the trail.
This means that rebound adjustment is usually somewhere in the middle and does correspond to how much PSI you put in the fork. Here is where you will likely need to access charts through the suspension manufacturer’s website, although rebound suggestions were listed on the Fox 36 fork that came on the Canyon Spectral CF 8 I’ve been spending the summer on.
Step 1: Start by making sure the rebound is fully closed, turning the dial in a clockwise position. (This process is for Fox suspension, others may ask to have the dial at a different starting point.)
Step 2: Turn the dial counterclockwise to the recommended number of “clicks” from the bike fork manufacturer.
Adjusting your compression
The easiest way to think about mountain bike suspension compression is that it is a way for you to adjust your suspension’s firmness without adding additional air. Quite often the suggestion is to start with the compression setting somewhere in the middle and adjust from there.
Step 1: If your suspension feels a bit too firm, turn the compression knob or dial counterclockwise toward the open position for a more plush ride feel. Do this and test the feel before you release air from the suspension.
Step 2: If you’re going through the travel too quickly, potentially bottoming out, turn the compression knob or dial clockwise. This will firm up the compression damping without having to add PSI.

On to the rear suspension
The process for setting up your mountain bike’s shock is going to be strikingly similar to the process you follow for the bike’s fork. There are, however, a couple of key things that are important to point out.
- You will be putting significantly more air in the bike’s shock than you did the fork. There’s no chart showing a PSI number corresponding to the rider’s weight. Instead, using your shock pump, set the bike shock’s PSI the same as your body weight. For example, if you weigh 150 pounds, put 150 PSI into the shock.
- Sag should be around 25% to 30% of the rear shock stroke, rather than the 15% to 20% on the fork.
- While you are putting air in the bike shock, stop and cycle the shock through its travel several times at 50 PSI intervals. This allows for the air going in to equalize in all the shock chambers.
After getting air into your mountain bike’s shock, and getting your sag set in that 25% to 30% range, setting compression and rebound will be essentially the same process as the front suspension. However, settings for the bike’s fork may be different from the rear shock. Don’t set the compression and rebound on the rear shock exactly the same as the fork. Consult the shock manufacturer’s recommended settings.

Time to ride
Actually heading out mountain biking is also a part of the suspension setup. Getting your bike on the trails and feeling how it rides will let you know if you need to make any changes.
Quite often, volume reducers are a part of your mountain bike’s suspension. Volume reducers, also known as tokens, fit into the air chambers of your suspension, and as the name implies, take up volume. This is another way to change the feel of the suspension without adding or releasing air.
Do you have the recommended PSI settings but you are barely going through your suspension’s travel? You probably have some tokens in your suspension and may need to take some out. Are you adding more and more air, but still bottoming out? You may consider getting some volume tokens to add a bit more progressivity to your suspension.
And if all else fails, schedule a suspension setup appointment with your local bike shop. They’re mountain biking experts who speak the language and can get your bike feeling like it should.