The humble camping tarp. It's not very exciting, is it? It's easy to understand why so many outdoorsmen geek out over their new backpacking tent, but a camping tarp, well they just hang from a tree, right? Well, the A-frame is a long-established tradition when it comes to tarp shelters. They work effectively over the top of a camping hammock, and they give you the most space for your shelter to move around under them, so why would you deviate from this setup?
Well, there's more to the tarp than just the A-frame. When you're camping in the rain and wind, it's rare to have your downpour coming, well, down. Tarps are versatile, far more versatile than any tent can ever be. You can pitch them almost anywhere with, or without trees. They're one of those bits of gear that I throw in my pack for almost every trip — along with a few lengths of cord — because I know that with these tarp shelters, I'll be able to keep myself dry overnight.
Lean-to
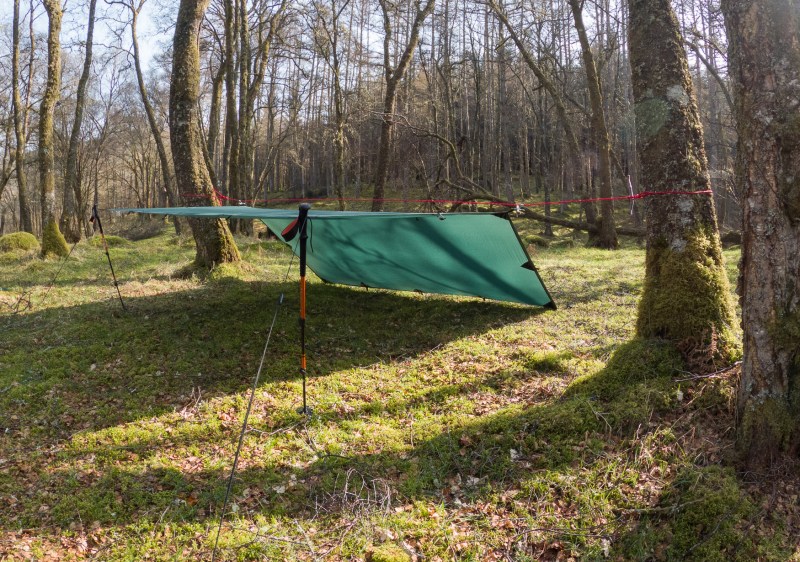
The classic lean-to. Okay, I'll admit, this looks a little like half an A-frame, and in a sense, it is. But the freedom that you can set up your lean-to with makes it far more versatile. Your lean-to can take the shape of a single wall, standing to a height of, well, however tall your tarp is. Alternatively, it can have an overhang that can keep you dry in the rain. Your wall-to-overhang ratio depends on your needs, but however you set it up, the lean-to is an excellent tarp shelter for anywhere with a prevailing wind direction.
Like the one above, a lower shelter gives plenty of space to lay under and get comfortable for an overnight camp spot but is still open and spacious. A taller lean-to would provide you with space to stand and walk around under and provide enough ventilation for cooking or even start a campfire underneath. Either way, you should make sure the side wall reaches the ground. Otherwise, the wind will whip underneath.
Step 1: Set your ridgeline to the appropriate height for your back wall and attach your tarp.
Step 2: Pin the wall of your tarp directly to the ground to form the windbreak.
Step 3: To create a shelter or roof, pull the top section of your tarp straight out from the ridgeline and use trekking poles or sticks to support the corners. Wrap your guy line around the top of your pole and run it to the ground for tight support.
Body bag
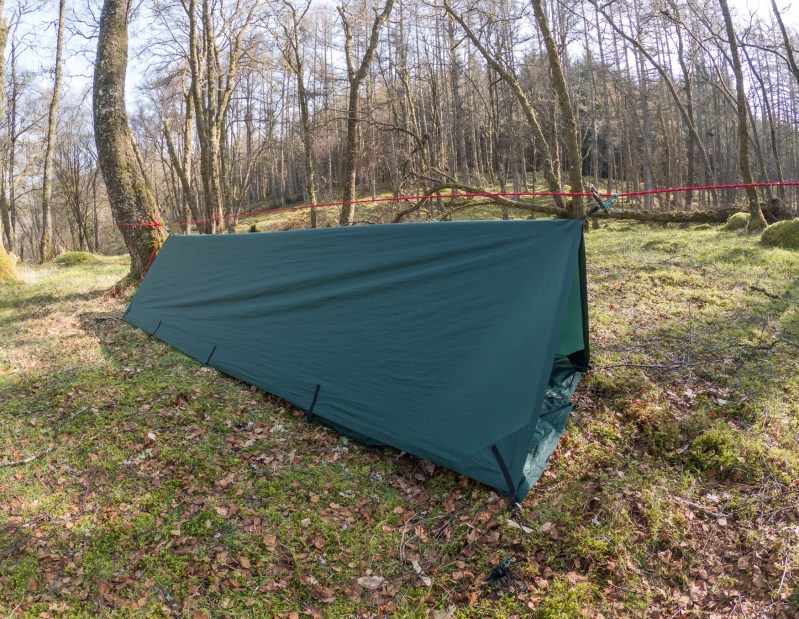
The name is offputting, sure, but otherwise, this is a great makeshift shelter for tarp camping in the rain. It looks a lot like a low-level A-frame, and that's because, at heart, that's precisely what this is. But there's a twist. This tunnel tent-style tarp is low and doesn't allow for the same movement as other designs on this list do, but it comes ready-made with a groundsheet, so you don't get soaked from the bottom up. You can drop one end of this structure in solid winds and pin it down to the ground to create a closed end.
Step 1: Set your ridgeline to around waist height.
Step 2: Attach your tarp to the ridgeline at least two-thirds of the way to one side.
Step 3: Peg the short side of your tarp directly to the ground.
Step 4: Use the longer side to create a sidewall and a groundsheet, pegging out both to create a taut triangular structure. Make sure your floor doesn't poke out from under your walls. Otherwise, it will do a great job of collecting water and leaving you in a puddle.
Plow point
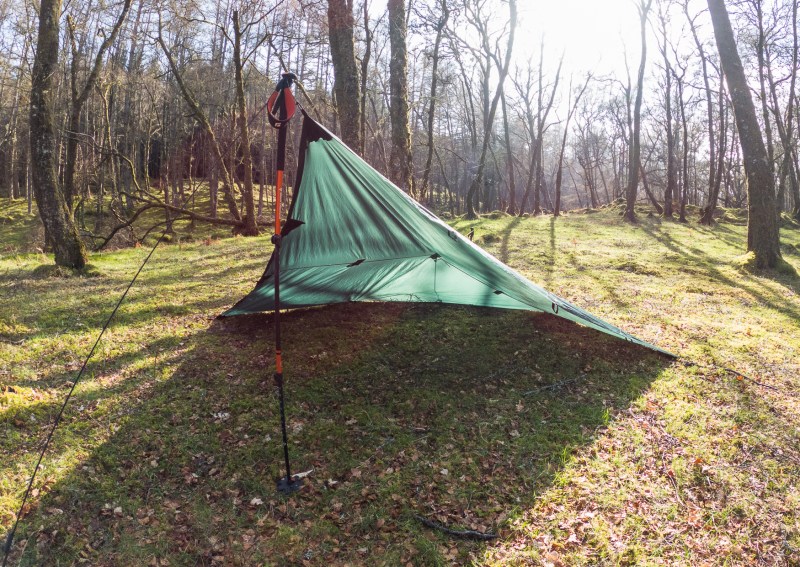
The plow point is a firm favorite among bikepackers, where their bikes can help to create the structure without encroaching on their sleeping space. This quick and easy structure can be set up against a tree, a stick, a hiking pole, a bike, or just about anything else that can support it. Because it's only supported at one point, the plow point gives you loads of protection for minimal pitch time.
Lower support will give you less shelter space but can be easier to set. Having the support at around head height optimizes space inside the shelter, and you can use your guy line to extend off a tree and give you more room to enter and exit your shelter.
Step 1: Lay your tarp flat on the ground and peg out the corner pointing into the wind. Then peg out the outside corners along either edge from this point. If you're using an exceptionally high attachment point, these outer corners can be pegged on short guy lines or bungee.
Step 2: Attach your remaining corner to your support point. If you're using a pole or bike, wrap the guy line around once and tension it to the ground. Be careful as you tension your line that you don't bend your hiking pole out of shape.
Step 3: Adjust the tension on the pole and corners until you have the setup properly secure. If you have a central attachment point on the back of the tarp, this can be run to another pole, or a tree, to maximize internal space and make sure that rain runs off efficiently.
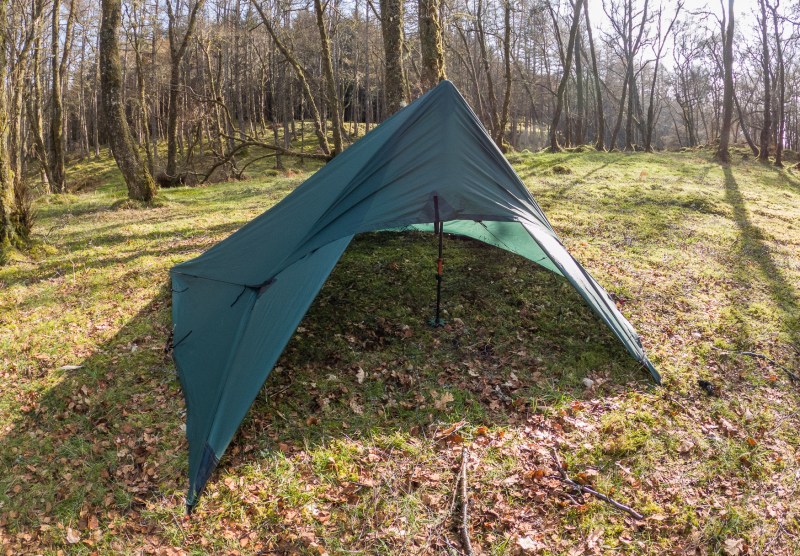
Adirondack
The adirondack looks a lot like a fishing shelter. The sidewalls of this shelter give you extra protection from the wind and rain while retaining a little more heat than a traditional lean-to. This is great for fair-weather winter camping, where you can set your campfire just outside the shelter and benefit from the heat without risking damage to your tarp. Compared with some of the other shelters, this can feel a little fiddly to set up and may not be a quick fix for a lunch stop.
Step 1: Set your ridgeline to around shoulder height. Pull one corner over the ridgeline. On tarps with multiple attachment points along each side, use the next point along from the corner to attach your tarp to your ridgeline.
Step 2: The tarp should reach the ground where the outside corners can be pegged directly into the ground. Adjust your ridgeline if necessary.
Step 3: Peg the back wall directly to the ground. Fold under the remaining corner - this can be used as a groundsheet, though it won't fill the whole space. If you have central attachment points on the back of your shelter, attach one of these to the ground also.
Step 4: Use the outside corners to create sidewalls and peg these out at an angle appropriate to your tarp shelter. In warmer weather, you may choose to create a more open shelter, or in the wind, you may have the sidewalls closer in.
Step 5: The top corner can be pegged out, or attached to a nearby tree, to create a small roof. Alternatively, roll it over the ridgeline and down the rear of the tarp to create a more open shelter.
Tarp tent
When the weather turns against you and all you have to hand is your tarp, you might wish you had packed something more substantial, especially if you can't find any trees. If you don't have a tent, why not make a tent?
The tarp tent is a crossover that you can pitch anywhere, using just a hiking pole, or a stick, as structural support. It might not close fully with a zip as a tent does, but you can create an entranceway tight enough to keep the majority of the weather out and give you as much protection. Just be careful that you don't roll over in the night and knock the pole down.
Step 1: Lay your tarp out square on the floor. Peg out the two corners facing into the wind, using the attachments points next to the corner, rather than directly in the corner. Tuck the corner underneath the tarp. This will be the back of your tent.
Step 2: Now come to the front two corners. Bring each corner attachment point to the next attachment point along the front edge of your tarp and peg them down. You should only peg down the corner attachment points. Your tarp should now be roughly trapezoid in shape.
Step 3: Place your pole or stick inside the tarp, towards the front, and turn it vertically. Take care not to bend a pole and make sure your stick won't pierce the tent. You may find you have to adjust the length of your support to get the right tension on your tent. Alternatively, try moving the support further backward or forwards. Your tarp should be taking shape as a tent.
Step 4: The door portion of your tent will be hanging loose. You should have attachment points halfway up on either side. Attach guylines to both of these and peg them backwards, along the side of your tent, to tension your door.
Step 5: You can either choose to peg out the flap above the door or let it hang as it is. Adjust the pegs and your shelter to have a more open or more closed door. Use any spare pegs you have to hand to pin your tent to the ground.

What type of tarp makes the best tarp shelter?
Not all tarps are created equal. Because tarps can be used for so many things, there is a wide variety in quality. While some tarps might be cheap, they aren't necessarily a bargin. Cheaper tarps won't be as durable, which is probably fine if you only plan on using it once a year or so, but if you plan on putting your tarp through heavy use, opt for a higher-quality product. It might cost more in the short term, but you won't have to replace it for a longer time. For outdoor use, look for tarps that are rated as waterproof, you don't want to find out that your tarp won't keep you dry when you're taking shelter from a storm.
There are almost endless ways you can use a tarp to create a shelter, and these are just some of them. Next time you go out with your tarp, try not to limit yourself to the classic A-frame, and why not try one of these instead?