
This is the easiest way to tie a bowline knot

Learn how to tie the king of knots

Rightfully seen as the king of knots, knowing how to tie a bowline knot should be a part of every outdoorsman's knot repertoire. While it's quick to tie and can even be learned one-handed, the beauty of the bowline knot is that no matter what weight you put through it, you will always be able to untie it afterward. From hanging your hammock, making loops for tent stakes, and even anchoring a rope to a tree to create a handrail up a muddy embankment, the bowline can be used in any number of outdoor situations.

Difficulty

Easy

Duration

5 minutes

What You Need

  • Any kind of rope

The bowline is a simple knot to tie but can be easy to get wrong. Anyone who has learned it — or grown up in the boy scouts — may remember a whole load of confusion around a rabbit, a tree, and a hole. While there are various styles of bowlines and many methods you can use to tie them, we've stuck with the standard bowline knot and laid out the most straightforward, easy-to-remember method to tie it. This knot can be either freestanding or around an object, though it is often easier to tie it around a chair leg or branch when you're learning. Grab yourself a length of rope and learn to tie a bowline, the king of knots.

How to tie a bowline knot

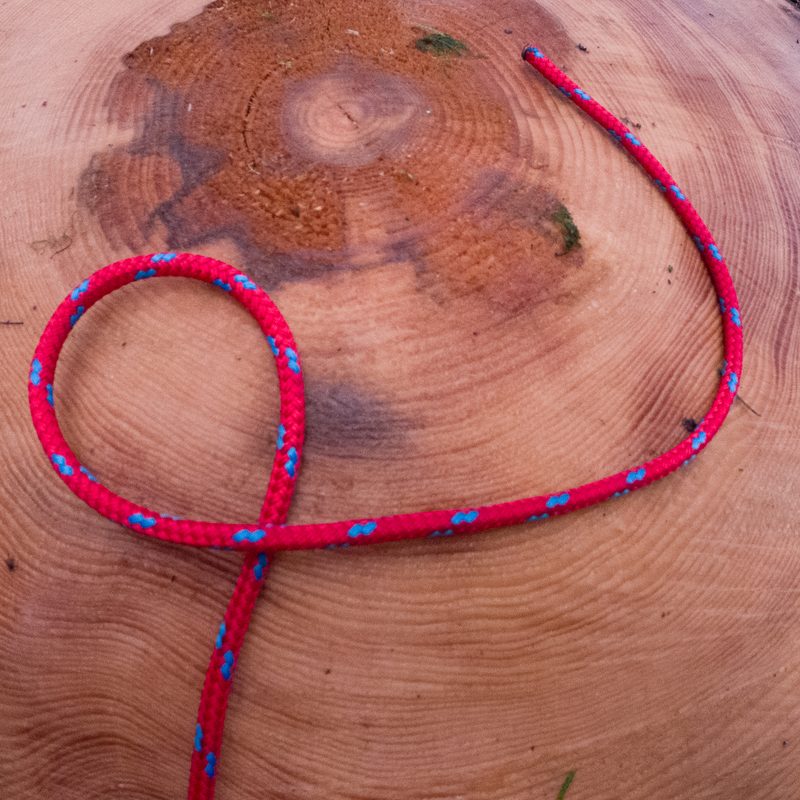
Step 1: Make a loop in your rope with the working end over the top of your standing end. This loop is what's referred to as the rabbit's hole.

how to tie a bowline knot c dcim100goprogopr0752 gpr
Image used with permission by copyright holder

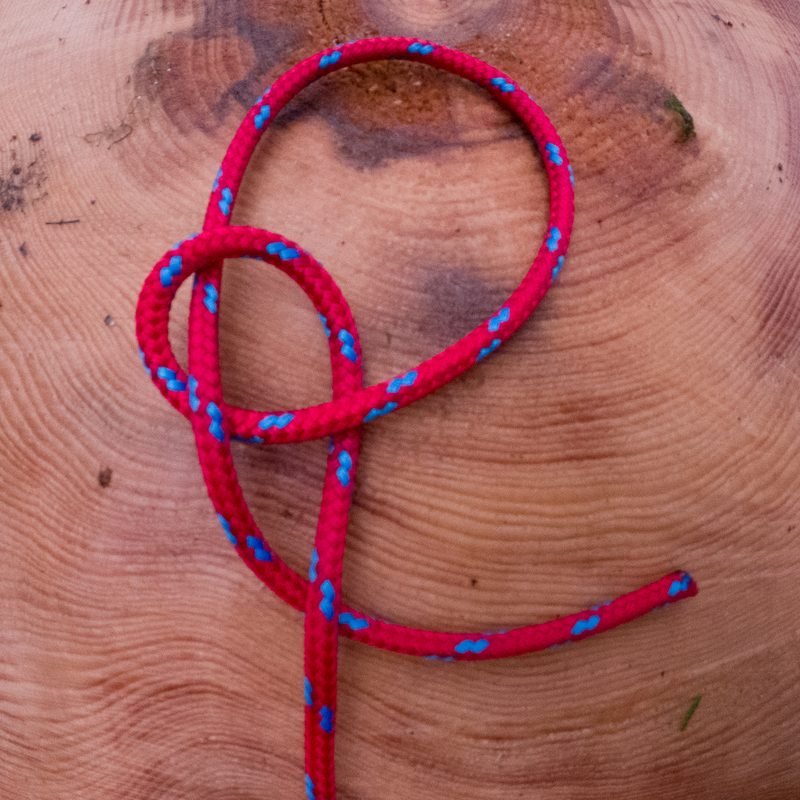
Step 2: Pass the working end of the rope up through the loop — the rabbit comes up out of the hole.

how to tie a bowline knot c dcim100goprogopr0754 gpr
Image used with permission by copyright holder

Step 3: Lead the rope around the back of the standing line — the rabbit goes around the tree.

how to tie a bowline knot c dcim100goprogopr0756 gpr
Image used with permission by copyright holder

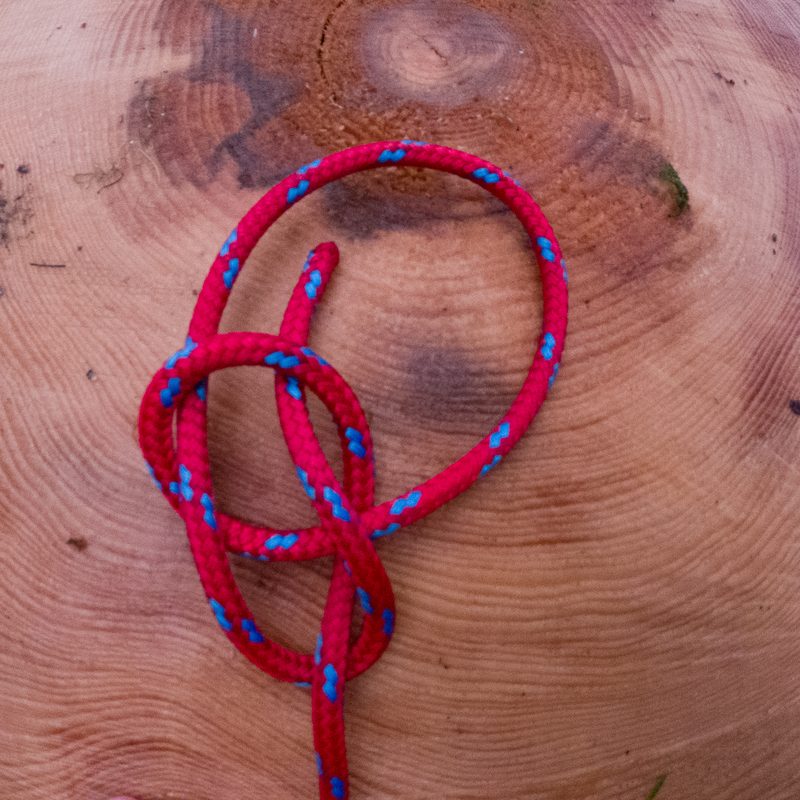
Step 4: Feed the working end back through the hole — the rabbit goes back into its hole.

how to tie a bowline knot c dcim100goprogopr0758 gpr
Image used with permission by copyright holder

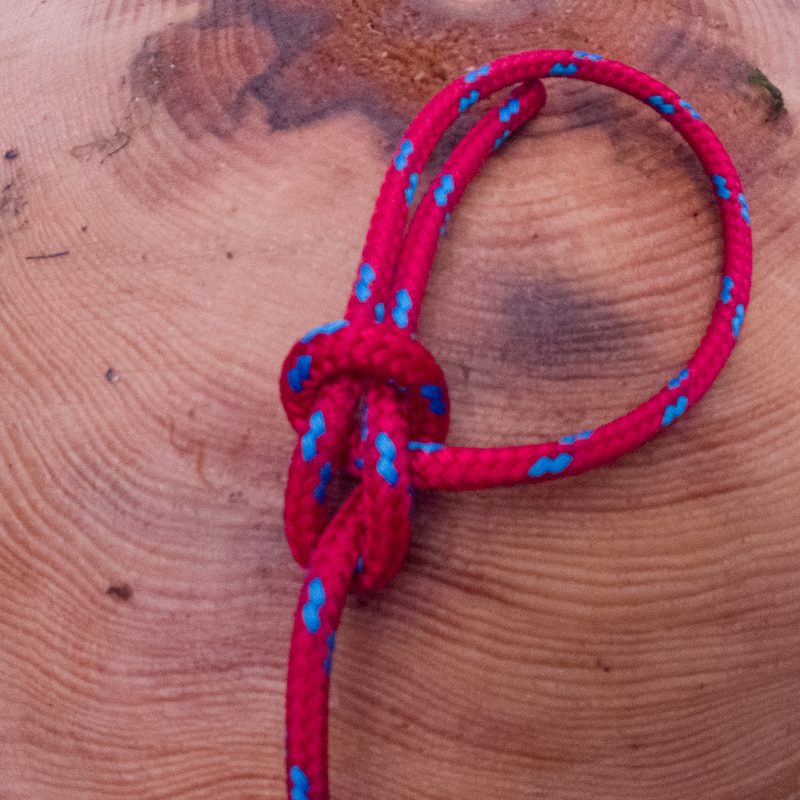
Step 5: Dress the knot by pulling on all the two strands of rope that go through the loop, and the standing line, individually. Then pull all three individually to tighten your bowline.

how to tie a bowline knot c dcim100goprogopr0760 gpr
Tom Kilpatrick / The Manual

Should you climb on a bowline knot?

The bowline was the go-to knot for rock climbers worldwide for many years when tying into their harness. More recently, though, it has been usurped by the double figure-eight knot, but why?

While the bowline has the major advantage that you can always untie it, even after it's been subjected to a heavy load, some drawbacks have caused climbers to move to the figure-eight. For a start, a bowline is only safe while under constant tension. When bounced, the knot can work its way loose and even untie. This means that the bowline has to be backed up with a stopper knot or tied as a Yosemite bowline, which involves an extra loop added around the knot. All of this adds in extra steps and the potential to tie your bowline incorrectly. Add to this the fact that many climbers see the bowline as being more difficult to recognize being tied incorrectly — when peer checking — and you have all the reasons for moving toward the figure-eight.

But does this mean that the bowline isn't safe? No, not at all. Plenty of climbers have been relying on the bowline for decades. If you're going to climb on it, though, be sure you know exactly what you're doing and be ready to justify why you don't want to use a figure-eight instead.

Practice the bowline until it becomes second nature, and you can recognize when it's tied incorrectly. While it's just one of many knots you will want to learn as an outdoorsman, the bowline knot is perhaps the most useful.

Editors' Recommendations

Topics
Tom Kilpatrick
A London-born outdoor enthusiast, Tom took the first ticket out of suburban life. What followed was a twelve-year career as…
How to make nutritious and delicious trail snacks: Your DIY guide
DIY trail snacks are less expensive and better for the environment
Date and cashew bars

Knowing how to properly feed yourself to stay energized throughout the day is essential to success on the trail. Whether you're out hiking for the day or on a multi-day thru-hike, nutrition will make or break your trip. There are loads of trail snacks on the market that you can take in your pack, but if you hit the trail every day, these can be costly.

We all want to be a bit more environmentally conscious. As outdoor enthusiasts, we have a much closer connection with the natural environment than most. Even some of the more environmentally aware companies still wrap their snacks in plastic packaging, and many snacks come individually wrapped for convenience. Save yourself money and look out for your environmental footprint in one move by learning how to make your own trail snacks at home. Here are six of our favorites.
Raisin, cherry, and honey flapjacks

Read more
Campfire cooking: This is the absolute best way to make a pot hanger
Make the most of campfire cooking with this ingenious pot hanger guide
A campfire pot hanger holds a kettle over a stone circle

Campfire cooking is an art form. Sure, you can always just skewer a sausage or a s'more and roast it directly over the heat, but with a little camping cooking gear, you can elevate your camp cooking to new heights. With the cooler nights of fall just around the corner, camp cooking becomes even more important, as you'll need the extra calories to stay warm overnight. There are plenty of styles of campfire cooking to explore, and a suspended pot over your fire is one of the most versatile.

By hanging a pot or a kettle over your fire, you can keep your dish away from direct heat, but retain a rolling boil or a gentle simmer. This means you can always have hot water ready and waiting for a cup of coffee, heat yourself a cowboy casserole of beans and ground beef to pour over a biscuit, or simmer a stew for a substantial meal under the stars.

Read more
Dust off your gear, it’s time to hit the trail: The spring hiking tips you need
These tips will keep you safe and comfortable on the trail
A person hiking

I don't know about you, but I love the fact that spring is here, and I can hit the trail again. I went out the other day without having to load up in all of my outdoor layers and enjoyed a trail run along some snow-free tracks. It's that time of year when you can dust off your hiking boots, dig out your trekking poles, and start to make some hiking plans. But spring isn't all sunshine and dry tracks. A little like fall hiking, spring trails can be muddy, and some of the wettest, coldest days I've had on the trail have come in springtime. Maybe it's not quite a time to pack away all that warm gear after all.

Spring is changeable. That's what I'm getting at. It's perhaps the toughest time of the year to pack a hiking pack because, on any given day, you might need to change layers four times. The days are long enough to get a good hike done, but you can still find yourself caught out after dark if you're not careful, and once that sun drops, the temperature goes with it. In return, though, spring rewards us with those golden hours at sunrise and sunset — the outdoor photographer's dream — raging waterfalls as the snow melts off, and the sounds and sights of nature coming back to life after a winter's hibernation. It's great if you get it right, and if you follow our spring hiking tips, you won't go far off track.
Dress and pack accordingly

Read more