Can you smell that? It’s not just the flowers of spring, it’s the waft of burgers and veggies cooking on the grill. Yes, grilling season is finally here, and it’s time to make sure your favorite outdoor cooking station is clean and ready to go.
It’s not the most fun task, but it’s one very much worth doing. And when you’re done, you can reward yourself with a great grill or smoker recipe and a refreshing spring cocktail. It’s the best way to kick off the alfresco dining season.
Fortunately, cleaning a grill doesn’t require much aside from some effort. You likely already have all the tools and even if you don’t have the exact agent, you can whip up one that’s just about as good at home (aka dish soap in lieu of grill cleaner).
Here’s a list of the tools you’ll need to clean a grill:
- Disposable latex or nitrile gloves
- Paper towels
- Sturdy grill brush
- Putty knife
- Scrub brush (stiff nonmetal bristles)
- Grill cleaner (dish soap and water also work)
- Vegetable oil spray (or a 1/2 cup of vegetable oil)
- Shop vacuum
Read on to learn how to clean a grill and get it sparkling just in time for dinner outside.
How to clean a grill to keep it in tiptop shape

Whether you stored your grill for the offseason (which we don’t believe in) or you maintained it during the warmer months, you need to follow these steps to keep your grill from rusting — or worse, picking up unwanted bacteria.
1. Remove the grill grate

The grill grate is one of the most important components to keep clean. Removing it allows you to access the grill’s other internal components. Don’t forget to put on disposable gloves before you start cleaning. They’re far easier to remove than grease stuck on your hands.
2. Remove any internal grill components
Almost all grills have some kind of internal components that need to be removed and cleaned:
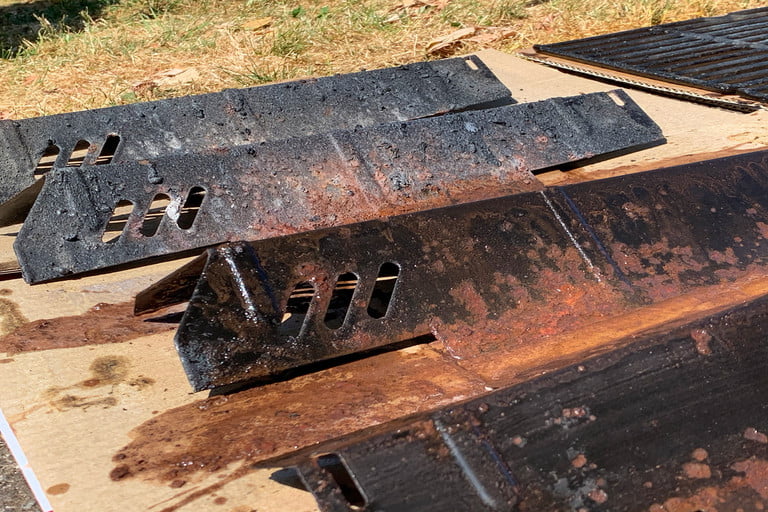
- Gas grills will often have flame diffusers that sit above the burners.
- Pellet grills will often have two heat deflectors that sit perpendicular to each other over the firepot.
- Kamado grills will have an internal fire pot and fire ring you can remove.
- Charcoal grills will have a lower charcoal grate that charcoal sits on.
3. Start cleaning the inside of the grill

With your internal components removed, use a putty knife or a sturdy spatula to break free any carbonized bits that may be caked on. These bits, along with any ash or fallen pieces of metal, should be removed and discarded.
A shop vacuum makes easy work of this task but you can also use a stiff brush. Most grills have some kind of an ash or grease collection area that can also be removed and cleaned. Although it should go without saying, if you’re cleaning a charcoal grill, make sure all the embers are completely extinguished before removing them.
4. Inspect the components
With the grill pulled apart, now’s a good time to do a grill inspection. If you have a gas grill, inspect the burners and make sure they are still intact. You can use a stiff brush to clean the burners from any cobwebs or other unauthorized stowaways that could clog the burners. Kamado grills should have their bands that connect the dome to the main part of the grill inspected and tightened.
Pellet grills should have a firebox that is free from small holes, and you should check to see that your pellet auger is turning freely during operation. Any loud knocking may indicate there is a blockage somewhere between the pellet hopper and the fire pit. Depending on how humid your climate is, you may even want to consider removing any old pellets and replacing them with new ones.
Charcoal grills — especially freestanding ones — should be inspected to make sure that the legs and wheels are in good condition. There’s nothing worse or more dangerous than a charcoal grill’s stand failing and falling over while you’re cooking.
5. Clean the grill grates
Cleaning your grill grates is something that should be done on a regular basis if not every time you cook. Scrape as much cooked-on food and grill grit away as you can with a putty knife, firm spatula, or grill brush. If that doesn’t do the trick, soak it in hot water and a degreasing kitchen soap like Dawn for a bit. Then give the grill grate a good scrub.
There are all kinds of cleaning products ranging from all-natural to chemical and caustic made for cleaning grills. The one you choose depends on personal preference and how big of a mess you’re cleaning. Regardless of how you decide to clean your grill grate, it’s not advisable to put them in the dishwasher.
6. Oil the grill grate and components
Some grill grates and internal components are made from stainless steel, which can oxidize after cleaning. To help protect them from rusting, lightly coat your grill grate and any removable heat deflectors or components with oil. Less is more when it comes to oiling, and you want to remove any pooling or droplets of oil as best as possible before reassembling your grill. Many grills will have an enamel coating on the grill grates. If this is the case, you should not need to apply oil.
7. Put the grill back together

Now that the internal grill components and grill grate have been cleaned it’s time to put the grill back together. Take care to make sure everything fits back the way it should. But keep in mind that the grill’s high heat can sometimes cause the metal to warp a bit. A little extra effort now in making sure everything fits and is seated properly will make for a more efficient cooking experience.
8. Fire up the grill
Now that the grill is back together it’s time to breathe some life into it. I like to fire up gas and pellet grills immediately after cleaning. This serves two purposes: It allows any moisture to burn off and evaporate, and it will burn off the oils and season your grill grate and the oiled components. Bring the grill up to about 450 degrees Fahrenheit and allow it to burn at that temperature for 30 minutes. This should burn off any oils and assist with seasoning the metal components.
More grill-cleaning tips
A few additional tips to take away. First, it’s typically easier to clean warm surfaces, so consider heating them up first before cleaning. Make sure your brush and other cleaning supplies aren’t too grubby and consider replacing them in between every deep clean. Lastly, avoid mold buildup in the offseason by cleaning and drying it out before the end of the grilling season. Otherwise, you may take on moisture and any food buildup inside could manifest into something quite gross during the offseason.
Homemade cleaning solution
You can create effective cleaning solutions with baking soda, dish soap, and vinegar for your grill and use them after every few uses to keep your grill clean and maintained during the grilling season, making end-of-season cleaning easier.
- Baking soda and dish soap paste: This option is for moderate cleaning and it combines the grease-cutting power of dish soap with the scrubbing power of baking soda.
- Baking soda and vinegar soak: This is a powerful combination for tackling heavy grill grime. The vinegar breaks down stuck-on grease while the baking soda absorbs it.
In most cases, you can effectively clean and burn back in your grill in under an hour. A little bit of grill maintenance today will not only make your grilled food more delicious but it will help to make your grill last longer. The only thing left to do is figure out what you plan on grilling next.