
The butter board trend is hot right now: Here’s how to create your own

Butter board ideas: Impress your guests with this tasty, newly popular trend

Finally, a new TikTok trend we can be excited about. With all of the stupidity going around on the popular app lately, it’s about damn time. The butter board trend involves a completely customizable spread, topped with any and all of your favorite toppings. It’s simple to put together and great for large or small crowds. Or, you know, when you’re on the couch Netflix-ing alone. No judgment, here.

Sound good? We think so, too.

What are butter boards?

Simply put, a butter board is an appetizer board that’s composed of softened, spreadable butter and anything else you please. Some popular combinations we’ve seen so far include nuts, olives, specialty oils, honeys, dried fruits, and herbs. In addition to being a stunning centerpiece, a major part of this trend’s appeal comes from its adaptability and versatility. Anything that pairs well with butter (is there anything that doesn’t pair well with butter?) can be included on your board.

What is the butter board trend?

On September 15, New York cook Justine Doiron, posted an Instagram reel of a beautiful butter board she’d created. In just a few days, the view count of that reel was over 8 million, and a new darling of social media food trends was born. While Doiron credits Chef Joshua McFadden with the creation, it was her post that set the trend ablaze.

Since then, butter boards have been popping up all over social media. And it’s no wonder, with such a gorgeous, delicious, easy-to-make dish that will please just about everyone.

How to use butter boards at home — our favorite recipes

Chances are, you currently have everything in your kitchen at this very moment to create even a basic (but lovely) butter board. While part of this dish’s popularity is that it’s so visually attractive, it’s pretty easy to recreate one just as pretty at home, even if “food stylist” is nowhere to be found on your resume.

Choose the right serving vessel for your butter board

The first step is finding a serving vessel. Most of the designs we’ve seen thus far have been created on wooden boards, which most everyone has in their kitchen —even a cutting board would be perfect for this. No need to get too fancy. If you don’t have one of these at home, or you’re just totally over the rustic-chic trend (we get it), feel free to use any other serving plate or platter you have on hand.

Make sure your butter is soft

The next step is making sure your butter is perfectly spreadable. We’ve all experienced that horribly frustrating feeling of trying to spread cold butter on toast. Now imagine trying to do that on a huge serving board. Nope. Soften your butter. The best way to do this is by leaving it out on the counter until it reaches the perfect texture. In our experience, microwaving is just not the way to go here as it creates too many hot and cold spots. Practice your patience and leave it on the damned counter.

Consider the ingredients you want to add

And then there’s the matter of what you want to feature on top of your butter. As we’ve already stated, you can use popular pantry ingredients you probably already have — nuts, dried fruits, etc. If you have some time, or are planning a fancy party, branch out and get creative with fun ingredients like edible gold-leaf or flowers.

Sweet and spicy butter board recipe

Aubrey's Kitchen

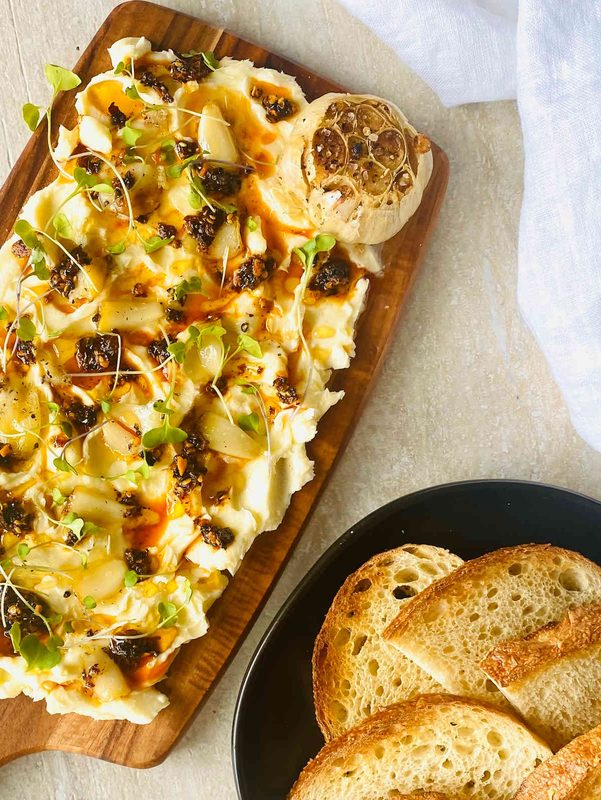
(From Aubrey’s Kitchen)

There aren’t any measurements listed in this recipe, which we realize is a bit unusual. But the thing we love so much about this dish is that the details are entirely up to you. Obviously, if you have a larger serving board or platter, you’ll want to use more of your ingredients. If, however, it’s a more intimate gathering of two, a tiny plate garnished with small amounts of these ingredients would be completely charming. Also, if you love honey, go nuts and use a ton! Hate chili oil? No problem, don’t use it. The beauty of the butter board is that everything is completely up to you. Embrace your culinary freedom.

Ingredients:

  • Butter, softened
  • One head freshly roasted garlic
  • Chili oil
  • Honey
  • Cashews
  • Micro greens
  • Sea salt
  • French bread, crackers, or another bread you prefer

Method:

  1. Spread softened butter over a wooden board, swirling to create an attractive pattern as well as crevices for other ingredients to sit in.
  2. Sprinkle sea salt all over the butter.
  3. Layer other ingredients on top of salted butter, arranging any way you prefer.
  4. Serve with bread and/or crackers.

That’s it! In no time, you’ll have a delicious snack completely customized to your preferences.

Editors' Recommendations

Lindsay Parrill
Lindsay is a graduate of California Culinary Academy, Le Cordon Bleu, San Francisco, from where she holds a degree in…
Think Circle K is just a pit stop for road trip snacks? The chain now has its own portfolio of wines
Circle K is now a winery, not just a convenience store
Circle K.

Circle K, the chain of quick-stop convenience stores with more than 7,200 locations, is now a winery. The Texas-based company founded in 1951 is now producing its own lineup of wines, and to the minimart's credit, the offerings are actually getting decent reviews so far.

Two lines of wine have officially dropped this summer: An entry-level wine called Sunshine Bliss and a higher-end line with wines priced from $10–$25. The Sunshine Bliss line starts at $8 a bottle and is currently available at around 3,000 U.S. stores, befitting of a franchise that prides itself on convenience.
All about Circle K's wines
How is the wine? Top wine publications are zeroing in on the value elements, awarding some in the lineup the title of "best buys." The Sunshine Bliss portfolio includes everything from pinot grigio to pink moscato. There are seven wines in all, including non-grape options like sweet strawberry and sweet peach.

Read more
Stop tossing your garlic and onion skins: Here are 6 incredible reasons why
It turns out you might be throwing away the best part of your everyday ingredients
Onions and garlic

They may be the first thing we toss in the bin when it comes time for dinner prep, but it turns out that papery onion and garlic skin actually has some pretty incredible talents other than frustratingly sticking to our fingers. These are our favorite onion skin and garlic skin benefits.
Benefits of onion and garlic peels
1. They add nutrients to your diet
It may sound peculiar, but you can actually eat your onion and garlic skins. And while that papery skin may not be the first thing you want to turn to when it comes time for a midnight snack, it can actually be incorporated into your recipes. Add garlic and onion peels to stock for added flavor, grind, and mix them into savory baked goods. However you choose to include them in your cooking, you can rest assured that you're getting extra boosts of vitamins A, C, E, as well as many additional antioxidants. Skins are also a hefty source of flavonoids, including quercetin, a potent antioxidant and anti-inflammatory.
2. They add protection and flavor during the cooking process
Keeping the skins on onions and garlic during the roasting process has many benefits. Firstly, all of the wonderful health benefits mentioned above. By keeping the skin intact as long as possible in the cooking process, more nutrients can make their way from the skin into your dish. But by keeping that skin on, you're also protecting the ingredients themselves from harsh cooking and over-browning. Onion and garlic skin will help to protect the more fragile flesh beneath from high heat, providing you with a softer, gentler, more flavorful ingredient.
3. They can relieve muscle cramps
Onions — especially onion skins — are rich in anti-inflammatory properties. By steeping your onion skins in hot water for a few minutes to make tea, you can help to alleviate muscle cramps and tension throughout your entire body. Enjoy before bedtime for full-body relaxation.

4. They're great for the garden
It turns out all those added nutrients in onion and garlic skins aren't just good for your body. They're great for your garden, too. Instead of tossing those skins in the garbage, compost them and put them right back into the ground where all of those wonderful nutrients can help other ingredients grow and flourish.
5. They relieve itchy skin
In addition to all of their other health benefits, garlic and onion skins contain anti-fungal properties that help to alleviate itchy skin ailments, including bug bites and athlete's foot. Simply apply onion or garlic skin-infused water to the affected area for instant relief.
6. They're to dye for
Did you know that onion and garlic skins can be used for dyes? By boiling skins in water, you can create a solution that will give a beautiful golden brown hue to most fabrics, including wool, linen, and silk. It will even help to eliminate gray hairs and give them a natural shine and bouncy texture. Who knew?!

Read more
How to achieve the perfect pour-over coffee to complete your morning routine
Follow this advice to craft a delicious, rich pour-over coffee
pour-over coffee set up

Coffee can be more than just that extra boost to kick-start your day. It could also be a ritual. While drip coffee is a great option in a pinch, if time allows, a pour-over is a divine treat to indulge in. Also known as a hand brew, this method allows you to take control of all the variables of the brewing process to craft it precisely to your taste. Making your cup of coffee this way can be an almost meditative addition to your morning routine. Whether you’re just dipping your toes into the world of coffee or you’re a seasoned professional, read on to learn more about perfecting your pour-over. 

Must-have equipment for pour-over coffee
Any great pour-over will hinge on the equipment you use to achieve it. Here are the must-haves: 
Brewing device 
First and foremost, you should pick out a pour-over brewing device. Several options will all lend nicely to a smooth brewing process. You really can’t go wrong if you have a great brewing method but, if you want to optimize your brew, consider buying a Hario V60 decanter. This plastic brewer doesn’t feature the three holes flat-bottom pour-over brewers have so it offers a faster, more efficient drawdown. 
Digital scale
A digital scale will aid in measuring out precise amounts of coffee grounds and water. This is absolutely critical when making a pour-over. As you shop around for a digital scale, be sure it’s capable of measuring to the .1g. 
Spoon 
This one is not that hard — any old spoon will do. This tool will be helpful at the end of the brewing process. 
Filtered water 
Water will determine a lot when it comes to the taste of your brew. Filtered water will offer the best results. You can either use bottled water or a water filtering device such as a Brita filter. 
Kettle 
Water temperature is key when it comes to crafting a pour-over. Ideally, you should look into getting a goose-neck electric kettle. A normal electric kettle will work too; it will just be more challenging to get a consistent pour. A pouring kettle is not recommended as you may lose valuable temperature as you transfer the hot water from its source. 
Coffee beans 
This is by far the most important factor when making any cup of coffee. Even if you brew your cup to perfection, it will be lackluster if you use low-quality beans. There’s a lot that goes into sourcing coffee beans, your personal taste included. Start by looking into local coffee roasters if you’re still learning your preferences. 
Grinder 
A burr grinder will offer even, uniform grounds. An electric burr grinder will cut down on time but if you’re looking for a cheaper option, you can also use a hand grinder. 
Filters
Purchase paper filters specifically made for pour-over cones. Fast papers will aid in the drawdown process but they are not a requirement. 

Read more