Every once in a while, a new piece of information goes against everything we’ve been taught, and it’s pretty mind-blowing. It turns out, cursive is useless, Pluto isn’t a planet, and we do carry around a calculator with us all the time (sorry, 1990s-era teachers). From time to time, these new truths also hit the food world, and when they do, it’s pretty exciting.
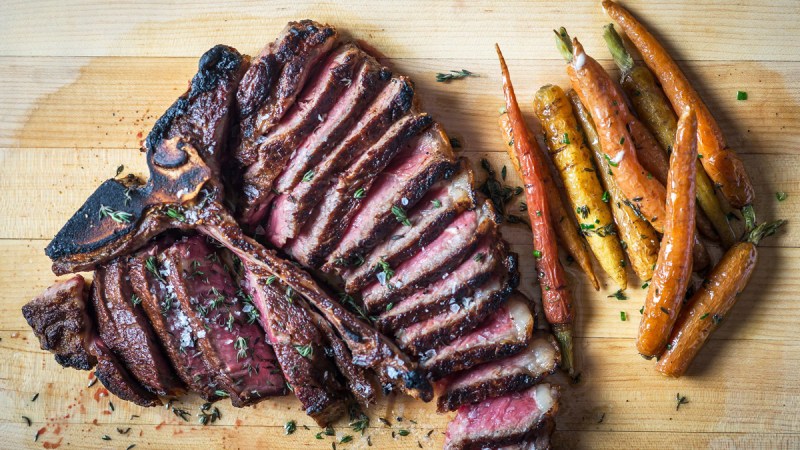
For as long as we can remember, the key to a good sear on steak has been fat and fast, high heat. Anything else would create a grayish, lackluster piece of meat that was hardly appetizing. But there’s a new trick in town about cooking steak — water. While cooking a steak in water sounds counterintuitive when it comes to proper searing, if done correctly, this technique can create a beautifully browned, perfectly seared, deliciously juicy piece of meat. So, how is this possibly the best way to cook steak, you ask?
Different types of browning in food
The science behind this new cooking method is pretty interesting. In cooking, there are two types of browning — caramelization and Maillard. Caramelization happens when sugars in certain foods are heated past 300 degrees Fahrenheit. When these sugars break down, we get browned, flavorful, sometimes jammy and sweet foods like caramelized onions. Maillard browning occurs when sugars and amino acids break down and reform in proteins like beef, pork, or chicken.
Why water works
Water has traditionally been the enemy of good browning because water turns to steam, which prevents pan heat from getting hot enough to create a proper sear, and that’s where colorless meat comes from. If you cook your meat thoroughly this way, it will end up sear-less and gray, which is just gross, any way you slice it.
However, suppose you add a bit of water to the pan first and simmer your meat just until that water evaporates. What will happen is that the sugars and amino acids will release from your protein, staying behind once the water has evaporated. Essentially, the water pulls the flavor and color out of the meat, leaving it for you to turn into something delicious.
To prevent poaching or steaming your protein, only add a few splashes of water. This is where it’s easy to go wrong. Remember, you’re not trying to cook your meat fully. You’re only giving it enough time to give up some of its extra flavor. Only a few splashes are necessary, no matter what you’re cooking.
This method also works perfectly for vegetables, and even mushrooms, which are hard to sear properly. With a bit of water applied in just the right way, almost everything you make can have a beautifully browned caramelization packed full of flavor. We tried this recipe for sauteed mushrooms with shallot and thyme using this method, and they were the best we’ve ever had!
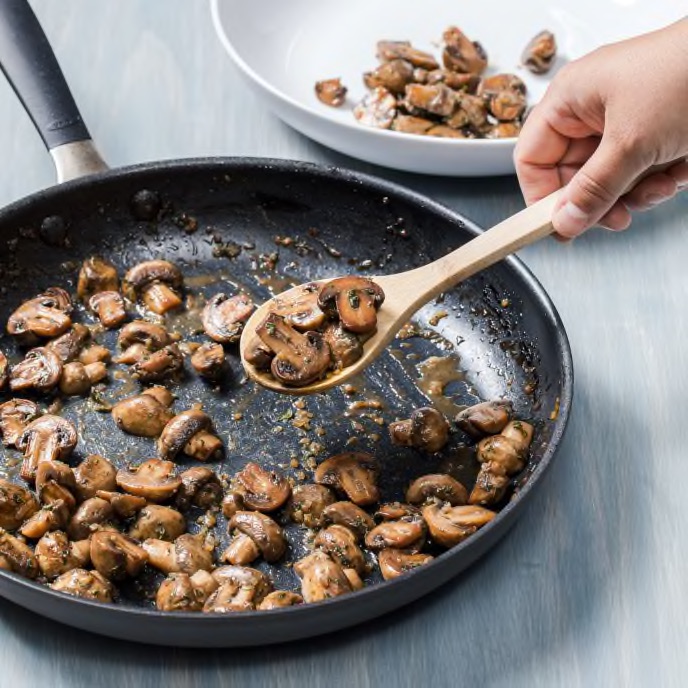
Sauteed mushrooms with shallot and thyme
(From America’s Test Kitchen)
Ingredients:
- 1 1/4 pounds mushrooms, halved
- 1/4 cup water
- 1/2 teaspoon vegetable oil
- 1 tablespoon unsalted butter
- 1 shallot, minced
- 1 tablespoon fresh thyme, minced
- 1/4 teaspoon table salt
- 1/4 teaspoon pepper
- 1/4 cup dry Marsala
- 1/2 cup chicken broth
Method:
-
Cook mushrooms and water in a 12-inch nonstick skillet over high heat, stirring occasionally, until skillet is almost dry and mushrooms begin to sizzle, 4 to 8 minutes.
-
Reduce heat to medium-high. Add oil and toss until mushrooms are evenly coated. Continue to cook, stirring occasionally, until mushrooms are well browned, 4 to 8 minutes longer. Reduce heat to medium.
- Push mushrooms to the side of the skillet. Add butter to the center.
- When the butter has melted, add shallot, thyme, salt, and pepper to the center and cook, stirring constantly, until aromatic, about 30 seconds.
- Add Marsala and stir the mixture into the mushrooms. Cook, stirring occasionally, until liquid has evaporated, 2 to 3 minutes.
- Add broth and cook, stirring occasionally, until glaze is reduced by half, 2 to 3 minutes.
- Season with salt and pepper to taste, and serve.


