In the days since GPS was invented, many of us have lost the skill of navigating by a good old compass and map. As a family on the road in a 1991 Airstream Motorhome, we were early adapters to the GPS, but I still remember a time when we had to navigate New York with the crinkled old maps in the glovebox. Out in the wild, things are a little bit different. Milestones don’t often sweep you by while you’re busy using a magnifying glass to figure out what intersection you’re on, but it can still be a challenge. Today, compasses are still considered to be a top 10 safety item by the National Park Service, but it’s a shame how many people don’t know how to use a compass. Here’s how to get started.
Parts of a baseplate compass
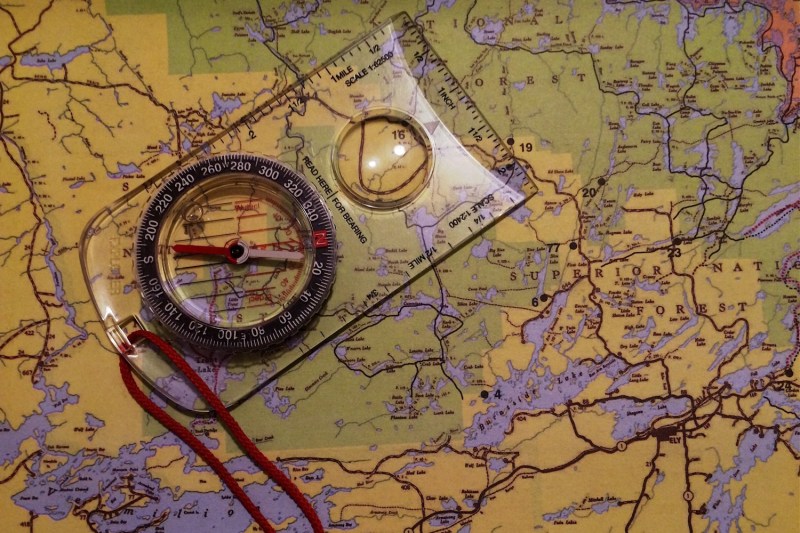
There are so many compasses to choose from, but if you’re just starting out, I highly recommend using a simple baseplate compass. These are attached to a ruler, so you’ll be able to easily take your bearings. Experts from REI do a great job of explaining the basic parts of a compass and how to use them, but here is the breakdown:
- Baseplate: A flat, transparent base that often includes ruler or scale markings for measuring distances.
- Bezel: A rotating circular case that contains the compass needle and is marked with degrees (0–360°), as well as cardinal directions (N, E, S, W).
- Magnetic Needle: A magnetized needle that points to magnetic north, often red for north and white or black for south.
- Orienting Arrow: Located within the bezel, underneath the needle. This is used to align the compass needle to the orienting lines.
- Orienting Lines: Parallel lines within the bezel used for aligning the compass with the map grid lines.
- Direction of Travel Arrow: An arrow usually near one end of the baseplate that indicates the direction you should travel when following a bearing.
- Index Line: A small, fixed mark or line on the bezel that shows the set bearing.
What is magnetic declination, and why does it matter?

Magnetic declination is the angle between magnetic north and true north, and it’s also one of the primary places where beginner navigators mess up. If you don’t account for the difference between magnetic north and true north, your bearings will be wrong, your maps will be misaligned, and you’ll do a great job of getting yourself lost. For example, if you follow a compass reading of 0° (north) without taking the declination into account, you’ll actually be heading 10° east of true north. Over long distances, even small declination errors can leave you miles off course.
To correct magnetic declination, you’ll need to know the declination information for your area. Usually, you’ll be able to find this on topographic maps. That said, if your map is old, it’s always worth it to check the declination using the NOAA calculator before you go. That way, you have the most current information at your disposal.
Some compasses allow you to set the declination adjustment so that the compass automatically accounts for the angle. If your compass doesn’t have this feature, simply add the declination angle if your location is easterly and subtract the angle if it’s westerly. Then, you can adjust your bearing accordingly.
How to take a bearing on a compass

As I mentioned, bearings are the direction or angle as measured in degrees from a reference point. To take a bearing, lay your map flat and orient it to true north using your compass. Then, mark your starting point and desired destination. I recommend using a pencil to draw a line between the two points.
Next, set the compass on the map with the edge of the baseplate along the line you drew. Make sure that the direction of travel arrow is pointing towards your destination.
After that, turn the bezel so that the orienting lines match up with the map’s grid lines. This will make the orienting arrow point towards your destination. Congratulations, you’ve done it! Read the bearing on your compass.
Now, you can take that bearing and follow it in the field. Rotate the bezel so that the desired bearing aligns with the index line. Hold the compass level as you rotate your entire body so the magnetic needle aligns with the orienting arrow inside of the bezel. The direction-of-travel arrow should point towards your destination.
As you walk in that direction, make sure that the magnetic needle stays in alignment with the orienting needle as you move.
How to use a compass to find out where you are

Using a compass to find your location involves a technique called triangulation. For this to work, you need your map, compass, and at least two visible landmarks, three if you want to be extra precise.
Once you have your landmarks, take their bearings by holding your compass flat with the direction-of-travel arrow pointed towards the first landmark. Turn the bezel until the magnetic needle is aligned with the orienting arrow (this is called the “red in the shed” alignment). Note the degree indicated on the index line and repeat for the other landmarks. At this point, you can then add or subtract the declination angle.
Place the edge of your compass on the map so that the landmark is on one end of the bearing, and rotate the map and and compass until the orienting lines on the compass align with the map’s grid. Then, you can draw a line from the landmark along the bearing.
If you do this a second time with a landmark greater than 60° away from the first one, the place where the two lines intersect is your location. Add a third landmark, and the lines will make a triangle. Your location will be somewhere in that triangle. This isn’t perfect, but you’ll have a fairly good idea of where you are.
Learning how to use a compass could be a lifesaving skill, so make sure you practice in a familiar area before setting out into the wild.