
How to tie the double fisherman’s knot (it’s not just for rock climbing)

Use this knot to connect two lengths of rope together securely

Tightening a double fisherman's knot
Tom Kilpatrick / The Manual

Of the many outdoor knots you can learn, there is none more secure for attaching two ropes than the double fisherman’s knot. Generations of rock climbers and rappelers have entrusted their lives to this knot, connecting them to gear placed into the rock itself or used to tie a prusik knot to control their descent. Not only that, but this knot is recognized as the knot for tying two ropes together if you need a full rope abseil but want to retrieve your rope afterward.

But what does this mean for the humble camper or survivalist? Well, it means that if this knot is trusted with climbers’ lives and body weight, we can trust it around camp. A bonus to the double fisherman’s knot is that it’s a lower profile compared with other methods of attaching two ropes — the figure-eight knot, for example. This means you can easily pull your rope through a carabiner if you need to hoist a bag or haul your tarp shelter off the ground. I’m a big fan of this knot; it’s easy to tie, and I’ve never had it fail me yet.

Tying a double fisherman's knot step two
Tom Kilpatrick / The Manual

How to tie a double fisherman’s knot

Step one

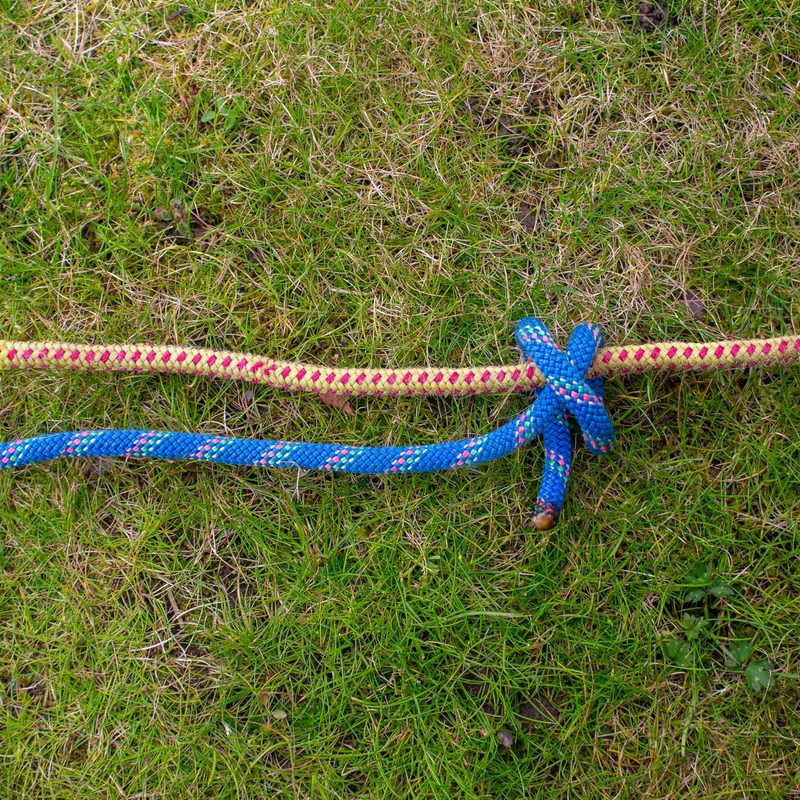
  • Lay your ropes out parallel to each other. In this instance, the blue rope will be rope one, and the yellow, rope two.
  • Take one working end of rope one and wrap it around rope two twice. Your second loop should be inside your first loop and cross over the standing end of ropes one and two to make an ‘X’ shape.
Tying a double fisherman's knot step three
Tom Kilpatrick / The Manual

Step two

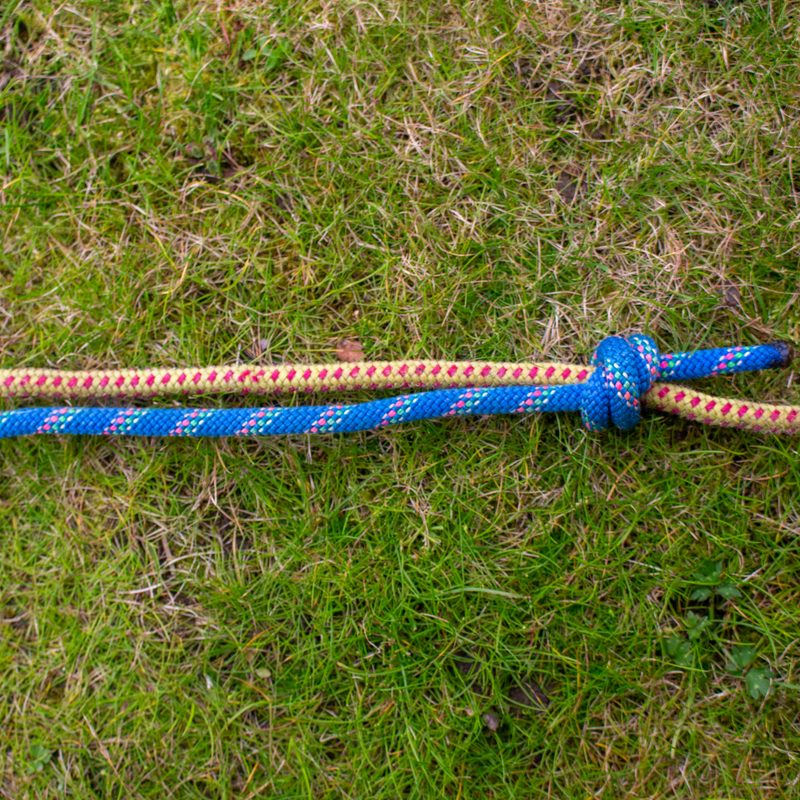
  • Tuck your working end of rope one through your loop — under the ‘X’ — making sure you have first completed both loops. If you don’t fully complete both loops, you will have a long tail and just the single loop around rope two.
  • Pull the rope tight around rope two. Adjust the tail if necessary — you should have a couple of inches of tail.
Tying a double fisherman's knot
Tom Kilpatrick / The Manual

Step three

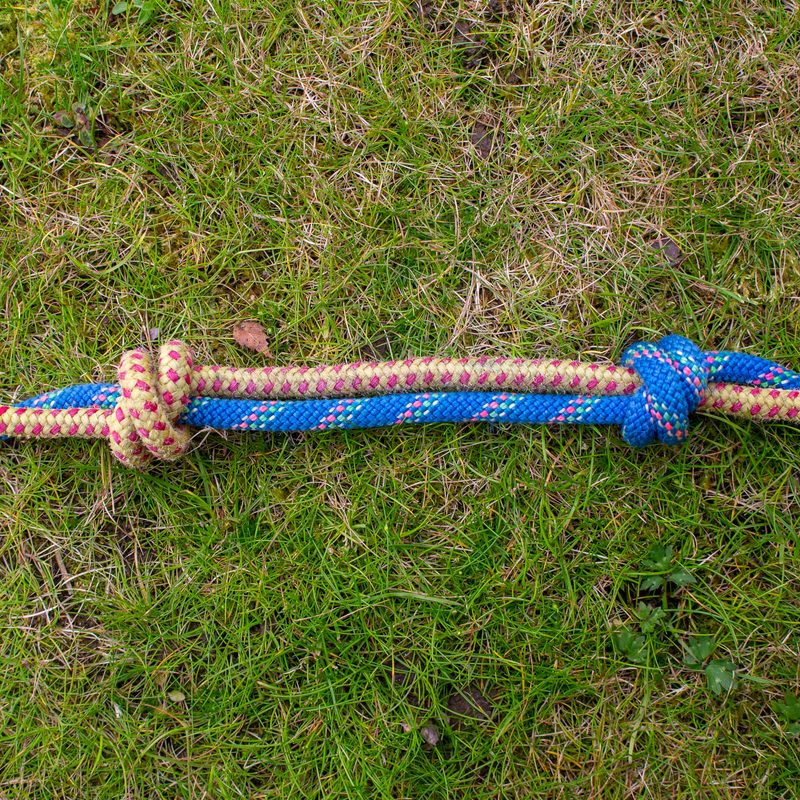
  • Pull rope two until you have enough to tie your knot around rope one. It doesn’t matter if you tie your second knot some distance from your first one.
  • Repeat the same steps with rope two as you did with rope one until you have two knots around your ropes.
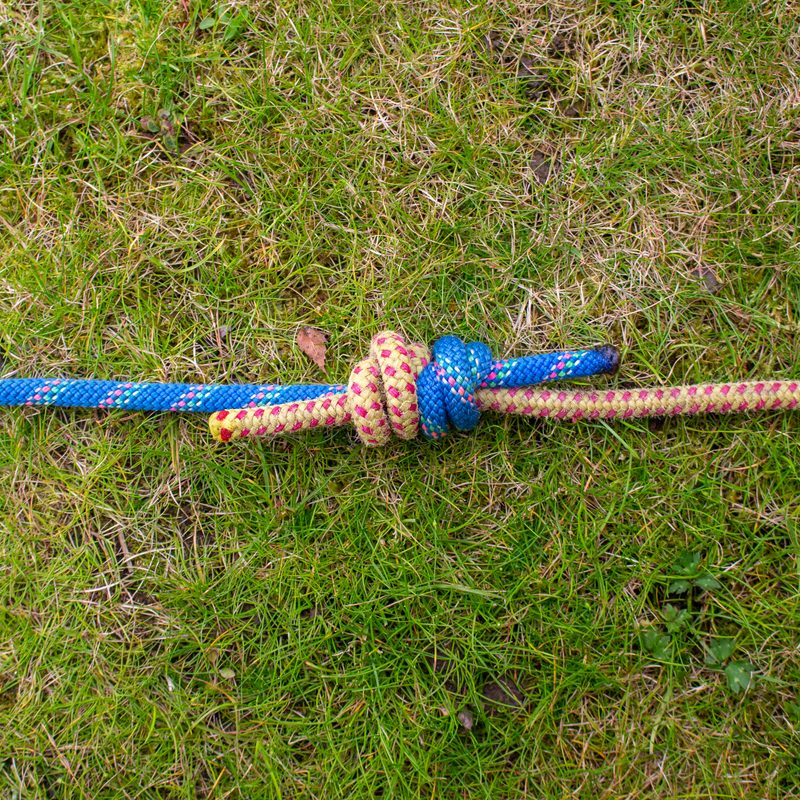
  • To dress your double fisherman’s knot, pull both standing ends until the knots butt up against one another and tighten.

Is the double fisherman’s knot the same as a stopper knot?

You may have seen a stopper knot used to back up climbing knots, such as the double figure-eight or the bowline knot. Stopper knots prevent the rope from being able to slide back through and loosen a knot while it’s not weighted, and these are integral to the safety of climbing knots. Tying a double fisherman’s knot involved simply tying two stopper knots back-to-back and pulling them together. To back up a knot in camp or while climbing, you would tie one of these on the standing end of your rope, away from your figure-eight or bowline.

Editors' Recommendations

Topics
Tom Kilpatrick
A London-born outdoor enthusiast, Tom took the first ticket out of suburban life. What followed was a twelve-year career as…
Forget rice: This is how to actually fix a wet iPhone, according to Apple
Have a wet iPhone? This is how you fix it
Various iPhones on a table.

The world is full of precarious situations for our unsuspecting smartphones, particularly when it comes to water exposure. Whether it's a sudden downpour during a hike, an accidental drop into a sink, or a plunge into a lake, our iPhones are constantly at risk of water damage. While most models are water-resistant, none of them are completely waterproof.

Understanding this vulnerability, Apple has put forward a series of recommendations to mitigate the damage when your device encounters mishaps like these. Apple's guidelines are crucial for iPhone users, providing a lifeline for your device in what can often be a moment of panic and uncertainty.

Read more
How to pack a cooler for camping (or any outdoor trip away from home)
Tips that make getting to your food and drinks easier
Two men with a Yeti cooler and a dog

Whether you're camping for two nights or a full week, camping requires some careful forethought and planning. No one wants questionable food due to the cooler getting too warm too soon or an unidentifiable snack that's soggy from falling out of an open package and into melting ice. With some consideration and preparation, you can easily pack a cooler for camping that will seamlessly serve you well throughout the length of your trip.

Type of cooler
The three greatest factors to consider when choosing the best cooler for camping are its ability to insulate well, its size, and its features. Brands like Yeti and ORCA are both top performers for backpack coolers because they are incredibly durable and excellent at insulating. If you are in the market to buy a fancy new cooler, you can get good sizes from both brands too, should you need a compact design or a more sprawling cooler depending on your needs.
Size
A 56-quart cooler can hold enough food and keep it from spoiling for up to six and a half days, which makes it a versatile option for campers who go on both long and shorter trips.
Features
If you know you'll be moving the cooler around with other camping gear, opt for a cooler with wheels. And if you plan to have a cooler just for drinks and ice, find a cooler with long ice retention and easy drainage.

Read more
How to survive a bear attack: Brown, black, and polar bears
Bear running through the water

If you're a serious outdoorsman, you'll eventually encounter a bear. The experience can be daunting, to say the least. I moved to B.C. from the U.K. a few years back and let me tell you, the first time I saw a bear fronting up to me as I came running around a corner, I seriously considered my future as a trail runner — not to mention my immediate future in general. You do get used to bears, but that doesn't mean they no longer pose a risk. Mostly, bears will turn tail and head off, but for the occasion that this doesn't happen, you need to know what to do if you see a bear and survive a bear attack if you want to keep hitting the trail.
How to avoid a bear attack
It's all well and good knowing what to do if a bear does attack, but there are usually steps you can take to avoid the encounter altogether. It's great to see these majestic menaces in their natural habitat, but seeing them from a distance and not having an incident is the best way to do this.

Step 1: Bears are commonly attracted to campsites for the same reason they're drawn to towns: free food. Hanging a bear bag is something every would-be wildlife camper should know how to do properly. Proper campsite management is essential in bear country. This means tidying up after yourself, not taking food — or toothpaste — into your sleeping quarters with you, and hanging your food safely out of reach. Remember to dispose of garbage and clean your pans, too.

Read more