So you’re building up your home bar. You’ve got the essential spirits in. You’ve added a selection of liqueurs and bitters to combine them with. Now, it’s time to add the finishing touches. From mixers to tools to glasswear, we’re rounding up everything else you’ll need to turn a corner of your kitchen into a great home bar.
Speaking of the kitchen – this is, in my experience, the absolute best place for a home bar. While I love a good bar cart for a living room (or even an office, if you have that kind of job!) these are really more decorative than a practical place to mix drinks. The problem with using bar carts for serious cocktail making is twofold: One, the surfaces are usually too low, at below hip height, so you’ll be bending over uncomfortably while you try to make your drinks. That’s not chic, and it’s hard on your back too. Instead you want something that’s counter level, hence opting for the kitchen. The second issue is access to ice and a sink. Mixing serious cocktails requires a large amount of ice and frequent washing of glasses and tools. Sure, you can get an attractive ice bucket for your bar cart, and that certainly makes a fun decorative accessory. But you’ll still be running back and forth to the kitchen to use the sink all the time anyway.
If you love the style of a bar cart, I certainly wouldn’t want to stop you having one. They are great fun, and stylish to boot. I have a bar cart myself in my living room, which I love and use for very simple mixed drinks like negronis (though even then, you still have to go and fetch ice every time you want a drink). It’s a great place for occasional special bottles, particularly beautiful glasswear, cocktail books, and other decorative accessories.
But for serious cocktail making, you want an area of clear counter space, near to a sink and to a freezer full of ice, and with easy access to all your bottles and tools. I find a small kitchen island perfect for this purpose, tucked into a corner of the kitchen near the appliances. Store bottles and equipment on the lower shelves of the island or on wall-mounted shelves to save space, and make sure you have a lamp or decent overhead lighting so you can see what you’re doing while you mix. You’ll want a small chopping board as well for slicing citrus and other fruit, and a small, sharp knife that you can borrow from your kitchen equipment.
Then it’s time to turn your attention to home bar tools.
Essential home bar tools

Despite the plethora of bar tools available, what you really need is pretty simple. You want equipment for shaking and for stirring drinks, and for moving that liquid from the vessel you make it in into the glass. So the first piece of equipment you’re going to need is a cocktail shaker. You can get gorgeous decorative shakers, and if you want a beautiful rose gold shaker then by all means go ahead and get one, but a simple metal shaker and mixing glass will do the job perfectly well. You often see shakers which are one piece, with a built in strainer, but I find these a bit cumbersome to use as often the parts are often difficult to get apart to add ingredients or to clean. I prefer the deep metal shaker and simple mixing glass, which are slightly different sizes so you can insert the glass face-down into the metal shaker and seal in place with a firm smack on the end. Then you shake your drink and firmly smack the side of the shaker with the flat of your hand where it joins the wrist to release the glass. I generally put my ice into the metal shaker and pour my liquids into the glass so I can see them before combining but really, however you want to do it is fine.
Another advantage of the metal shaker/mixing glass combo is that it takes care of the second essential piece of equipment, which is a mixing glass. Specific cocktail mixing glasses tend to be larger than the ones which come with metal shakers, and to have flat sides rather than sloped. If you’re really into your mixed drinks you might want to get a mixing glass as well as the flat sides make it easier to stir in a smooth, continuous movement. They’re also attractive things to look at and to see in use. However, if you’re only occasionally making mixed
Then you’ll want a strainer. It’s important to strain your drinks after mixing them to remove larger residue like ice shards, fruit pulp, mint leaves, or anything else that you’ve used to add flavor to the drink but you don’t want in your glass. The classic is the Hawthorne strainer which has a metal coil around its edge. It should fit neatly over the mouth of your shaker and you can use it to strain out
For mixing drinks you’ll want a bar spoon, which is a spoon with a much longer and twisted handle. If you’re practiced at your stirred
If I could convey just one tip to the world to make better drinks, it would be this: you need to measure your ingredients. Precision is important when making cocktails, and just guessing at amounts and ratios is a good way to make a mess of a classic recipe. There are professional bartenders who don’t measure and pour by eye – called free pouring – but that is a skill which requires a lot of practice and experience. When you’re starting out, what you want is a jigger. Jiggers come in various types but are most often a double ended cone shape like an hourglass. One side will be a larger amount for a double shot (typically 40 – 50ml) and the other a single shot (around 20 – 30ml). This makes measuring out different amounts precisely much easier, and the shape makes it easy to hold and to tip ingredients into your shaker. You can use a kitchen measuring cup or even a shot glass if that’s all you’ve got, but a jigger is the simplest and easiest to use solution.
Other equipment you’ll need includes things you’ll have in your kitchen anyway, like a citrus juicer and a vegetable peeler (for peeling citrus to make garnishes), a bottle opener, ice trays, and straws so that you can sample drinks as you make them for other people.
And finally, there are the nice-to-haves which you might want depending on preference, like a muddler (a handled instrument with a textured end used to pound up fruits or herbs), an ice bucket, and pourers for your bottles.
Essential home bar mixers, juices, syrups, and garnishes
For quick and easy drinks, it’s hard to go wrong with a spirit plus a mixer. Grab mixers based on what you like to drink – tonic for gin & tonic fans, ginger beer for those dark and stormys, fruit juices of all kinds (but fresh juice is always, always going to be better, so opt for fresh lemons and limes rather than packaged citrus juice), and some form of club soda or fizzy water.
For mixers, you’ll only be using small amounts in your drinks, typically 100 ml or less. So you’ll want to stay away from large bottles or even large cans, as these will go flat quickly. Opt for tiny individual cans where possible, so you only open a can when it’s going to be used immediately and it stays fresh and sparkling.
Another ingredient you’ll find frequently called for in cocktails is sugar syrup. This is simply white sugar dissolved in hot water to make it easy to pour in liquid form and which is used as a sweetener. It’s a real faff to have to make a fresh, tiny batch of sugar syrup every time, and this is one case where freshness isn’t important. So make a batch of 500 ml or so of sugar syrup, pour it into an old bottle, and keep it on hand as needed. Put it in the fridge when you’re not using it and it should last several weeks.
Related to sugar syrup, you’ll find cocktail recipes calling for syrups of all kinds, from strawberry syrup for a sweet strawberry daiquiri to salted caramel syrup frequently added to espresso martinis. The Monin brand is the most recognisable and stocks syrups in just about every flavor you can imagine. However, commercial syrups have their limitations. They tend to be extremely one-note sweet and use artificial flavorings, which isn’t great. If you want to take your cocktail game up a notch then you can start making your own syrups, which isn’t generally too hard and can create some delicious and unique results. But if you’re short on time then you can usually find a range of syrups in the grocery store.
Lastly, when it comes to garnishes you can keep it as simple or get as fancy as you like. If you’re using fresh citrus in a drink it’s never a bad idea to take off a wide length of peel before juicing so you can use that as a garnish. You can make a simple but elegant peel twist by using a sharp knife to clean up the edges of the length of peel and flipping it over to remove most of the white pith. Then twist the length of peel around a straw and hold it in place for five to ten seconds. When you let go, the peel will stay in its twisted shape and you can balance it on the rim of the glass.
Other garnish options that can be useful to have on hand are dried options like juniper berries or liquorice root, or you can use slices of fruit, fresh herbs, or preserved cherries for a sweet note. There are no firm rules here so garnish however strikes your fancy.
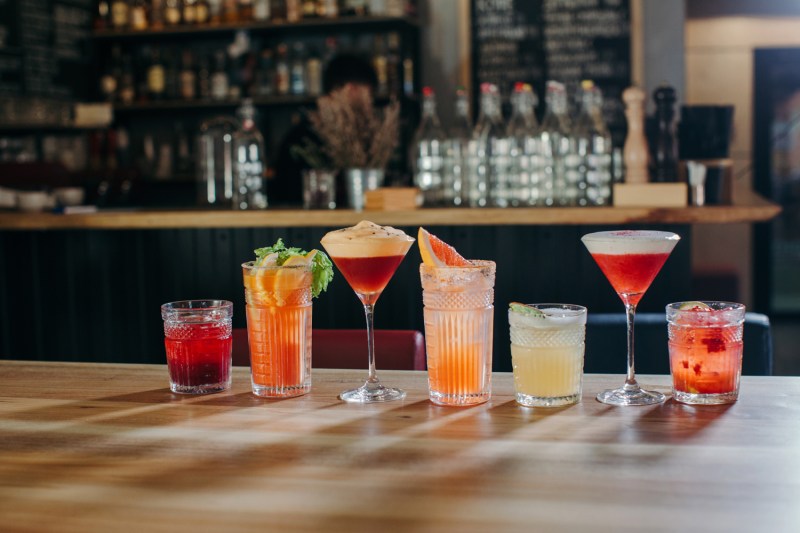
Essential home bar glasswear

Glasswear is one of those things which seems unimportant but actually makes a huge difference to your drinks. There’s a reason that white wine glass and red wines glasses are different, and the same is true for your cocktails. Different shapes of glasswear will let you smell more from the drink, or help to keep it cool, or show off its layers attractively. So while you technically can of course drink your cocktails from whatever vessel you choose, right up to a coffee mug if you really want, to get the full experience it’s helpful to have a range of glasswear.
You probably already have a set of tall tumblers (called collins glasses) for mixed drinks, and short tumblers which are ideal for whiskey and other sipped
Then there are your champagne flutes, which show off bubbles beautifully in their tall, thin forms, and brandy snifters which have a very wide bowl to enhance the scent of dark spirits. Along with wine glasses, beer glasses, and shot glasses for those who prefer their non-cocktail drinks.
Choosing the right glasswear for the cocktail you’re making is an artform unto itself, so we’ll cover that in a future post. But for essential guidance, most cocktail recipes should specify what kind of glass you should use, and if you don’t have that exact type then use whatever you’ve got that’s closest. Beautiful glasswear is a nice luxurious touch for a home bar, but as long as you have glasswear that is adequate then the most important thing is the flavor of your drinks.


