Pizza as we know it stems from one style — Neapolitan pizza. Its construction is classic — soft, chewy dough, anointed with brilliant red sauce, milky white mozzarella, and green basil. Despite the countless variations of pizza throughout Italy and the world, Neapolitan pizza has stood the test of time.
History of Neapolitan pizza
The origins of Neapolitan pizza can be traced to the Italian city of Naples in the late 18th century. Flatbreads of various shapes and flavors had existed for centuries in Italy before the creation of pizza. However, tomatoes were nowhere to be found. European explorers first brought the tomato to the continent in the 16th century. Initially, the red fruit was shunned as it was viewed as poisonous. Things changed sometime in the late 19th century when enterprising peasants in Naples started to use tomatoes on flatbreads. This delicacy soon blossomed into a well-known regional culinary item.
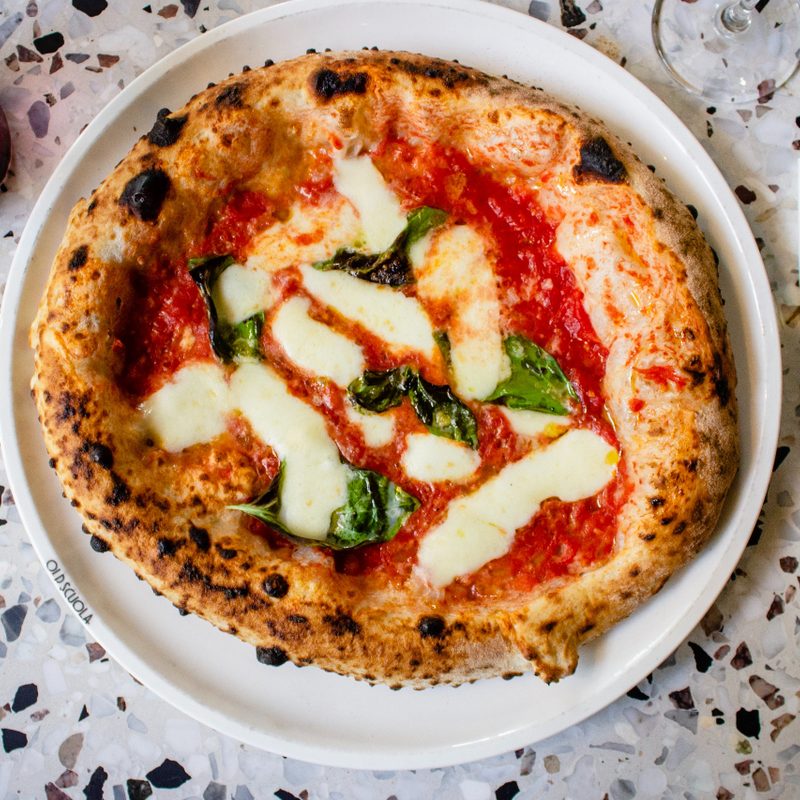
The best-known type of Neapolitan pizza is the Margherita, a combination of mozzarella, basil, and tomato sauce. This creation was invented by Raffaele Esposito in 1889 in honor of Queen Margherita. Esposito chose the toppings as an homage to the colors of the Italian flag.
What is Neapolitan pizza?
The criteria for authentic Neapolitan pizza is serious business. Authenticity of Neapolitan pizza is certified by The Associazione Verace Pizza Napoletana. The organization has an 11-page document of rules, with details ranging from the pH level of the dough to the amount of time the dough should be mixed.
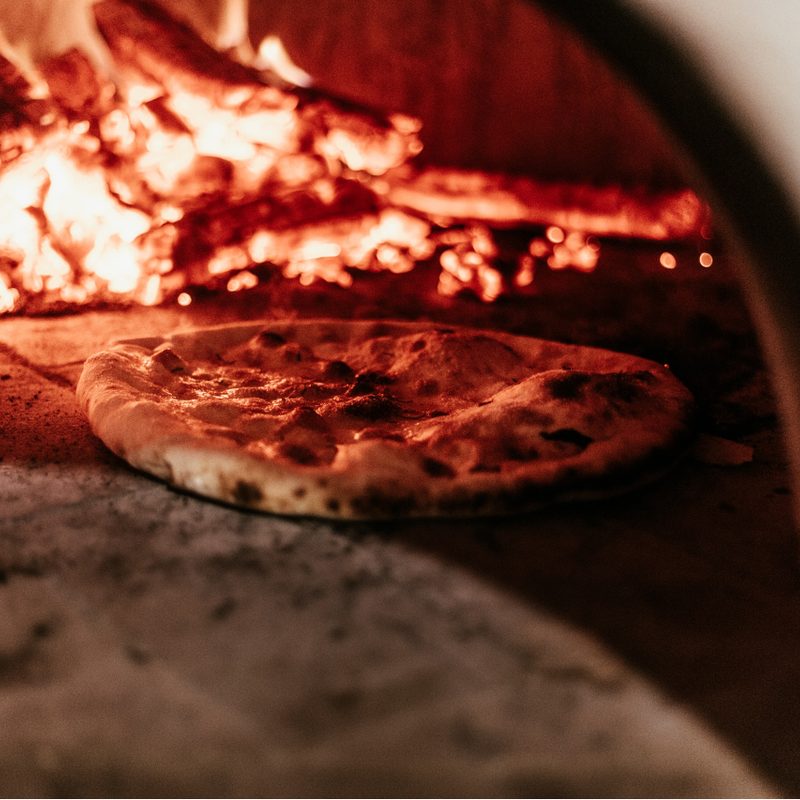
To start, the dough must be made from Italian 0 or 00 refined flour, fresh brewer’s yeast, water and salt. The sauce must be made from pureed, raw Italian San Marzano (a key difference from cooked American-style pizza sauce). For cheese, there are two types — fior di latte (cow’s milk) and mozzarella di Bufala (water buffalo milk). The final toppings are fresh basil and extra-virgin olive oil. The cooking of Neapolitan pizza is just as important as the ingredients. Neapolitan pizza must be cooked in a wood-fired stone oven (minimum 800 degrees Fahrenheit) for 60 to 90 seconds. The pizza will emerge with large bubbles on the crust and a soft, oozy center.
Unlike American pizza types, it’s perfectly acceptable to eat Neapolitan pizza with a fork and knife. In fact, many Italians will eat Neapolitan pizza with utensils since the pizza will often come unsliced. If eating with hands, Neapolitan pizza should be folded since the crust and toppings will be softer than a typical American-style pizza. Neapolitan pizza can also be eaten with hands with some adjustment. This is called pizza a portafoglio, “wallet pizza” and entails folding the pizza in half, then in quarters, until it resembles a wrap.
Margherita pizza explained
Though we told you that the Margherita pizza was invented by Raffaele Esposito in 1889 in honor of Queen Margherita, here’s a more detailed explanation of this pie. The base is made with thin, hand-stretched dough using specific flour (00 or 0 type), water, salt, and yeast. This dough is cooked in a wood-fired oven at very high temperatures for a short time, resulting in a crispy crust with a slightly puffy edge. The beauty of the Margherita pizza lies in its simplicity of just three ingredients:
- San Marzano tomatoes: These plum tomatoes are known for their sweetness and acidity, creating a flavorful base.
- Mozzarella cheese: This is ideally buffalo mozzarella for its creamy texture and mild flavor. Fresh mozzarella balls are typically torn into pieces for the pizza.
- Fresh basil leaves: Added after baking to preserve their fresh flavor and bright aroma.
The new wave

Authentic Neapolitan pizza can now be found throughout the world. However, while many of these pizzas follow the basic guidelines of Neapolitan pizza, they have also adapted the style. An interesting country that has emerged as Neapolitan pizza destination is Japan, particularly Tokyo.
Many of these Japanese pizza chefs studied Neapolitan pizza making in Naples but returned to Japan to create a new style known as Tokyo Neapolitan. An example of this is Chef Tsubasa Tamaki of Pizza Studio Tamaki (PST). Here, Chef Tamaki creates Tokyo Neapolitan using local Japanese oak or cherry blossom, along with an extra punch of salt.
Neapolitan-style Margherita pizza
(By Chef Or Amsalam and Chef Alexander Phaneuf of Full Proof Pizza and Lodge Bread Co.)
Chef Or Amsalam and Chef Alexander Phaneuf are the masterminds behind Lodge Bread Co., a bakery that focuses on whole-grain sourdough bread-making and flour-milling.
Pizza tips: Make sure your starter is active and healthy, doubling in volume 3 to 5 hours after feeding at room temperature for best results. Be sure to have enough starters on hand to supply the recipe and maintain your starter for the future. Read through the recipe and plan out the time it takes to reach each step in the process so that your dough is ready when you need it.
Pizza dough (makes 6 pizzas)
Ingredients
- 5 1/2 cups bread flour (preferably stone-ground)
- 3/4 cup and 3 tablespoons whole wheat flour
- 2 3/4 cups and 3 tablespoons warm water
- 1 cup and 1 tablespoon active sourdough starter (4 hours old)
- 2 tablespoons salt
Method
- Feed your starter — put it in a warm place to ferment and mature.
- Gather and weigh all ingredients (except the warm water) as well as a large (6 to 8 quarts) mixing bowl or container to hold your finished dough for proofing (if you plan to chill your dough after shaping and before baking, it’s best to clear a spot for your dough rounds now).
- Once your starter is 3 hours old, add 2 1/2 cups and 3 tablespoons of warm water to a mixing bowl. Add all the flour on top of the water.
- Mix on low speed (2) to fully incorporate into a smooth dough with no clumps.
- Cover the bowl to keep it from drying out and let rest for 1 hour.
- Add the matured starter (now 4 hours old) to the mixing bowl.
- Mix on low speed (2) for 1 minute. Dissolve the salt in the remaining warm water and add it to the mixing bowl.
- Mix on low speed (2) for 2 minutes (if you can still feel salt grains in the dough mix for another 30 seconds).
- Rest for 5 minutes. Mix on medium-low for 3 minutes.
- Oil the bottom and sides of a large bowl or container. With wet hands, remove the dough from the mixing bowl to the oiled container and cover. Place the dough in a container in a warm spot to proof, 30 minutes.
- After 30 minutes of proofing, fold the dough on itself towards the middle of the container like a letter, first from the bottom, then from each side, and lastly from the top. Starting again from the bottom, fold the dough up continuously, turning it over on itself until the letter fold seam is on the bottom and the top surface is smooth and round. Cover, and let rest for another 30 minutes.
- Turn the dough out onto your workspace and divide it into 10 1/2-ounce pieces. Roll each dough portion into a small round. Let rounds rest for 10 minutes, then tightly shape into a round again and cover.
- To finish the dough, there are several options. (Option 1) Refrigerate your dough for 8+ hours; pull out to temper for 30 minutes to 1 hour ahead of time before final shaping. (Option 2) Leave the dough in a warm area for 2 to 3 hours before final shaping.
Tomato sauce
Ingredients
- One can San Marzano tomatoes
- A few basil leaves
Method
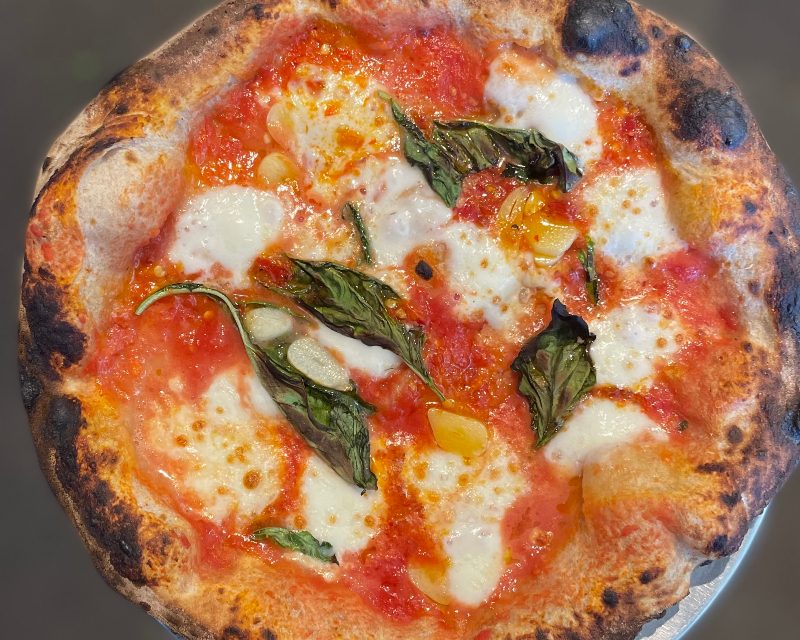
- Lightly blend tomatoes with a few leaves of basil. (That’s it! The acidity of the uncooked tomato is perfect for Neapolitan pizza) Margherita pizza.
Assembling the pizza
Ingredients
- 1 1/2 balls fresh mozzarella
- 3-4 leaves fresh basil
- Tomato sauce
- Extra-virgin olive oil
- Maldon salt to finish
- 1 teaspoon crushed Calabrian chili (optional)
Method
- The dough should feel bouncy, airy, and relaxed before final shaping, if not give it more time (make sure it’s not cold). Working from the middle of the dough, outward stretch a dough round into a 10- to 12-inch circle, slightly thicker toward the rim to form a crust.
- Place stretched dough on a floured baking peel.
- After shaping your pizza, add roughly 3 tablespoons of tomato sauce to the dough, leaving a 1/2-inch ring unsauced. Tip: Too much sauce will yield a watery pizza due to the fresh mozzarella.
- Tear the fresh mozzarella into small pieces and scatter it around the pizza.
- Add the fresh basil (add crushed peppers if making it spicy) and 1 teaspoon of olive oil.
- Bake for 15 to 20 minutes at 475 degrees Fahrenheit.
- Finish with a pinch of Maldon salt and serve immediately. Tip: If baking in a high-temperature pizza oven, the bake time is reduced dramatically, and the pizza will be ready within minutes.