
Prosciutto is one of my favorite ingredients to use, along with countless other people, not only because of its beautifully silky texture and incredible flavor but also because of its culinary diversity. Prosciutto gives an instant upgrade to anything you happen to be eating. If I’m faced with a boring sandwich, I know a few pieces will transform it into an Italian masterpiece. Is your cheese board or your charcuterie board a little humdrum? Pile on some silky slices and no one will be able to leave that board alone. Kids won’t eat their asparagus? Wrap it in this stuff and watch the magic happen.
And while I love prosciutto for its savory, salty, briny, meaty goodness, learning how to make prosciutto at home probably isn’t something many of us have thought possible, until now. Keep reading to learn how.
How to make prosciutto at home
What is curing?
Curing is the process of adding a mixture of salt, sugar, and nitrite/nitrates to meat, fish, and even vegetables to preserve and infuse flavor and color. By drawing the moisture out, the result is a texturized, seasoned, more shelf-stable version of the meat. The most common cured meats you’ll find are pork-based favorites like salami, speck, pancetta, and prosciutto.
While not impossible, curing meat at home does take a bit of science and quite a lot of time, but the finished product is worth the effort. Why wouldn’t you want to serve a charcuterie board that features your own house-cured prosciutto? Try some wild goose pastrami and rival the tame flavors you can buy in stores. We’ve put together a great recipe and guide for curing and drying your own prosciutto at home:
What you need to make prosciutto
- 10-12 pound leg of pork (this should be from a very fresh ham that’s just been butchered; ask your butcher to drain the central vein and remove the ball joint, leaving the rest of the leg bone intact)
- 5-10 pounds of salt
- 1/2 pound peppercorns
- 4-5 heads of garlic (varies depending on the size of the ham)
- Vinegar
- A wooden box with a lid (or a piece of wood that’s smaller than the box)
- 1-2 bricks (or another heavy weight)
How to cure your meat
- Peel the garlic and grind the cloves together with the peppercorns in a food processor. You should have enough paste to spread generously on the entire pork leg.
- Pat the pork dry with paper towels, then spread a thick layer of the garlic peppercorn paste all over the leg.
- Pour half an inch of salt into the bottom of the box. Cover the pork generously with salt; be sure to encrust the meat completely. It should be encased with salt as thickly as possible so no bacteria can live.
- Place the pork in the box, then pour salt on top so it’s covered by an inch.
- Place the lid on top of the ham and a brick or two on top of the lid. Unless you have a very cool cellar, you must place it in a refrigerator for 32 days while the salt draws out the moisture. Turn it occasionally.
- Remove the ham from the refrigerator, empty the box, and shake off any excess salt. Place the ham back in the box with the weighted lid on top. Let it sit on your kitchen counter for about five days.
How to dry your meat
- Rinse the meat carefully with equal parts water and vinegar. You may have to repeat this process once or twice until all the salt is removed.
- Wrap the meat in cheesecloth, then tie and hang it somewhere flies won’t be able to get to it easily. It should hang for at least six to seven months — the longer, the better. You can let it dry for two years if you have the patience.
- Unwrap your prosciutto, debone it, and remove the skin. Slice and eat!
Note: We recommend doing a little research on the proper temperature and humidity for your location and what good and bad mold looks like. This is a solid process, but reading up and educating yourself on the science behind the curing process before trying this at home is good.
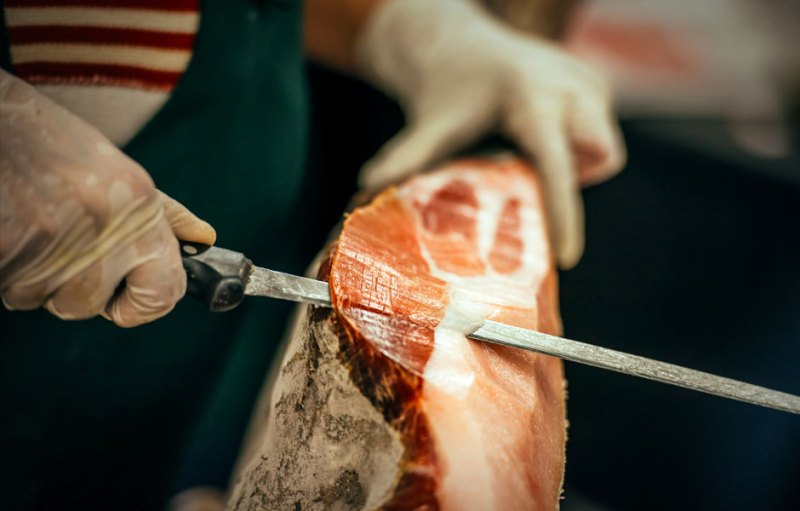
How to slice prosciutto

Unlike a lot of meats that can be sliced in advance (we’re looking at you, bacon), prosciutto is best when it is sliced to order, meaning only slice off what you need to use, and make the slices paper-thin — around 1/16 of an inch. It should be translucent when held up to a light. The reason for this is that it is salt-cured and dried meat. Once prosciutto is sliced, it tends to dry out and get tough very quickly, so it’s best to wait to slice it right before serving it.
While most professional deli counters use industrial meat slicers to get that perfect cut, you can easily slice your own at home. You need a knife with a long, sharp, wide blade; do not use a serrated knife.
Hold the prosciutto by the thinner end and hold it steady against a wooden cutting board. Cut from the top, going against the grain, moving from the skinnier end of the meat to the wider end. Once you’re done, wrap the unsliced proscuitto in plastic wrap and store it in your fridge.
Is prosciutto safe to eat if it’s not cooked?

If you’ve been reading this closely, you may have noticed one thing about the curing process for prosciutto: It’s not cooked, just cured. And you might be wondering if it’s safe to eat since we’ve all heard countless warnings about eating raw or undercooked pork.
According to the USDA, prosciutto is perfectly safe to eat, even if it hasn’t been cooked. That’s because since it is a dry-cured ham, it can be eaten raw because the lengthy curing process draws enough water out of the meat to prevent bacteria from growing.
So throw aside those fears about eating uncooked pork and enjoy a slice (or three) of prosciutto on your next sandwich. You’ll be glad you did!


