
We all have different passions and talents, and that’s a beautiful thing. Some of us are incredible athletes, entrepreneurs, or investors. Some of us have spent our adult lives learning several languages or have learned how to fly airplanes or design skyscrapers. And then there are those of us who’ve dedicated our careers and our love to food. Some of us feel like kids at Disneyland when walking into a grocery store with a menu to plan. And while we’re certainly not the ones to build you a house or plan your retirement, what we can offer is, arguably, even better, which is learning how to cook.
While Uber Eats and DoorDash are life-saving options some days, learning a few basic kitchen techniques is a pretty important life skill. Knowing what you’re doing in the kitchen is one of the sexiest things you can master, so even if you have no interest in using your oven for anything but storage, know that being a good cook, if nothing else, is pretty hot.
Of course, not everyone is cut out to be the next Wolfgang Puck or Julia Child. We don’t all have the desire to spend hours in the kitchen, elbow-deep in bacon fat or frosting, whipping up the newest culinary TikTok trend. But eating, cooking, drinking, and celebrating life with these things is beautiful. And with a little patience, simple cooking know-how can evolve into a lifelong passion.
And if not, it’s always good to know how to bake a potato. So listen up.

1. How to hold a knife
Holding a knife properly is arguably one of the most important cooking skills one can master in the kitchen. There are several reasons for this. Firstly, you’re much more likely to avoid an injury. A proper hold on your knife will also mean more efficiency and speed when chopping ingredients and more aesthetically pleasing cuts.
The grip you want to master is called the “pinch grip.” Do this by pinching the heel of the blade with your thumb and index finger, leaving only your middle, ring, and pinky fingers to wrap around the handle. If you’re accustomed to holding your knife another way, this method may take a little getting used to, but you’ll soon find how much more control you have over your knife.
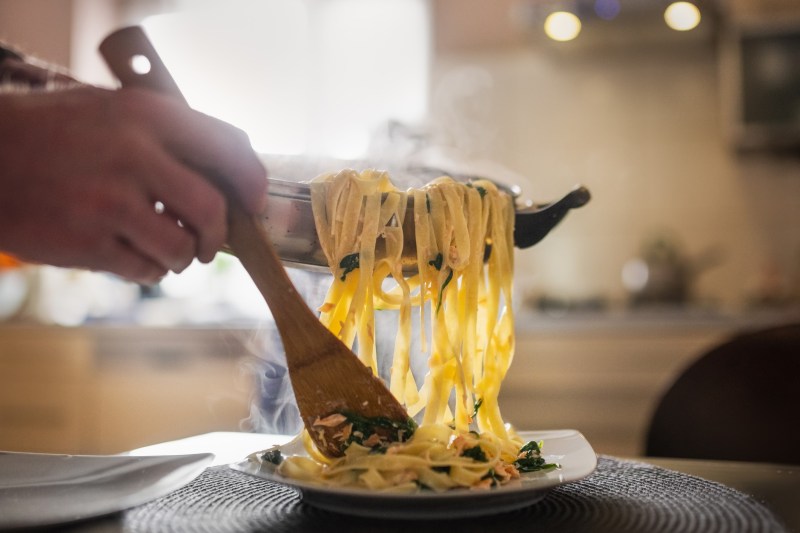
2. How to properly cook pasta
Let’s start with the basics here. You’ve probably heard the term al dente, but you may not know what it means. It’s okay. No one’s here to judge. Directly translated from Italian, al dente means “to the tooth”, meaning that your pasta should have a bite to it — none of this cook-it-’til-it-becomes-shapeless-goo nonsense. There’s truly nothing more heartbreaking than a flabby, mushy, lifeless bowl of pasta. As a general rule, cook your boxed pasta for 2 to 3 minutes less than the instructions indicate. This is especially true if you’ll be (and you should be!) finishing your pasta in the sauce you’ll be serving with it.
Pasta should always finish cooking in its accompanying sauce so that the two ingredients are combined in the hot pan and then plated as one. Pasta and sauce should never meet for the first time on the plate, despite what so many of us grew up with: Boiled noodles with a generous pouring of Prego straight from the jar.
You’re better than that.

3. How to make a basic cocktail
These days, many traditional, classic culinary rules have been tossed right out the window, making way for delicious fusion cuisine, crazy-cool techniques like molecular gastronomy, and endless texture and flavor combinations. And as someone who went to one of the strictest and most traditional culinary schools in the world, I am absolutely here for it!
Never having been much of a rule follower myself, I generally don’t like being told that something must be prepared one particular way or another. However, in certain dishes and drinks, guidelines are tremendously helpful. In fact, they can help get the creative juices flowing when we know, for example, that a classic cocktail is made up of three components: A base, a modifier, and a flavoring. Bartenders shine in the details, but in order to get there, we have to understand the basic components.
The base of a cocktail is your spirit, such as gin, whiskey, rum, vodka, or tequila. The modifier is the ingredient that gives your cocktail its main flavor and texture. Examples include fruit juices, sodas, vermouth, coffee, cream, etc. The last component is a flavoring, such as simple syrups, grenadine, or bitters.
Within these guidelines, feel free to go crazy and get as creative as your tipsy heart desires.
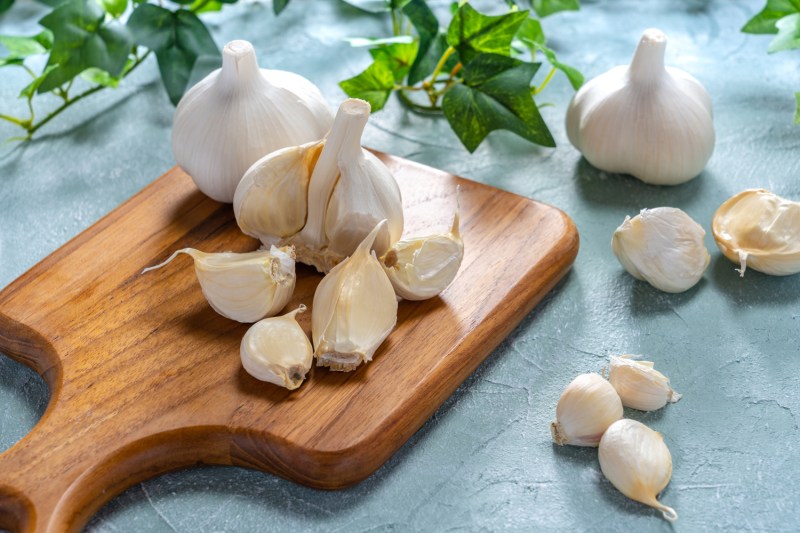
4. How to crush garlic
Garlic is one of the greatest things in existence. It just is. Its umami, slightly sweet, slightly spicy notes belong in almost any dish we can think of, as its versatility is remarkable. Raw, it’s pungent and bold, a beautiful kick to things, like pestos, salsas, and salad dressings. When cooked, garlic tames down to a softer, nuttier, rounder flavor, accenting nearly any savory dish in the most delicious way.
But jeez, It’s hard to get into these little suckers if you don’t know what you’re doing.
Recipes call for garlic in any number of ways: Minced, chopped, crushed, whole. The one consistent thing you must always do is remove its papery skin. The easiest way to go about this is to crush the cloves. You do this by placing the garlic clove on a cutting board, under the blade of your knife, and carefully but firmly pressing down on the blade to crush it. The paper should peel away relatively easily after this, and then you can prepare the garlic however the recipe requires.

5. How to bake a potato
Give us a potato and we’ll show you about a hundred different ways to prepare it. But there’s just something about a good old-fashioned, classic baked potato that everyone adores. The crispy skin, the steamy, pillowy inside, ready to burst open and be topped with absolutely anything from butter to sour cream to cheese to bacon. It’s truly just happiness in an ugly little brown package. If you haven’t yet mastered the art of the perfect baked potato, listen up, because this simple method will come in handy on countless occasions.
To bake the perfect potato, set your oven to 400 degrees Fahrenheit. While the oven is preheating, give your potatoes a good scrubbing. They do, after all, grow in the ground, and they’re often pretty grimy even after a stay at the grocery store. After you’ve washed them thoroughly, pierce each one several times with a fork. This will allow steam to escape during baking, saving you from a potential potato explosion.
The next step not to take is wrapping them in foil. This is a popular choice, but it’s a bad one. Wrapping your potatoes in foil will prevent them from developing a crisp skin. It also keeps all of the moisture inside, causing your potatoes to actually steam cook instead of baking. This will give you a much mushier potato, so skip the foil.
Depending on the size of your spud, bake for about 50 minutes to an hour. You’ll know it’s ready when you can easily insert a knife into the center.
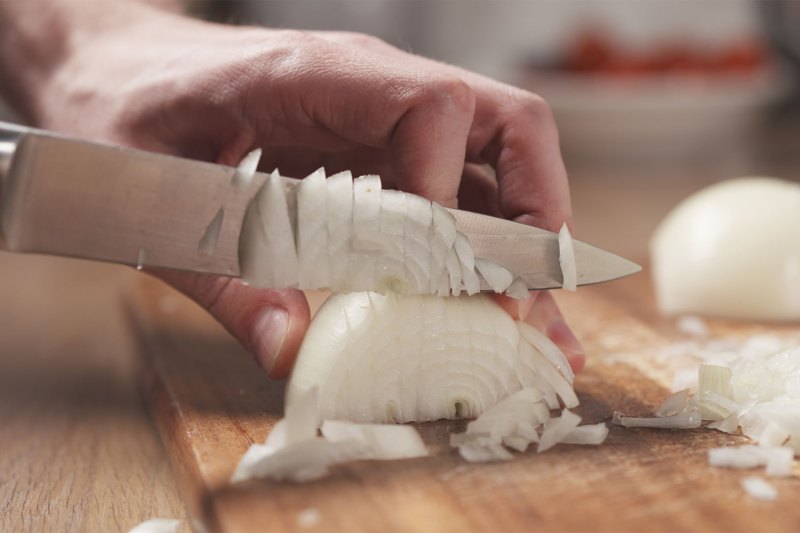
6. How to chop an onion
Onions are in everything, and while we may be in tears over it, you won’t hear any complaints from us. They’re the start of every great dish because of their sweet and tangy flavor and their ability to bulk up both flavor and texture in any savory application. While there are many ways to cut an onion — julienne, rings, any number of dice sizes — this is the most basic, most commonly used method you’ll use.
An onion has two ends: The stem and the root. The root is the end that has a mass of little strings (roots) sticking out. The stem is the looser, papery end. Remove the stem end, then slice the onion vertically (end to end) in half. Peel the papery onion skin away and discard.
- Starting with one onion half, lay it flat side down on the cutting board, holding the top firmly with your non-knife hand. Make one to three (depending on onion size) horizontal slices through the onion, working side to side, without cutting through the root.
- Changing the angle of your cuts, move the blade to the top of the onion and make four to five vertical cuts from top to bottom, moving from one end to the other.
- Finally, changing the angle of the cuts once more, move the blade to make crosswise cuts, resulting in small, perfectly shaped pieces that will fall away from the onion.
- Repeat with the second half of the onion, and remember — there’s no shame in crying.
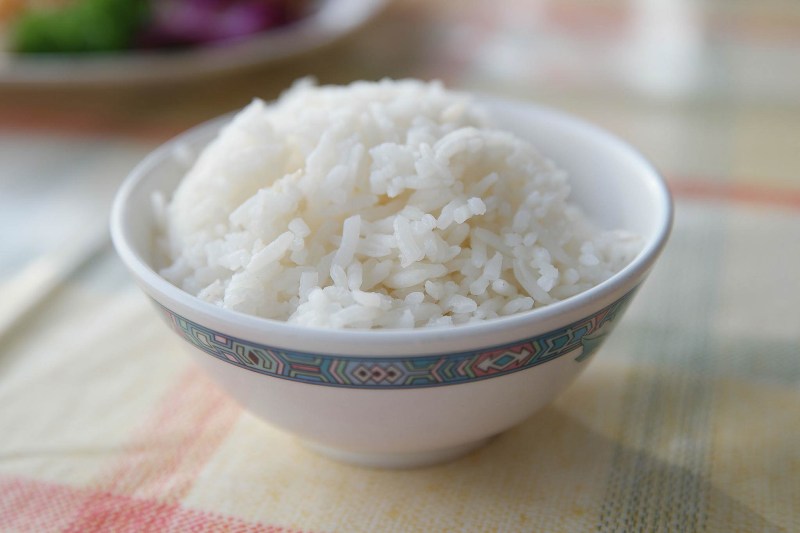
7. How to cook rice without a rice cooker
Rice cookers have certainly made cooking rice a breeze. A little rice, a little water, a flip of a switch, and bam — perfectly cooked rice every time. But what if you don’t have a rice cooker, or it’s broken, or your kid used it to melt Play-Doh? What if you realize that rice is the easiest thing ever to make without a rice cooker and it’s nothing but another needless appliance?
Making rice without a rice cooker is a very simple task you should know how to do. There are lots of special rice dishes — pilaf, risotto, fried rice, paella — that take a bit more finesse, but making a simple bowl of white rice is very easy. Rice is also extremely useful as a base or accompaniment to any number of dishes. Here’s how to do it.
First, understand water-to-rice ratios. We’ve found that a 1 1/2 to 1 ratio is ideal for making rice on the stove. That means you’ll need 1 1/2 cups of water for every 1 cup of rice.
For 1 1/2 cups of rice, put rice and 3 cups of water in a saucepan and bring to a boil over medium-high heat. Once the water is boiling, reduce the heat to a low simmer and cover the pot with a lid. Continue to cook on low for 12 to 14 minutes until all of the water has been absorbed.
When the water has been absorbed, remove the rice from the heat and let rest for another 5 to 10 minutes with the lid on the pot. Then fluff with a fork and serve.
See how easy that was? No rice cooker required.
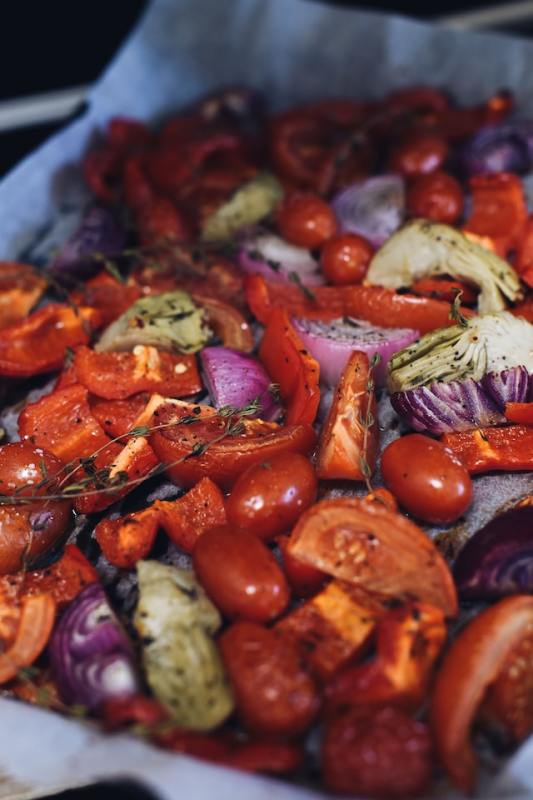
8. How to roast vegetables
Roasting vegetables is another comically easy task with absolutely delicious results. When vegetables are roasted at a high temperature, their natural sugars are released and they become the sexiest versions of themselves. This tried and true method works for almost any vegetable you can imagine; you’ll only need to adjust your timing.
To roast vegetables perfectly, cut them all into similarly sized pieces (yes, you can and should mix and match different, similarly textured vegetables). Cutting the pieces into sizes about one or two inches wide works well in most cases. If you’re mixing a large variety of differently textured vegetables, you can start roasting the pieces which will take longer, then add the softer ones to the same pan later.
Spread the vegetable pieces on a sheet pan covered in foil or parchment paper. Drizzle a generous amount of olive oil over the vegetables and season with salt, pepper, and any other spices that pair well with your dish. Using your hands, toss the mixture together and spread the vegetable pieces in an even layer.
- Bake at 425 degrees Fahrenheit for 15 to 45 minutes, depending on your vegetables.
- For root vegetables like potatoes, carrots, and beets, roasting time should take around 30 to 45 minutes.
- Vegetables like broccoli, brussels sprouts, and cauliflower will take between 20 and 40 minutes.
- Soft and/or thin vegetables like bell peppers, zucchini, green beans, and asparagus will take 20 to 25 minutes.
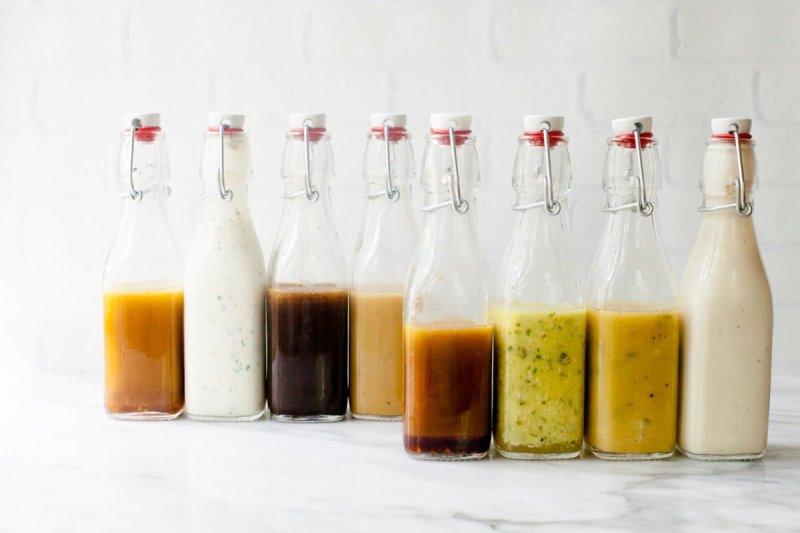
9. How to make a basic salad dressing
Much like other items on this list, there are degrees of complexity in varying salad dressings. You can always drizzle a little oil and vinegar over your greens and call it a day. There’s no shame in that at all. In fact, it’s delicious, and if that’s all you have time for, it’ll do very nicely. If you’d like a bit more emulsification in your life, whipping up a little bottle of your special salad dressing takes about a minute and is so wonderful to have in the fridge. With a little mustard, oil, garlic, lemon juice, salt, and pepper, you’re two shakes away from your own homemade salad dressing.
Ingredients
- 3 tablespoons olive oil
- 1/2 tablespoon Dijon mustard
- 1 garlic clove, minced
- 1 tablespoon lemon juice
- 1/2 teaspoon salt
- 1/4 teaspoon freshly ground black pepper
In a small bowl, simply whisk together the mustard and oil until they emulsify. Add lemon juice, garlic, salt, and pepper.
Our favorite time to make this dressing is when there’s a bottle of Dijon that’s on its last legs. If you’re scraping the sides, it’s time to make dressing. Simply add all of the other ingredients to the mustard bottle and give it a good shake, then you’re good to go.

10. How to cook a perfect steak
There’s endless debate around the best way to cook a steak, and let’s be real — they’re all delicious. Is there anything better than a big, juicy, fatty, savory steak hot off the . . . well, anything, cooked to perfection? Nope. There just isn’t. And while we’re big fans of grills and open flames, not everyone has access to these cooking methods. In our opinion, a simple cast-iron pan makes the best steak anyway.
Anyone can throw a steak in a pan and cook it for a bit. If you’ve got a good piece of meat, chances are it’ll turn out pretty decent. But if you really want to impress, even if it’s just yourself, there are some very simple tips to follow to ensure a decadent steak.
- First, season your steak and bring it to room temperature before cooking. This should take 15 to 30 minutes. Seasoning your meat this early in the process will allow the flavor to penetrate through and tenderize your steak. The resting period is important to ensure that the meat cooks evenly, meaning without hot or cold spots.
- When you’re ready to cook, preheat the cast-iron pan for a few minutes so that it becomes very hot. You want that steak to sizzle when it hits the heat because that sizzle means brown, caramelized flavor and juices staying sealed right where they belong. Sear the steak in canola oil for 2 to 5 minutes per side, depending on the steak cut, size, and your temperature preference.
- While the steak is cooking, add butter to the pan and baste the steak as it cooks. The butter will seep inside the steak and create the most incredible flavor.
- When the steak has reached your preferred temperature, allow it to rest once more before cutting into it. While this step can be torture, it’s crucial to ensure a juicy steak. If the steak is cut too quickly, the juices will come pouring out before they’ve had time to settle into the meat.
- Serve with the baked potato and roasted vegetables you’ve just learned how to make, and get ready for all the compliments.

11. How to properly crack and cook an egg
Chances are you’ve probably cooked eggs in the past, and the chances are you’ve cracked the egg wrong. Now, we know that seems impossible, you take the egg, smack it on the side of the bowl or pan, and it cracks. How hard could it be?
Well, that’s not the proper way to crack an egg. When you use the edge of a bowl or a pan, that can force pieces of the shell back into the egg, and they might also break the yolk. The proper way to crack an egg is to give it a solid smack on a clean, flat surface. Doing it that way results in a clean break that doesn’t drive shell fragments into the egg, and you don’t have to get frustrated fishing them out.
As for properly cooking an egg, the advice is simple: low is the way to go. No matter if you are scrambling, frying, or even making an omelet, cooking the eggs over low heat will let them cook evenly and will keep the eggs from getting rubbery.


