Another Valentine’s Day is upon us, and you’re probably thinking about what to put on the dinner table. Whether you’re flying solo this year, trying to impress that special someone, or hosting a dinner party, we’ve got you covered. Valentine’s Day dinner and dessert are known for being a bit indulgent. Steak and lobster are frequently on the menu, often at the same time. That said, making a delicious Valentine’s Day meal doesn’t have to cost a bunch or take a ton of time. We’ve included recipes for all skill levels and hope that however you celebrate Valentine’s Day, this year is a good one.
Related Articles:
- The 12 Best Valentine’s Day Cocktail Recipes to Make
- Unpacking the Fascinating History of Valentine’s Day
- Best Online Flower Delivery Services for Valentine’s Day

Valentine’s Day Dinner Table Decoration Ideas
Flowers, specifically roses, come to mind for decoration ideas. But chocolate, candy boxes, and candles are also great options. Simple and understated can be nice, but going all out is also fun once in a while. You do you.

Valentine’s Day Family Dinner Ideas
Looking to celebrate Valentine’s Day with the whole family? Don’t worry, these recipes elevate you every night while also being tasty for the whole family.
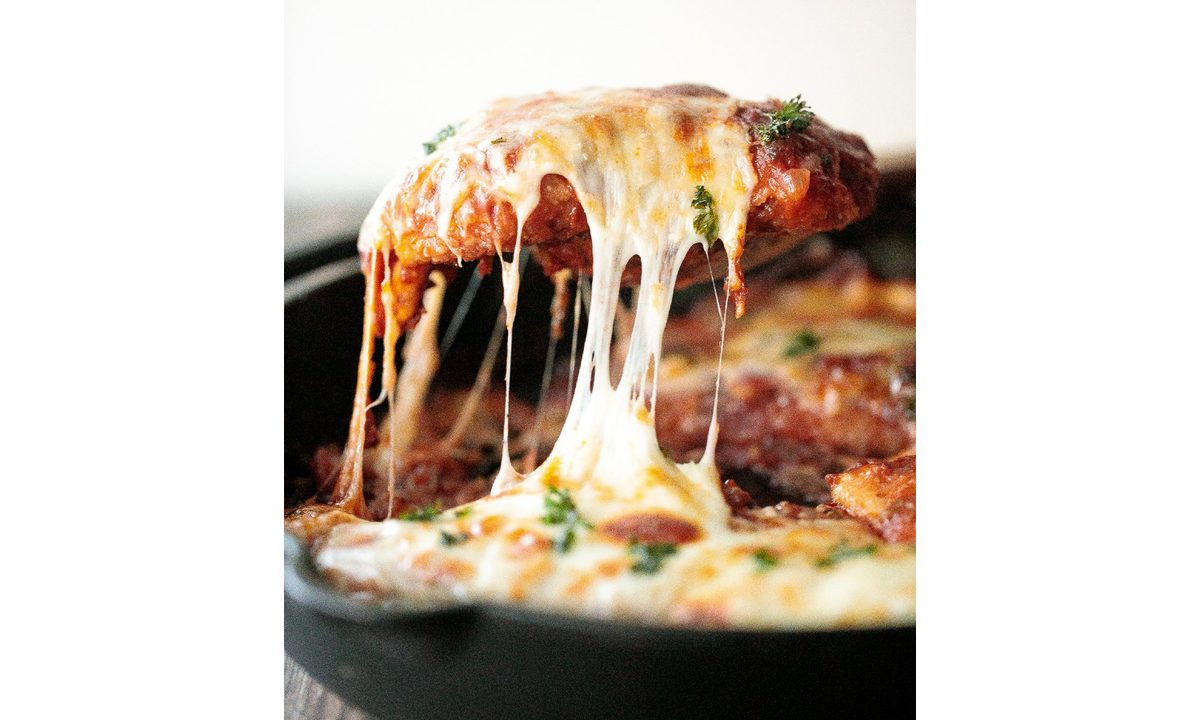
Chicken Parmesan Recipe
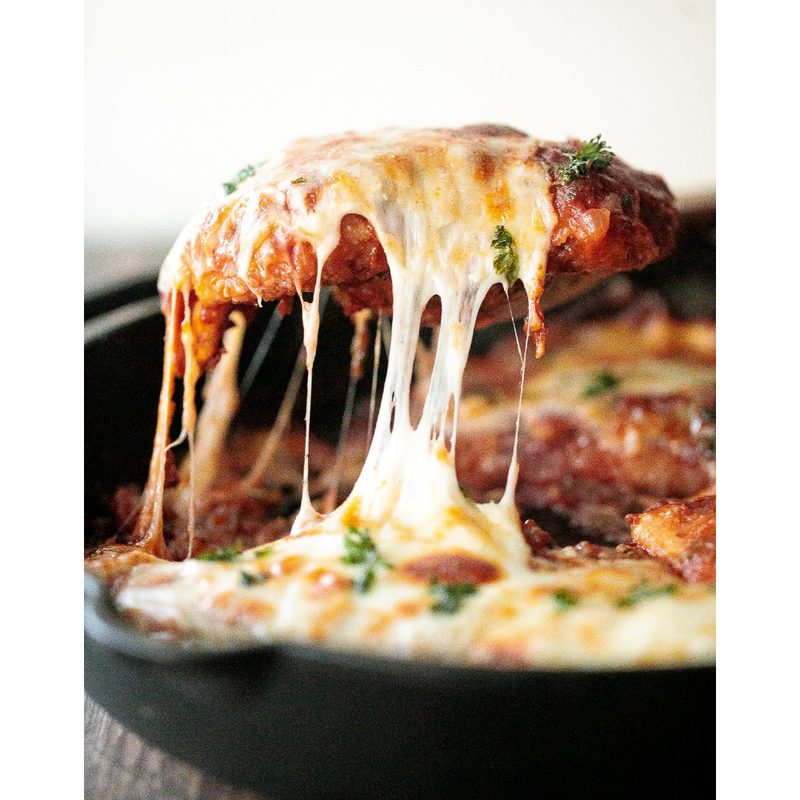
Ahead of Thyme has this great breaded chicken breast smothered in tomato sauce and mozzarella cheese elevates your normal chicken breast and the kids will love it. Serve it was pasta and salad.
Prep Time: 30 minutes
Total Time: 50 minutes
Yield: 5 servings
Ingredients:
For the chicken:
- 2-3 chicken breasts, sliced in half lengthwise
- 2 teaspoons salt, divided
- 2 cups Panko breadcrumbs
- 1/2 cup Parmesan cheese, grated
- 1 tablespoon garlic powder
- 2 eggs, beaten
- 1/3 cup vegetable oil (for pan-frying)
For the sauce:
- 1 cup onion, finely chopped
- 2 tablespoons garlic, minced
- 2 cups tomato sauce
- 2 tablespoons tomato paste
- 1 teaspoon Italian seasoning
- 1/4 cup fresh parsley, chopped
- 1/2 teaspoon salt
For the topping:
- 5 slices of mozzarella cheese
- 1/4 cup Parmesan cheese, grated
- 1 tablespoon fresh parsley, finely chopped
Method:
Prepare the Chicken:
- Preheat oven to 425 F.
- Slice each chicken breast carefully in half lengthwise. Place each halved chicken breast between two sheets of plastic wrap or in a freezer bag. Carefully flatten the chicken breasts with a rolling pin to achieve uniform thickness, about a half-inch thick. Don’t pound the breasts too hard. It could tear them apart.
- Pat dry each breast completely with a paper towel and season with 1 teaspoon salt. Set aside for at least 10 minutes.
- In a shallow plate, whisk together Panko breadcrumbs, Parmesan cheese, garlic powder, and the remaining 1 teaspoon salt. Set aside. Add beaten eggs into another shallow plate.
- Dip both sides of each halved chicken breast into the eggs to evenly coat them, and then dip it into the breadcrumb mixture. The breadcrumbs will stick to the egg wash.
- Heat oil in a non-stick cast-iron skillet over medium-high heat for 2 minutes until the hot oil is sizzling and shimmering. Pan fry the chicken breasts for about 4-5 minutes on each side until golden and crispy. Set aside on a plate. The chicken should be almost fully cooked and the internal temperature should reach above 155 F.
Prepare the Sauce:
- Remove all but 2 tablespoons of the hot oil in the skillet. Add onions and sauté for 2 minutes until soft and tender. Add garlic and sauté for another 2 minutes until fragrant.
- Add tomato sauce, tomato paste, Italian seasoning, parsley, and salt. Stir well to combine and bring the sauce to a simmer. Turn to low heat and let it simmer for 5 minutes. Remove from heat and transfer sauce into a bowl.
Assemble and Bake:
- In the same skillet, or in another cast-iron skillet or baking dish, evenly spread 1/2 cup of the sauce on the bottom. Place the chicken breasts spaced evenly apart over the sauce.
- Cover each breast with 1/4 cup sauce, and top each breast with a slice of mozzarella cheese and 1 tablespoon Parmesan cheese. Sprinkle finely chopped parsley on top.
- Bake in the preheated oven at 425 F for 15-20 minutes until the cheese melts and turns golden brown.
- Serve with spaghetti and garnish with more parsley on top.
Heart-Shaped Pizza Recipe

Food Network knows it’s no secret that kids love pizza. If you’re looking to make this family classic a little more Valentine’s Day-themed, simply shape the dough like a heart and add your favorite toppings.
Prep Time: 25 minutes
Total Time: 1 hour 40 minutes
Yield: 2 servings
Ingredients:
- 1 pound store-bought pizza dough
- 1 tablespoon olive oil, plus more for brushing
- 16 slices pepperoni
- All-purpose flour, for dusting
- 1/2 cup prepared pizza sauce
- 1 cup shredded low-moisture mozzarella
Method:
- Put the pizza dough in a medium bowl and coat well with the olive oil. Cover with plastic wrap and allow to sit at room temperature for 1 hour.
- Meanwhile, put a large inverted baking sheet on the lowest oven rack and preheat the oven to 500 F.
- Fold a pepperoni slice in half and use a pair of kitchen shears to trim the edges into the shape of half of a heart. (When you unfold the pepperoni slice, it will be a whole heart.) Repeat this process with the remaining pepperoni, then set aside.
- Divide the pizza dough into two balls. On a lightly floured surface, stretch one ball of dough into a 10-inch round. Transfer the dough to a piece of parchment paper, then slide the parchment and dough onto a second inverted baking sheet. Use a pair of kitchen shears or a paring knife to cut the pizza dough into the shape of a large heart, discarding the dough scraps.
- Spread half of the sauce on the dough in a thin layer and scatter half of the mozzarella on top. Top with half of the pepperoni slices. Use a pastry brush to brush the exposed edges of the dough with olive oil. Carefully slide the parchment onto the preheated baking sheet and bake until the crust is golden brown and the cheese is bubbling, 6 to 8 minutes. Let cool 1 to 2 minutes before slicing. Repeat to make a second pizza.
Valentine’s Day Romantic Dinner Ideas
Steakhouse Sheet Pan Dinner for Two
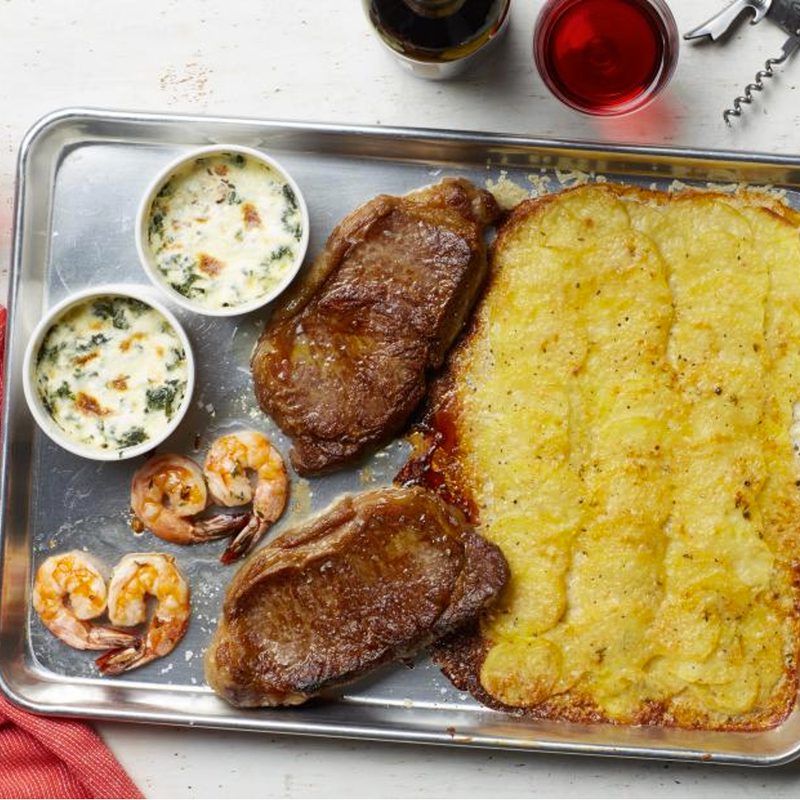
Food Network has this easy, somewhat affordable, and delicious sheet pan dinner that is sure to satisfy.
Prep Time: 30 minutes
Total Time: 1 hour 15 minutes
Yield: 2 servings
Ingredients:
- 2 tablespoons unsalted butter, melted, plus more for the sheet pan
- 4 tail-on jumbo shrimp, peeled and deveined
- 2 teaspoons fresh thyme leaves
- 3 small cloves garlic, minced
- Kosher salt and freshly ground black pepper
- 1/4 cup grated Parmesan
- 2/3 cup heavy cream
- 1 pound Yukon gold potatoes (about 6), sliced into 1/8-inch rounds
- 2 ounces cream cheese, at room temperature
- One 10-ounce package frozen spinach, thawed and squeezed completely dry
- 2/3 cup shredded Gruyère (about 5 ounces)
- Two 8-ounce New York strip steaks (1 to 1 1/2 inches thick)
Method:
- Position an oven rack in the top third of the oven and preheat to 450 F. Lightly grease a third of an 18 x 13-inch sheet pan with butter.
- Toss the shrimp with the melted butter, 1 teaspoon of the thyme, a third of the minced garlic, 1/2 teaspoon salt, and a few grinds of pepper in a medium bowl until well coated; set aside.
- Mix the Parmesan, 1/3 cup of the heavy cream, remaining 1 teaspoon thyme, half the remaining garlic, 1/2 teaspoon salt, and a few grinds of pepper in a small bowl.
- Arrange half of the potato slices in a single, overlapping layer on the buttered part of the sheet pan and pour the heavy cream mixture over the top. Top with the remaining potato slices. Cover the potatoes with foil and bake until tender when pierced with a fork, 15 to 17 minutes.
- Whisk together the cream cheese, remaining 1/3 cup heavy cream, remaining garlic, and 1/4 teaspoon salt in a medium bowl until smooth. Fold in the spinach until well coated. Divide the mixture between two 4-inch ramekins and press the spinach down so that it is flat and the cream mixture is pooling a bit on top.
- Remove the pan from the oven, remove the foil and sprinkle the potatoes with the Gruyère. Put the steaks down the middle of the pan and sprinkle generously with salt and pepper. Put the ramekins on one end of the empty third of the pan so that they are side by side.
- Bake until an instant-read thermometer inserted in the middle of the steak registers 95 F, 12 to 14 minutes. Remove the pan from the oven and turn on the broiler. Create two hearts with the shrimp on the pan beside the ramekins by connecting the tails. Broil until the steaks start to turn brown in some spots, an instant-read thermometer inserted in the middle of the steak reaches 125 F (for medium rare), the shrimp are opaque and the cheese on the potatoes turns golden and starts to crisp, 3 to 4 minutes. Let rest 5 to 10 minutes. Slice and serve the steak on plates alongside the shrimp, potatoes, and creamed spinach.
Red Wine Risotto with Peas
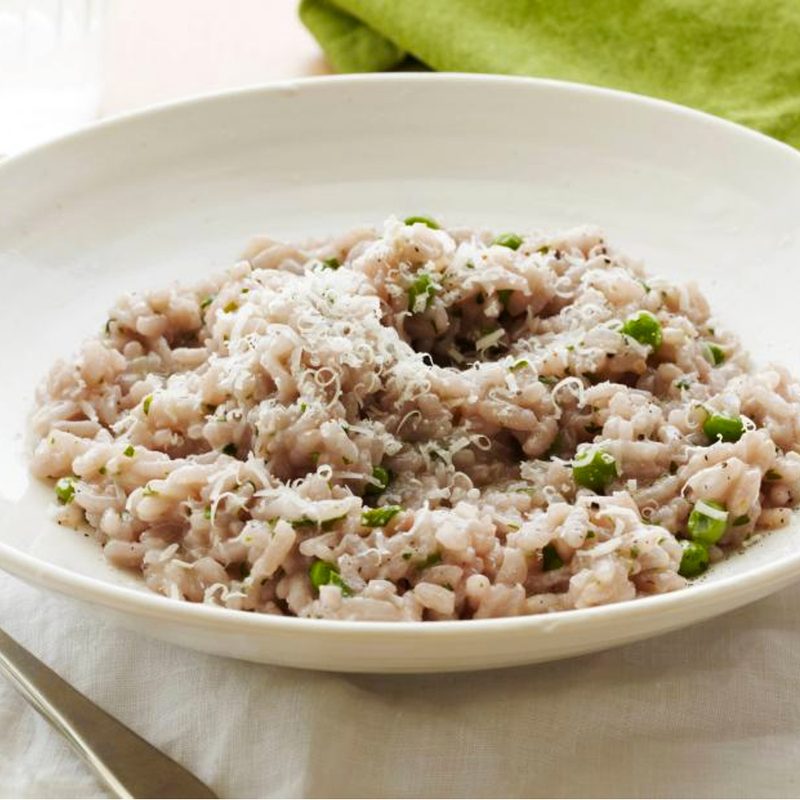
The creamy risotto from Food Network is made with red wine and savory chicken broth for a sophisticated meal. Swap out vegetable broth for a vegetarian take.
Prep Time: 10 minutes
Total Time: 40 minutes
Yield: 4 servings
Ingredients:
- 3 1/2 cups canned low-salt chicken broth
- 3 tablespoons unsalted butter
- 1 cup finely chopped onion
- 2 garlic cloves, minced
- 1 cup arborio rice or medium-grain white rice
- 1/2 cup dry red wine
- 1/3 cup frozen peas, defrosted, optional
- 1/4 cup chopped fresh Italian parsley leaves
- 1/2 cup grated Parmesan, plus additional for garnish
- Salt and freshly ground black pepper
Method:
- Bring the broth to a simmer over medium-high heat. Cover the broth and keep it warm over very low heat.
- Melt the butter in a heavy large saucepan over medium heat. Add the onion and saute until translucent, about 8 minutes. Stir in the garlic and saute for 30 seconds. Stir in the rice and cook for about 2 minutes until the rice is toasted. Add the wine and stir until it is absorbed, about 1 minute. Add 3/4 cup of hot broth; simmer over medium-low heat until the liquid is absorbed, stirring often, about 6 minutes. Repeat, adding 3/4 cup of hot broth two more times, stirring often, about 12 minutes longer. At this point, the risotto can be made 4 hours ahead. Refrigerate the risotto (the rice will still be firm) and remaining broth, uncovered, until cool, then cover and keep them refrigerated until ready to proceed.
- Bring the remaining broth to a simmer, then cover and keep it warm over very low heat. Stir 3/4 cup of hot broth into the partially cooked risotto over medium heat until the broth is absorbed and the risotto is hot, about 3 minutes. Add the remaining broth and simmer until the rice is just tender and the mixture is creamy, about 5 minutes longer. Stir in the peas and parsley. Add the 1/2 cup of Parmesan. Season to taste with salt and pepper. Spoon the risotto into bowls. Sprinkle additional cheese over and serve.
Ultimate Beef Wellington
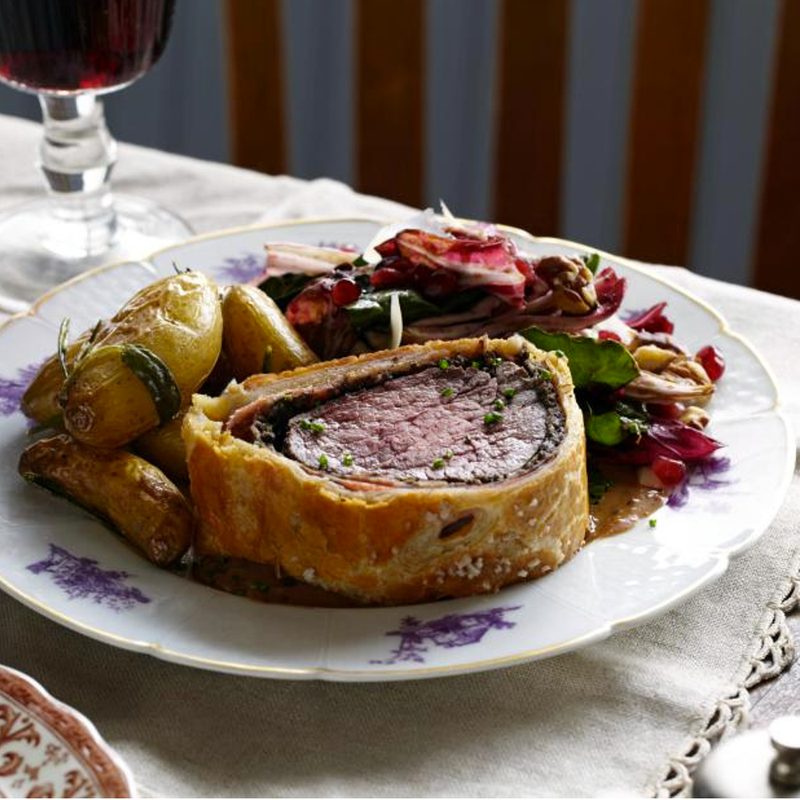
This recipe from Food Network’s Tyler Florence tackles the classic beef wellington. Beef tenderloin wrapped in Proscuitto and a crispy pastry crust. Though it’s a bit involved, get it right and this one is sure to impress.
Prep Time: 1 hour
Total Time: 6 hours
Yield: 6-8 servings
Ingredients:
For the Duxelles:
- 3 pints (1 1/2 pounds) white button mushrooms
- 2 shallots, peeled and roughly chopped
- 4 cloves garlic, peeled and roughly chopped
- 2 sprigs fresh thyme, leaves only
- 2 tablespoons unsalted butter
- 2 tablespoons extra-virgin olive oil
- Kosher salt and freshly ground black pepper
For the Beef:
- One 3-pound center-cut beef tenderloin (filet mignon), trimmed
- Extra-virgin olive oil
- Kosher salt and freshly ground black pepper
- 12 thin slices prosciutto
- 6 sprigs of fresh thyme, leaves only
- 2 tablespoons Dijon mustard
- Flour, for rolling out puff pastry
- 1 pound puff pastry, thawed if using frozen
- 2 large eggs, lightly beaten
- 1/2 teaspoon coarse sea salt
- Minced chives, for garnish
- Green Peppercorn Sauce, recipe follows
- Roasted Fingerling Potatoes with Fresh Herbs and Garlic, recipe follows
- Warm Wilted Winter Greens, recipe follows
Green Peppercorn Sauce:
- 2 tablespoons olive oil
- 2 shallots, sliced
- 2 cloves garlic, peeled and smashed
- 3 sprigs fresh thyme, leaves only
- 1 cup brandy
- 1 box beef stock
- 2 cups cream
- 2 tablespoons grainy mustard
- 1/2 cup green peppercorns in brine, drained, brine reserved
- Roasted Fingerling Potatoes with Fresh Herbs and Garlic:
- 2 pints fingerling potatoes
- 2 sprigs fresh rosemary
- 2 to 3 sprigs fresh sage
- 3 sprigs fresh thyme
- 6 cloves garlic, left unpeeled
- 3 tablespoons extra-virgin olive oil, plus for sheet pan
- Salt and pepper
Warm Wilted Winter Greens:
- 1/4 cup honey
- 1/2 cup balsamic vinegar
- 1/2 pint walnuts, for garnish
- 3 bunches assorted winter greens (such as Swiss chard, radicchio, or escarole), washed, stemmed, and torn into pieces
- 1 tablespoon grainy mustard
- Extra-virgin olive oil
- 1/2 cup pomegranate seeds, for garnish
- Parmesan shavings, for garnish
- 1 shallot, chopped, for garnish
Method:
- To make the Duxelles: Add mushrooms, shallots, garlic, and thyme to a food processor and pulse until finely chopped. Add butter and olive oil to a large saute pan and set over medium heat. Add the shallot and mushroom mixture and saute for 8 to 10 minutes until most of the liquid has evaporated. Season with salt and pepper and set aside to cool.
- To prepare the beef: Tie the tenderloin in four places so it holds its cylindrical shape while cooking. Drizzle with olive oil, then season with salt and pepper and sear all over, including the ends, in a hot, heavy-based skillet lightly coated with olive oil — about 2 to 3 minutes. Meanwhile, set out your prosciutto on a sheet of plastic wrap (plastic needs to be about a foot and a half in length so you can wrap and tie the roast up in it) on top of your cutting board. Shingle the prosciutto so it forms a rectangle that is big enough to encompass the entire filet of beef. Using a rubber spatula, cover evenly with a thin layer of duxelles. Season the surface of the duxelles with salt and pepper and sprinkle with fresh thyme leaves. When the beef is seared, remove from heat, cut off twine, and smear lightly all over with Dijon mustard. Allow to cool slightly, then roll up in the duxelles covered prosciutto using the plastic wrap to tie it up nice and tight. Tuck in the ends of the prosciutto as you roll to completely encompass the beef. Roll it up tightly in plastic wrap and twist the ends to seal it completely and hold it in a nice log shape. Set in the refrigerator for 30 minutes to ensure it maintains its shape.
- Preheat oven to 425 F.
- On a lightly floured surface, roll the puff pastry out to about a 1/4-inch thickness. Depending on the size of your sheets, you may have to overlap two sheets and press them together. Remove beef from refrigerator and cut off plastic. Set the beef in the center of the pastry and fold over the longer sides, brushing with egg wash to seal. Trim ends if necessary then brush with egg wash and fold over to completely seal the beef, saving ends to use as a decoration on top if desired. Top with coarse sea salt. Place the beef seam side down on a baking sheet.
- Brush the top of the pastry with egg wash, then make a couple of slits in the top of the pastry using the tip of a paring knife — this creates vents that will allow the steam to escape when cooking. Bake for 40 to 45 minutes until pastry is golden brown and beef registers 125 F on an instant-read thermometer. Remove from oven and rest before cutting into thick slices. Garnish with minced chives, and serve with Green Peppercorn Sauce, Roasted Fingerling Potatoes with Fresh Herbs and Garlic, and Warm Wilted Winter Greens.
- Green Peppercorn Sauce: Add olive oil to pan after removing beef. Add shallots, garlic, and thyme; saute for 1 to 2 minutes, then, off heat, add brandy and flambe using a long kitchen match. After flame dies down, return to the heat, add stock and reduce by about half. Strain out solids, then add 2 cups cream and mustard. Reduce by half again, then shut off heat and add green peppercorns.
- Roasted Fingerling Potatoes with Fresh Herbs and Garlic: Preheat oven to 500 F and place a baking sheet inside to heat. Add potatoes, rosemary, sage, thyme, and garlic to a medium bowl. Drizzle with olive oil, and season with salt and pepper. Remove sheet pan from oven, lightly coat with olive oil, and pour potatoes onto pan. Place potatoes in oven and reduce heat to 425 F. Roast for 20 minutes, or until crispy on outside and tender on inside.
- Warm Wilted Winter Greens: Cook honey and balsamic together over medium-high heat in a large saute pan, about 5 minutes. Toast walnuts in a small skillet; set aside to cool. Pile greens on a platter. Stir mustard into balsamic-honey dressing, then whisk in about 1 cup extra-virgin olive oil; pour over greens. Season greens with salt and pepper and garnish with walnuts, pomegranate seeds, shavings of Parmesan, and shallot.
- Use extreme caution when igniting alcohol. Remove the pan from the heat source before adding the alcohol. Pour the alcohol into the pan and carefully ignite with a match or click lighter. Return the pan to the heat and gently swirl to reduce the flames.
Citrus-Roasted Salmon
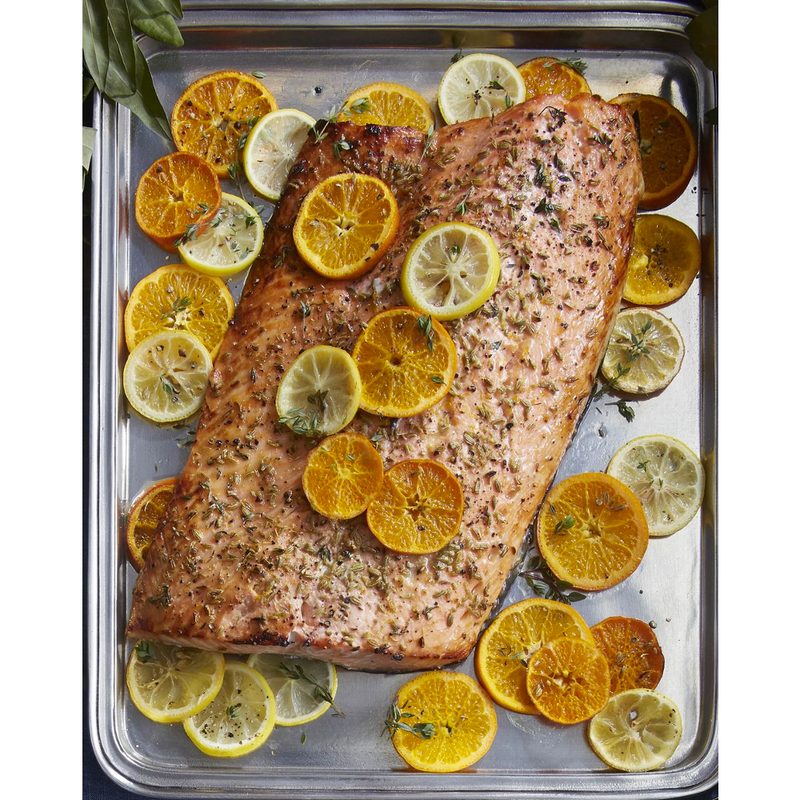
Country Living’s delicious salmon combines citrus and thyme for a tender and juicy star of the show. Pair with couscous or rice, roasted veggies, or a salad.
Prep Time: 15 minutes
Total Time: 40 minutes
Yield: 8 servings
Ingredients:
- 3 clementines, divided
- 1 lemon, sliced
- 8 sprigs thyme, plus 1 tablespoon thyme leaves
- 1 (3-pound) skin-on salmon fillet
- 1 1/2 tablespoons pure honey
- 1 tablespoon fennel seeds, crushed
- Kosher salt and freshly ground black pepper
Method:
- Preheat oven to 425 F. Slice 1 clementine. Arrange sliced clementine, lemon, and thyme sprigs in center of a baking sheet. Top with salmon, skin side down.
- Grate zest from 1 clementine into a measuring cup, then squeeze in juice from both remaining clementines (you should get about 1/4 cup). Add honey and whisk until dissolved. Brush salmon with half of clementine mixture, then sprinkle with fennel and thyme leaves. Season with salt and pepper. Roast 10 minutes.
- Brush salmon with remaining juice mixture. Roast until barely opaque throughout, 12 to 15 minutes.
Valentine’s Day Dinner Party Ideas
Hosting a group of people? These ideas are great for feeding small and large groups.
Prosciutto, Brie, and Apricot Crostini
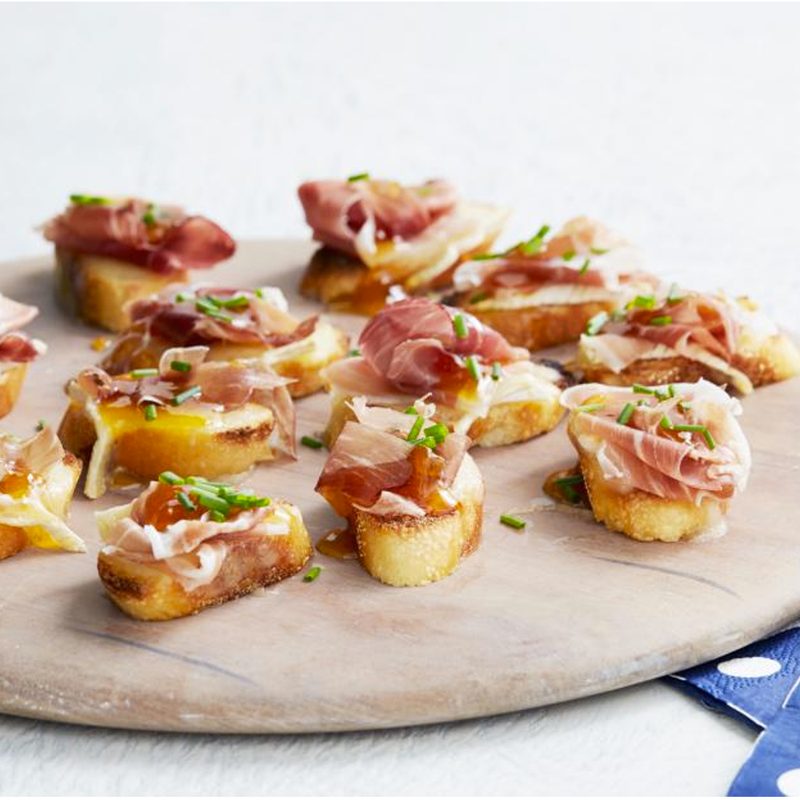
To start off the party, these elevated crostinis from Food Network will please guests.
Prep Time: 15 minutes
Total Time: 15 minutes
Yield: 8 crostinis
Ingredients:
- 1 baguette, cut diagonally into 1/4-inch slices
- 8 ounces Brie
- 4 ounces thinly sliced prosciutto (about 6 slices), cut crosswise into 1/3-inch-wide ribbons
- 1/4 cup apricot jam
- 1 tablespoon chopped chives
Method:
- Preheat the oven broiler. Put the baguette slices on a baking sheet lined with foil. Cut the Brie into 1/4-inch-thick slices and top each piece of bread with a slice. Broil until the cheese melts, 1 to 2 minutes.
- Top each cheese toast with some prosciutto and a dollop of apricot jam and a sprinkle of chives.
Paella
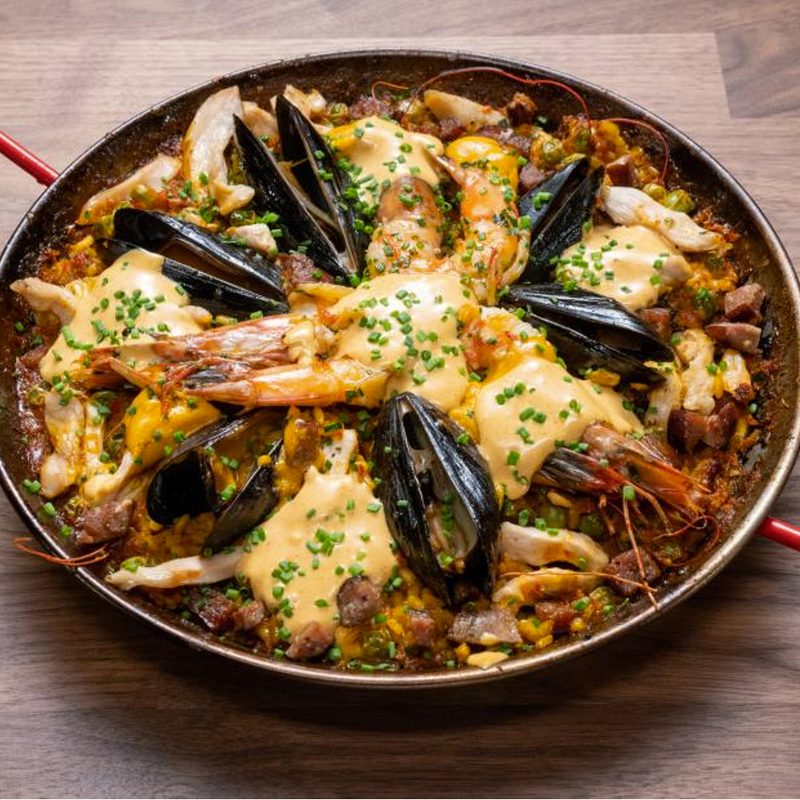
Food Network’s paella is a surf-and-turf dish that combines chicken, sausage, shrimp, and veggies.
Prep Time: 1 hour 5 minutes
Total Time: 1 hour 35 minutes
Yield: 6 servings
Ingredients:
- 4 cups chicken broth
- 1/4 teaspoon saffron threads
- Olive oil, for cooking
- 1/2 pound andouille sausage, sliced into 1/2-inch pieces
- 1 chicken breast, medium diced
- Kosher salt
- 1/2 Spanish onion, small diced
- 4 cloves garlic, minced
- 1 teaspoon pimenton
- 1 green bell pepper, small diced
- 1 red bell pepper, small diced
- 2 cups Bomba rice
- One 15-ounce can crushed tomatoes
- 1/2 cup dry white wine
- 1/2 cup fresh or frozen peas
- 6 large shrimp (size U10), shells and tails on
- 12 mussels, cleaned
- 1/2 bunch fresh parsley, roughly chopped
- 1 lemon, cut into wedges
Method:
- Heat chicken broth in a small pot.
- Add saffron to a small bowl and pour in about 3 tablespoons of the warm chicken broth. Allow to steep until ready to use.
- Heat a 16-inch paella pan over medium heat. Add olive oil to coat. Add andouille sausage and sear until golden brown on all sides, then remove from the pan and set aside. Add the chicken and sprinkle with salt. Sear on all sides until golden brown (chicken doesn’t need to be cooked through; it will continue to cook later). Remove chicken and set aside. Add the onions to the pan and cook until translucent, about 4 minutes. Add the garlic and pimenton and cook until just translucent and soft, about 2 minutes. Add the bell peppers and saute until they begin to soften, a few minutes. Add the saffron broth and stir to combine. Add the rice and stir to combine. Add the tomatoes and white wine, then bring to a boil. Add the remaining hot broth and bring to a simmer. Reduce heat to low and allow rice to cook and liquid to be absorbed, about 20 minutes.
- Stir in the peas, chicken, and sausage. Sprinkle with salt. At this point, it is important to stop stirring and allow the bottom to crisp up. That’s the best part! Arrange the shrimp and mussels on top and cook; turn shrimp after 7 minutes. Continue to cook until shrimp have turned pink and mussels have opened, about 3 minutes more. Remove paella from the stove and garnish with parsley and lemon wedges. Serve out of the paella pan and share with friends.
Baked Caprese Chicken
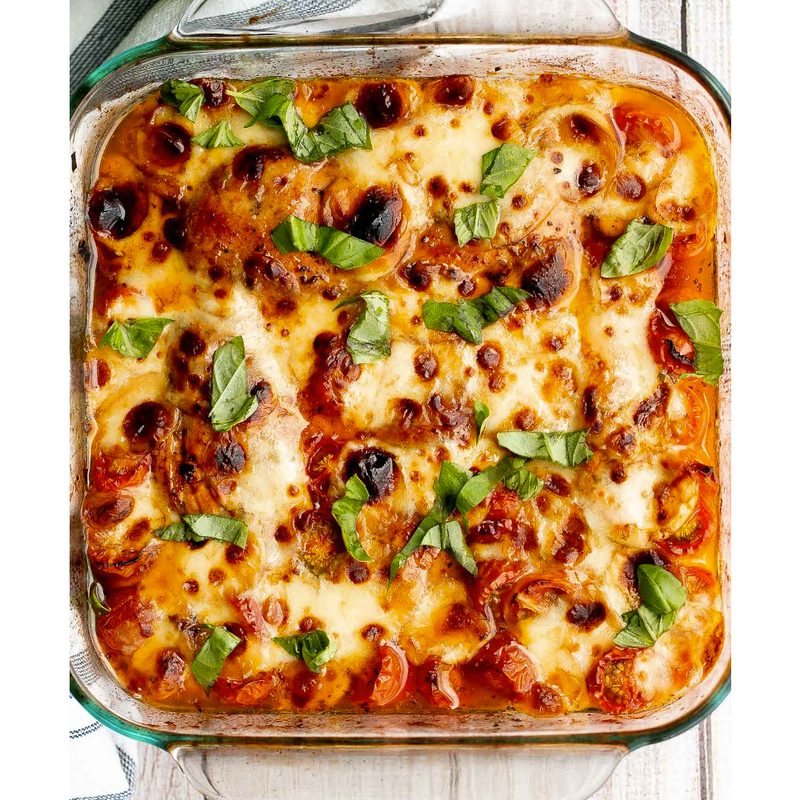
The classic summer Caprese is transformed into a main dish in this recipe from Ahead of Thyme. Easy to throw together, it’ll be a hit whether you’re hosting a party or attending one.
Prep Time: 25 minutes
Total Time: 35 minutes
Yield: 5 servings
Ingredients:
- 5 chicken breasts (about 2.5 lbs.), skinless and boneless
- 2 tablespoons olive oil, divided
- 1/2 tablespoon Italian seasoning
- 1 teaspoon salt
- 1/2 teaspoon ground black pepper
- 1/2 cup balsamic vinegar, divided
- 2 cups cherry tomatoes, halved
- 2 cups bocconcini (mozzarella balls), halved
- 1 tablespoon fresh basil, chopped
Method:
- In a large Ziploc bag, combine chicken breasts with olive oil, Italian seasoning, salt, pepper, and 2 tablespoons balsamic vinegar. Press air out of the bag and seal tightly. Press the seasoning around the chicken to coat. Let it marinate for at least 15 minutes, up to overnight in the fridge. You can also marinate in a large mixing bowl and cover with plastic cling wrap.
- Preheat the oven to 400 F.
- Arrange marinated chicken in an 8-inch square baking pan. Add tomatoes and distribute them evenly in the pan. Bake for 20 minutes until the tomatoes are soft.
- Remove the pan from the oven and add mozzarella balls evenly over the chicken. Return the pan to the oven and continue baking for another 10-15 minutes until the melted cheese turns golden brown. The internal temperature for the chicken should also reach 165 F, as read on a meat thermometer.
- Meanwhile, make the balsamic glaze by adding the remaining balsamic vinegar to a small saucepan. Let it simmer for over low heat until thickened and reduced by half (about 5-7 minutes), stirring occasionally.
- Allow the baked chicken to rest for 10 minutes. Then, drizzle the balsamic reduction on top. Garnish with basil and serve warm.
Creamy Chicken Roulade with Spinach and Mushrooms

Ahead of Thyme’s chicken roulade is great for one or two people but can also be sliced up and served to a larger group as an appetizer or main course. Just adjust the recipe according to the size of your group.
Prep Time:
Total Time: 1 hour
Yield: 3 servings
Ingredients:
Chicken Roulade:
- 1 cup + 1 tablespoon vegetable oil, divided
- 1 cup onions, finely chopped
- 1 cup brown mushrooms, finely chopped
- 3 chicken breasts, boneless and skinless
- 3 teaspoons black pepper, divided
- 3 teaspoons salt, divided
- 3 teaspoons Italiano seasoning, divided
- 1 cup baby spinach, chopped and divided
- 2 eggs, beaten
- 1-2 cups panko breadcrumbs
Creamy Alfredo Sauce:
- 3 tablespoons butter
- 1/3 cup parsley, finely chopped
- 3 tablespoons cream cheese
- 2 teaspoons garlic powder
- 1/2 cup milk
- 1/2 cup Parmesan cheese, grated
- 1/2 teaspoon ground black pepper
Method:
Prepare the Chicken Roulade:
- Heat 1 tablespoon of oil in a skillet over medium-high heat. Add onions and mushrooms. Stir well and cook for 2-3 minutes. Transfer the mixture into a bowl and let it cool at room temperature for at least 20 minutes.
- Season both sides of each chicken breast with 1 teaspoon each of black pepper, salt, and Italiano seasoning.
- Place each chicken breast, one at a time, between two sheets of plastic wrap or in a Ziploc freezer bag. Carefully flatten the chicken breasts with a rolling pin until they are approximately 1/4-inch thick and 6-inches wide. Don’t pound the breasts too hard. It could tear apart the breast. Ideally, you want flattened chicken breasts with uniform thickness.
- Place one chicken breast on a new sheet of plastic wrap. Add 1/3 cup baby spinach on top of the chicken breast.
- Reserve 1-2 tablespoons of the mushroom and onion mixture, and then add a third of the mushroom and onion mixture on top. Make sure to spread the filling evenly, leaving a half-inch border around edges.
- Tightly roll the chicken into a log, and wrap the rolled chicken tightly in plastic wrap. Once wrapped, grab the two ends of the plastic wrap and roll to twist them and make it extra tight. Use plastic clips to secure both ends. Repeat these steps with the remaining two chicken breasts.
- Transfer the chicken rolls to the refrigerator and let them set for 30-60 minutes.
Make the Creamy Alfredo Sauce:
- Melt butter in a non-stick saucepan over medium heat. Add chopped parsley and the reserved onion and mushroom mixture. Cook for 2 minutes until it sizzles and becomes aromatic.
- Add cream cheese and garlic powder. Stir well and cook for another minute. Add milk and continue stirring so the sauce forms a uniform texture. Add in Parmesan cheese and black pepper.
- Stir well to combine and cook for one more minute. You will notice the mixture start to thicken a bit.
- Remove from heat, and transfer the sauce to a clean bowl.
Make the Chicken Roulade:
- Take the chicken rolls out of the fridge and remove the plastic wrap. Take two shallow plates and add eggs to one and panko breadcrumbs to the other. Dip each chicken roll into the beaten eggs (beaten eggs act like glue to coat the chicken rolls with bread crumbs). Then, roll in the panko and fully coat. If you like a thicker breaded coating, you can double dip in beaten eggs and then breadcrumbs again.
- Cook the breaded chicken rolls in one of three ways:
Fry: Heat 1 cup of oil in a pot over medium heat for 3-4 minutes until it reaches 325 F. Fry the breaded chicken rolls in the hot oil for about 5 minutes on each side, or until the outside is an even golden brown and the internal temperature reaches 166 F.
Air Fry: Spray some oil over the chicken rolls to ensure that they get that golden brown coating. Cook in the air fryer at 350 F for 25 minutes. Turn the chicken rolls over halfway through baking.
Bake: Spray some oil over the chicken rolls to ensure that they get that golden brown coating. Cook in a preheated 375 F oven for 25 minutes. Turn the chicken rolls over halfway through baking. - Cool the chicken rolls on a wire cooling rack for 5 minutes. Slice and pour the creamy alfredo sauce on top.