If you want a new action camera, let’s say you have quite a few options. A field that a single brand once dominated has seen quite a few competitors rise, challenging ranks amongst the leaderboards.
One such challenger has been Insta360, bringing its unique, 360-degree camera shots to the action cam world. From professionals to amateurs, photos to videos, Insta360 boasts new features, higher quality, and easy editing with the Insta360 X3.
The folks at Insta360 were kind enough to send an X3 over to The Manual for me to use. While I’ve had some experience with other action cameras, Insta360 was a completely new platform to me, and I was eager to see how it performed and how easy it was to use. So, I strapped it on, grabbed my bike, and hit the trails.

Getting started
Ok, if I’m being honest, I didn’t immediately strap on the X3 and hit the trails. A little setup was required. But, to Insta360’s credit, setting up the X3 was incredibly easy. After opening the box and plugging the camera in to make sure it was charged, I snapped a picture of the QR code Insta360 provided, which linked to their app.
The Insta360 app took care of the rest. I was prompted to turn the X3 on and sync it to my phone. After a few minutes, the setup was complete, and I had the option to watch a tutorial video. Since I certainly fall into the “novice” category regarding action cams, I watched. Once the 8-9 minute video was complete, I felt I had somewhat of an understanding to start using the Insta360 X3.
Strapping on the Insta360 X3
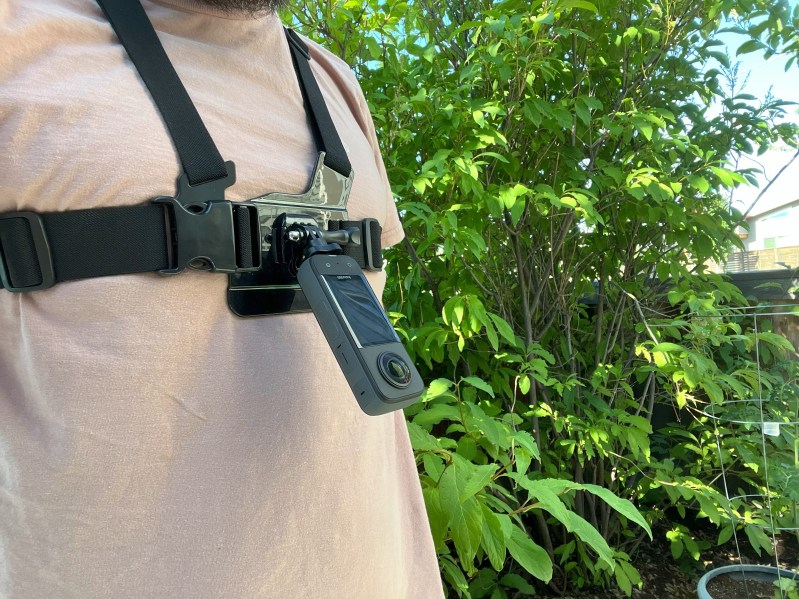
After setup, I found myself at the top of my first descent, using the chest mount to get some POV video footage on my mountain bike. I intentionally did this at the trailhead, without much fiddling at home, to see how intuitive the X3 would be to use trailside.
I found that the Insta360 X3 was very easy to use trailside. Without tons of different options and video settings, it was easy to choose a setting, get the angle on the chest mount right, and start filming my POV footage.
Being an amateur and not a technology wizard, I very much liked the simplicity of the X3 when it came to the camera settings. I recognize, however, this is only a good feature if the footage comes out well. In the case of the Insta360 X3, the footage came out crisp and clear, minus a few hiccups I’ll address in a bit.
I settled on 4K resolution for single lens, POV footage, the highest the X3 offered. 4K was more than adequate for the footage I shot. The 360 lens option allows 5.7K resolution, but my “360 time” was limited, which I will also address later.
For me, the simplicity and user-friendliness of the Insta360 platform were a big win. I can get overwhelmed with many camera setting options and, frankly, end up shooting poor videos. The X3 provided me with a few options, all of which I used and all of which recorded high-quality video.

What I liked
As I already stated, setting up the Insta360 X3 was super easy with downloading the Insta360 app. Viewing and editing your footage and photos is also made incredibly easy with the app, with features like reframing your footage and pulling snapshots from videos.
A nearly 2.5-inch touchscreen made camera setup and video preview very easy. I could ride a section of trail and swipe on the screen to review my footage. The footage was clear and easy to watch for mistakes or changes I needed to make, such as adjusting the camera’s angle on the chest mount. I could easily do all of this with the X3 still mounted.
Speaking of the camera still being mounted, anything you would need to access on the Insta360 X3 can be done without removing the camera from the mount. For example, replacing the battery on some action cameras would require removing the camera from the mount. With the mounting mechanism living by itself on the bottom of the X3, this problem is solved.
A few other things that stood out to me were the option for high-resolution photography at 72MP and the video stability with the Insta360 FlowState Stabilization technology. And while my trails were dry and dusty, the X3 offers up to 33 feet of waterproofing.

What I found lacking
On to the “hiccups” I referred to earlier. First is my general lack of time shooting in 360 mode. I had no problem while on a hike or just using the camera around town, but taking it to the trails was a different story. The problem I continued to have was with the mountain hardware.
I could not tighten the bolt to mount the camera in place enough to keep the camera standing up. The camera mount is essentially a hinge, allowing the user to adjust the camera angle, held together with a bolt. With the Insta360 X3 mounted to my helmet, I would feel the top of the camera hit my head as soon as the trail got rough.
I feel this is mainly due to the Insta360 X3’s shape. The X3 breaks away from more traditional, boxy camera shapes and looks rectangular. And while the X3 isn’t significantly heavier, maybe 50 grams, than some of its competitors, the length of the X3 makes the device top heavy. Whether mounted to my helmet or handlebars, the X3 didn’t want to stay in place.
The next best thing was single-lens, POV footage. But, again, I ran into similar problems. While staying put significantly better while attached to the chest mount, the X3 would still move out of place over time, dropping to a lesser angle the further I rode.
The length of the camera, creating the top-heavy effect, was again an issue on the chest mount. While the FlowState Stabilization in the Insta360 X3 worked flawlessly, my footage would still be shaky at times. I found this was due to the whole chest mount moving during larger impacts. With the X3 hanging away from the mount so much more than other cameras, I couldn’t get the chest mount tight enough to prevent the camera from flopping.

Final thoughts
Would this mounting snafu or top-heavy movement prevent me from continuing to use the Insta360 X3 as my action camera? Definitely not. Seeing how many people use the camera to film their action sports adventures tells me they’ve solved this problem. I imagine that with a little bit of internet research and maybe a hack or two, this problem can be solved. It may be that this is even an issue that Insta360 has a solution for.
This is the bottom line. The Insta360 X3 was easy to set up. The app is intuitive and easy to use. Using the camera and reviewing footage trailside was a breeze. The videos were clear and crisp, despite the issues I ran into along the way. And, once again, due to the very user-friendly app, playing around with and editing footage was simple. Once those edits are complete, uploading them to your social media platforms is not a problem.
Overall, Insta360, I’m impressed.