Before you’ve packed your bags and before you’ve gassed up the wagon, there’s the little issue of figuring out where you’re actually going to go and — more importantly, if you’re going to be outdoors — the type of terrain that’s there.
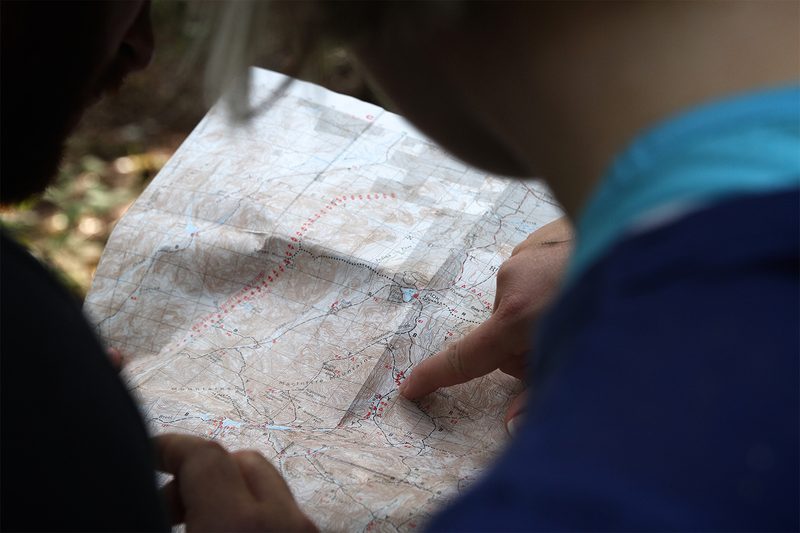
One of the best ways to do that is to peruse a map of the region that goes a little further than just showing you a layout of the park. A topographic map introduces you to the peaks and valleys and gives you an understanding of how difficult the terrain might be in the area where you’re headed. It was originally developed as a way to depict counties and cities before the U.S. military used it in World War I.
Where to begin

To help you decipher and navigate your way through these complex maps, we spoke with expedition expert Cameron Martindell, who has completed journeys on just about every continent, including a four-month stint at the South Pole. When it comes to understanding terrain, his knowledge is invaluable. Here are his tips on how to properly read and fully use a topographic map for navigation.
Get the map
Once upon a time, you had to go to a brick-and-mortar outdoors store or a well-stocked library to look at and copy multiple pages of a topographical map. Trails would stretch across pages, and it was quite a time-consuming process.
Today, we have plenty more options. There are a few great apps that Martindell uses as his primary topographical sources:
- Outdoor Active: Uses augmented reality to identify mountains and trails, while offering downloadable maps.
- Gaia GPS by Outside+: Offers easy-to-read maps and creates shareable maps for friends and other adventurers.
- Avenza Maps: Delivers a 1:24,000 scale USGS map for the entire U.S.
- OnX Maps: Shows a combination of points of interest and other features over one map level.
Even with all the digital options now available, Martindell stresses that the only surefire way to be safe in the wilderness is to have a paper copy of the area where you’re headed. “Sometimes, even software updates can zap your saved maps,” he told us. “Plus, a printed map doesn’t need batteries.”
For paper maps, he recommends CalTopo, which has detailed maps that can be optimized for printing. You can hone in on a specific region and efficiently capture a desired area. You could even get a map printed on a durable silk scarf, which serves double duty on the trails.
Read the map

It’s important to understand the scale of the map when analyzing it. “On a paper copy, does an inch represent a mile, maybe 10?” Martindell proposed. It’s also important to note the contour interval, or distance in vertical feet, between contour lines. For any given map, the contour interval is always the same within that map.
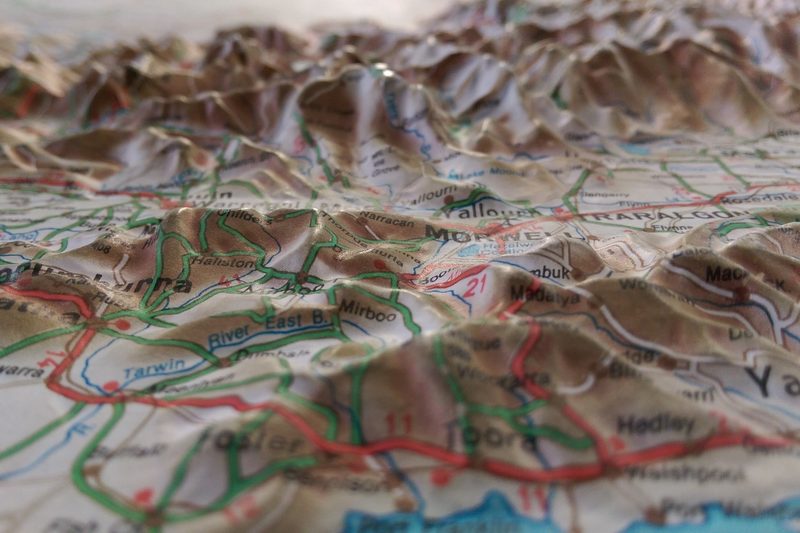
The brown lines weaving all around the map are known as “contour lines.” Each contour line represents a single elevation, which means that no matter where you put your finger, as long as it’s along the same continuous line, it will always be at the same elevation.
On the map, if contour lines are close together, it represents a steep incline, like a mountain. If the lines are farther apart, then the terrain is more level. Martindell notes that careful attention must be paid to determine where the breaks in the lines are. A change in contour could be anything from a basin to a valley. “When lines form a V shape, it can be difficult to recognize the difference between a ridge and a ravine,” he said. On that subject, in areas where there are peaks, hills, and mountains, contour lines can form large concentric circles that grow smaller the higher the elevation and vice versa. So, be aware that, much like the difficulty in recognizing the difference between a ridge and a ravine, so too can there be difficulty in telling apart a mountain from a circular depression or valley.
What are the five map symbols?
There isn’t a universally standardized set of five map symbols that apply to every map. However, topographic maps, which depict physical features of the Earth’s surface, commonly use a variety of symbols. Here are five broad categories of symbols you’ll likely encounter on a topographic map.
- Relief symbols: Represented by contour lines, these lines depict areas of equal elevation. Closely spaced lines indicate steeper slopes, while widely spaced lines represent gentler inclines.
- Hydrology symbols: Shown in blue, these symbols represent water features like rivers, streams, lakes, and oceans. The V-shape formed by contour lines crossing a blue line indicates the direction of water flow.
- Vegetation symbols: Depending on the map’s detail, these symbols may depict forests, grasslands, or other vegetation types. They can be represented by green areas, specific shapes, or hatches.
- Transportation symbols: Roads, highways, railroads, and trails are all depicted by various line symbols, often differentiated by thickness, color, or pattern.
- Cultural symbols: Man-made features like buildings, parks, power lines, or political boundaries are shown using a variety of symbols, which you can decipher by referring to the map’s legend.
Remember, the specific symbols used will vary depending on the map and its purpose. Always consult the map legend for a definitive explanation of the symbols used on that particular map.
Study, study, study
Learn as much as you can about the terrain where you’re headed. “Trails can be mismarked, and signage may not be what you expect it to be,” he said
Knowledge really is power when it comes to reading and getting the most out of a topo map. You’ll be able to plan timing and exertion for the trail. “A rough estimate is two miles per hour walking plus an extra hour for every 1,000 ft. in elevation gain or loss,” he said.
Finally, please remember to always carry a compass.


