
This secret ingredient can be the key to your holiday meal: How to roast garlic

Roasted garlic: This simple ingredient will add a ton of flavor to all of your dishes

There’s just something about garlic. Obviously, it’s delicious, but its adaptability is really something to behold. The ability it has to take dishes to new heights in both its raw and cooked form never fails to impress. Minced raw and tossed into a salsa, it’s pungent, spicy, and boisterous. When cooked, however, garlic becomes a whole new ingredient.

Its wild and bold notes tame to earthier, nuttier, more luscious flavors that just seem to melt into whatever you happen to be cooking, adding beautiful flavor and complexity along the way. This little bulb can be cooked in any number of ways, but roasted is by far our favorite. If you’ve never roasted your own garlic at home, just know that you’ve been missing out big time. Even the scent of roasting garlic wafting and dancing through your house is enough reason to buy this papery little bulb in bulk.

So how do we make this magical little ingredient? It’s truly one of the easiest things you can do for your cooking that will have big-time delicious results.

To make your own roasted garlic at home, all you need are four ingredients: garlic, olive oil, salt, and pepper. Now, we’re willing to bet that you’ve already got these ingredients in your pantry, so there’s really no excuse not to make this as soon as you’re done reading this article. It’ll be the most scrumptious thing you do all day, so chop chop. But, not literally. To roast garlic, you’re going to want to keep the bulb whole.

Roasted garlic can be an incredible flavor boost to countless dishes. We love it on pizza and mixed in with pasta dishes. If you really want to impress with your mashed potatoes this Thanksgiving, stirring in a few roasted cloves will have everyone going back for seconds.

You can also use roasted garlic to replace raw garlic in most recipes, if the raw taste of garlic is too bold for your palette. It’s wonderful in pestos, salad dressings, guacamole, or even completely alone, spread on toast.

After your garlic has roasted, if you’ve managed not to spread it all on an entire baguette and eaten it completely by yourself (good luck), it’s best to store the cloves in an airtight container in the refrigerator for up to two weeks.

Roasted garlic recipe

Image used with permission by copyright holder

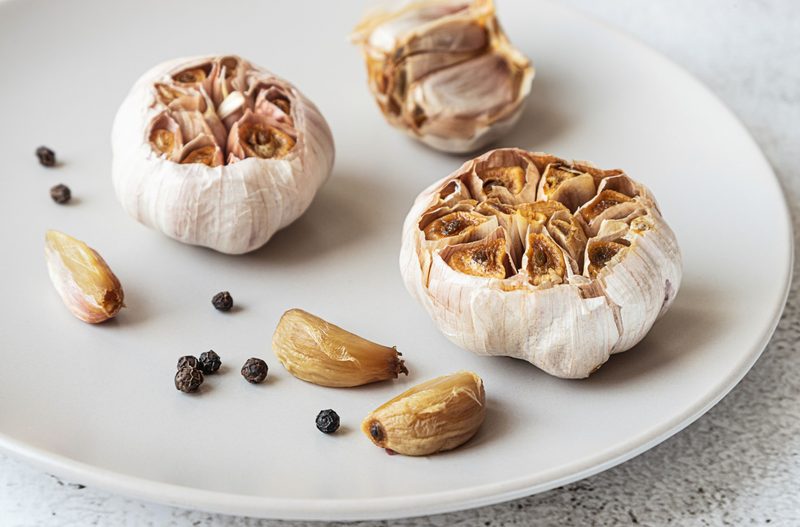
Once your whole garlic head has roasted, the individual bulbs should slip out of the papery skin quite easily. Be sure to remove all of the skin before eating and storing your roasted garlic.

Ingredients:

  • 1 whole garlic bulb
  • 1 teaspoon olive oil
  • Salt and pepper

Method:

  1. Preheat the oven to 350F.
  2. Using a sharp knife, slice the top ¼ inch off the top of the garlic bulb.
  3. Place the garlic cut-side up on a piece of foil, drizzle with olive oil, and season with salt and pepper. Bring foil sides up around the entire bulb, covering the garlic completely.
  4. Bake 45 minutes – 1 hour, until the cloves are soft and golden brown.

Editors' Recommendations

Lindsay Parrill
Lindsay is a graduate of California Culinary Academy, Le Cordon Bleu, San Francisco, from where she holds a degree in…
Yes, bourbon can be aged too long – here’s how to pick the best-aged bourbon
Why bourbon over 15 years old might be too old
Whiskey in a glass

We all know the general bourbon rules and regulations. To be called a bourbon, it must be made with a mash bill of at least 51% corn, aged in new charred oak barrels, made in the US (not just Kentucky), distilled to a maximum of 160-proof, barreled, at a maximum of 125-proof, and bottled at a minimum of 80-proof and a maximum of 150-proof. But none of these rules explain how long a bourbon must be aged.

Technically, there are no rules about how long a bourbon must be aged. However, the whiskey must mature for at least two years to be called a straight bourbon. On top of that, bottled-in-bond bourbon spent at least four years aging in a federally bonded warehouse.

Read more
You can make a quick hollandaise in your microwave in under 2 minutes – here’s how
It's time to stop cursing at broken sauces
Eggs Benedict on plate

During my very first break from culinary school, I went home to visit my parents. As one does, I'd decided to show off with all of my fancy new culinary know-how and spent the weekend preparing a royal spread of pastries, breads, desserts, and every meal I could dream up...or had at least had jotted down in one of my notebooks. But on the third or fourth morning, exhausted from croissants and brioche, I decided to make for my my parents eggs benedict, complete with the most silky and buttery of all the sauces - hollandaise. Hollandaise sauce is truly something straight from the gods. Traditionally made from egg yolk and butter, emulsified slowly over low heat and accentuated with a lemony kiss, this velvety sauce is what brunchtime dreams are made of. Traditionally served over a number of dishes, it just doesn't get any more delicious than a classic hollandaise.

Unfortunately, however, this delicious sauce can also be one of the most finicky to make. That morning with my parents, hopeful and full of joy and optimism after spending a few nights in my childhood bedroom, I set to work making a perfect eggs benedict with hollandaise for my sweet parents. I did everything right. The eggs were tempered, the bain marie was perfect, the eggs were poached to perfection. And then, out of nowhere and with no warning, along with my sweet young heart, my hollandaise broke. In a fury of embarrassment, I poured the entire batch down the drain and started again. And again. If memory serves, it was the fourth batch that finally worked, though I'd done absolutely nothing different than in the first three batches. Needless to say, it was a frustrating (and expensive) morning.

Read more
This secret ingredient will make your crock pot ribs so much better
You probably already have it in your kitchen
Barbecue ribs with sauce

When made correctly, ribs are an American classic dinner that is both delicious and hearty. Even better, ribs made in the crock pot are easy to make by nearly anyone, resulting in the melt-in-your-mouth texture of you seek. Crock pot ribs can be made in dozens of different ways, but there's one secret ingredient you need to bring your slow cooker ribs to the next level. Although it might sound disgusting at first glance, BBQ ribs are quickly elevated by adding some coke (yes, Coca-Cola) to your ribs recipe. Here's why.
The secret ingredient to crock pot ribs
One of the simplest ways to perfect your crock bot BBQ ribs is by adding Coke to your slow cooker. This might sound odd at first, but there's a scientific reason it works. The acidity of Coca-Cola works to tenderize the meat, helping to make it soft and easy to chew. On the other hand, the sugar in a Coke helps enhance the taste of your BBQ ribs by adding just the right amount of sweetness.

On average, Coke has a pH of 2.7, which helps tenderize the ribs but is not acidic enough to break down the protein in it completely. Even better, it's an ingredient you might already have in your pantry (or an inexpensive one you can quickly grab at the grocery store). Also, if you don't have Coca-Cola on hand, any classic soda like Pepsi or even Dr. Pepper will do the trick.

Read more