Home cooking naturally became a ubiquitous pastime during the quarantine, with some amateur chefs taking the opportunity to attempt kitchen endeavors that they never considered trying before they found themselves stuck at home. Bread baking takes forever … but when you have nowhere to go and you (somehow) also have plenty of flour and yeast, then it suddenly feels very possible and worthwhile to make your own loaf of sourdough.
This ethos applies to many food-related projects, and some intrepid carnivores out there are choosing to eschew their usual store-bought sausages in favor of their own artisanal versions. It’s an admirable goal, especially for first-timers … but if you’ve never worked with sausage casings or grinding apparatus before, then DIY sausage can feel really daunting. For that reason, it helps to start with a relatively simple sausage with abundant potential uses. In our opinion, one Italian sausage style is especially appropriate for fledgling sausage makers, and it’s known as ‘nduja.
What is ‘nduja?
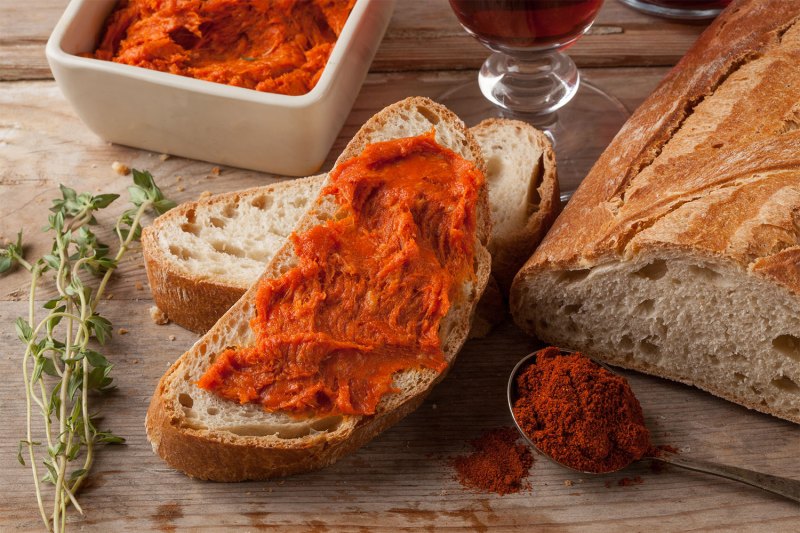
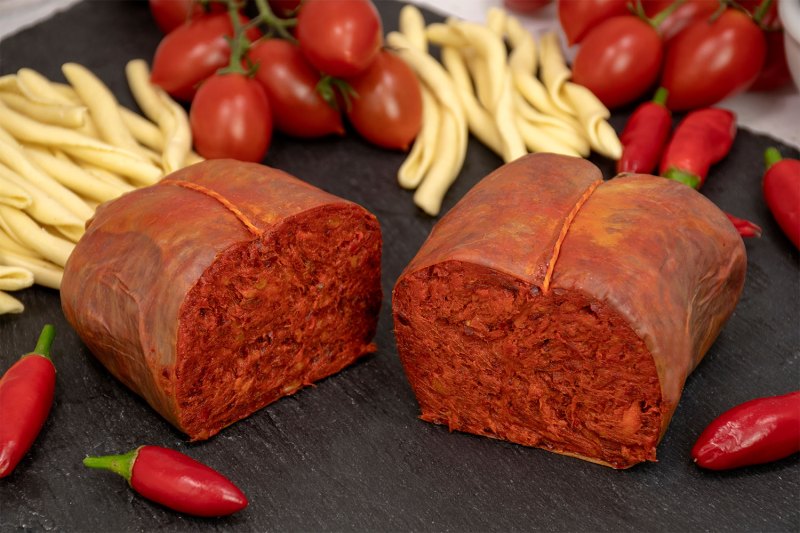
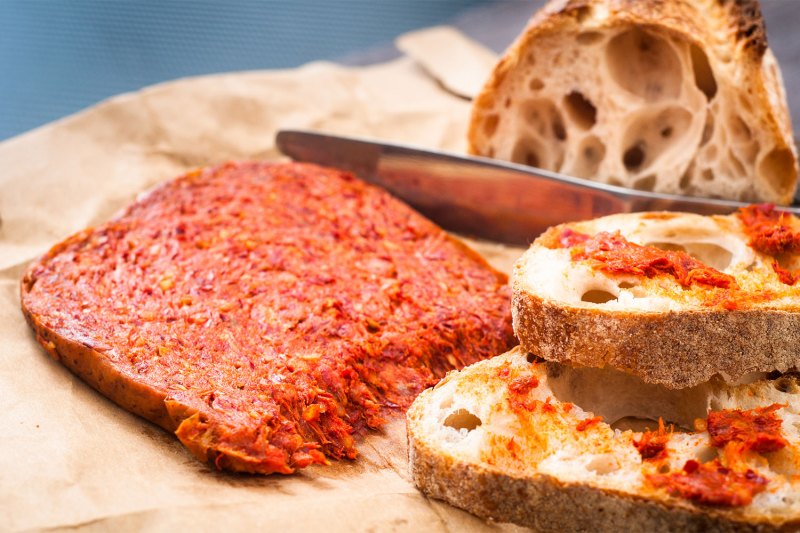
According to recipe developer and founder Chris Riley of The Daring Kitchen, “‘Nduja is a great starting point for a beginner charcutier.” Riley defines this spreadable sausage as “a delicacy typically [found in] the Calabria region of southern Italy. You can [often] see it spread atop olive oily bread. If you are near a well-stocked Italian grocery, [then] you have a chance to get a hold of a jar of ‘nduja. ‘Nduja can only be imported if it is pasteurized; that’s why you will find it in jars and not casings.” ‘Nduja’s soft texture not only makes it a perfect choice for a sandwich spread or a crostini topper, but it also renders it ideal for slow-cooked meat sauces and quick weeknight ragus.
In terms of flavor and ingredients, ‘nduja generally uses pork as its base. Its most notable seasoning comes in the form of Calabrian chiles. These hot peppers give ‘nduja both its powerful spice level and its signature reddish hue.
What makes “spreadable sausage” spreadable?
‘Nduja isn’t the only spreadable sausage out there, but thanks to a recent renaissance of this product at trendy restaurants and high-end butcher shops and grocers, it’s likely the most widely used version in the U.S. The key to ‘nduja’s soft, almost paste-like texture lies in its high fat content. Most charcutiers use pork back fat or belly to elevate the sausage’s fattiness, and olive oil can help the ingredients blend together, resulting in a beautiful, smooth spread.
How can you make great ‘nduja at home?
- Use the best-quality meat you can find.
For a truly unforgettable batch of ‘nduja, you’ll need to resist any temptation to phone it in where your meat selections are concerned. “Always use good meat to make good sausage. If you use low-quality ingredients, you will end up with a subpar result. The ideal [situation] would be to find a shop that does whole-animal butchering and knows where the animals are coming from,” advises Riley. If you decide to expedite your ‘nduja-making project by using pre-made salami as a base (more on that later), then seek out the best possible versions.
- Don’t rush the process.
Chef (and Top Chef alum) Chris Scott of the Institute of Culinary Education in New York City provided us with a speedy ‘nduja recipe (see below), but he still urges at-home sausage makers to take their time and fully commit to their processes. “Don’t be afraid [to make your own ‘nduja]; it will taste delicious! Take your time and pay attention to how you are cooking. This way, you will gain a better understanding of the process and learn how to make it better next time,” Scott tells us.
- Don’t have a meat grinder? Your KitchenAid mixer or a food processor can do the job.
‘Nduja recipes typically call for meat that’s either ground or finely minced. You can ask your butcher to do this for you beforehand, but if you’d prefer to handle your own meat processing (hey, we told you that sausage-making can be an ambitious project!), then you’ll be glad to know that there’s a way to achieve your goal without shelling out for a dedicated meat grinder. “The grinder attachment for the KitchenAid stand mixer is perfect for the task,” insists executive chef Christian Frangiadis of Spork in Pittsburgh.
Don’t have a KitchenAid, but have a food processor? Then you’ll still be able to grind meat for ‘nduja using these tips from Frangiadis: “Cut the meat and fat in small cubes and keep it very cold. Chill the bowl and blade of the food processor in the freezer for 20-30 minutes before using. Then pulse to blend well; since it is a spread, it has an emulsified look anyway.”
Ready for some ‘nduja recipes? You’ll find them right here:
‘Nduja (Beginner Level)
(By Chris Scott, Chef, Institute of Culinary Education, NYC)
An easy, not-too-time-consuming ‘nduja will never go out of style, and Chris Scott’s rendition expedites the process by swapping in pre-made salami and cured belly for unadorned raw meat and fat. His plan keeps prep time down without compromising flavor or consistency, making it a smart move for charcuterie newbies and more seasoned sausage makers alike.
Ingredients:
- 2 oz cured belly (pork, lamb, or pancetta)
- 3 Calabrian chili peppers
- 6 oz salami, rough cut
- 1 tbsp olive oil
- 1 tbsp butter
Method:
- Dice the cured belly into small pieces. Add to a cold sauté pan and gently raise the heat, rendering the belly until it’s crispy.
- Put the crispy belly and its fat into a food processor or blender. Add the chili peppers, rough-cut salami, oil, and butter and blend until everything is smooth.
- Transfer to an airtight container and serve immediately. If you’d like to refrigerate it and save it for later, use the mixture to fill sausage casings.
‘Nduja (Intermediate Level)
(By Chris Riley, recipe developer and founder, The Daring Kitchen)
If you’re prepared for a more challenging ‘nduja adventure, then Chris Riley’s recipe has you covered. This take on the sausage requires a few specialty ingredients and a bit of a time investment, but you’ll be amply rewarded with a robust, spicy, and satisfying spreadable treat.
Ingredients:
- 4.5 lbs pork back fat, chilled
- 1.75 lbs “pork mince” (ground pork), lean and chilled
- 1 ox bung, soaked in cold water for 4 hours (for the casings)
- 1 1/16 oz dried chilies, blitzed into powder
- 7 1/16 oz red chilies, blitzed into paste
- 2 ⅛ oz smoked paprika
- 2 oz fine salt
- ⅓ oz curing salt (often called “Cure No. 2”; Riley says that it can be bought “from curing retailers or online”)
- Charcuterie twine
Method:
- Begin by placing a very large mixing bowl in the freezer to chill. Meanwhile, mince the pork back fat and pork mince. Use the meat mincer or grinding attachment with the finest mincing plate. Place the minced meat in the chilled mixing bowl.
- Add both the fine salt and the curing salt to the pork mix, along with the paprika and the dried and fresh chilies. Using a stand mixer with a paddle attachment or your hands, combine the ingredients until you get a sticky, orange mixture.
- Drain and wash the ox bung with running water. Find the opening and stretch it out so you can start filling it. Take a quarter of the meat mix and place it in the ox bung, making sure you push it to the end in a compact ball. Repeat with the rest three-quarters of the filling to get a total of four mounds.
- Separate the mounds by twisting the ox bung a few times to create a gap between each one. Using the twine, tie a knot around the first ‘nduja to secure it. Tie another knot about an inch down to secure the second one. Repeat until you have secured all four of the balls. Each ball should have a knot on each side with the exception of the first, which will have only one, because it is at the end of the ox dung.
- Separate each ‘nduja mound with a knife. Tie a knot around the top of each ball and wrap the twine around it lengthwise, securing the string again at the top.
- Make another loop around the ‘nduja sideways, securing again. Repeat until you have a total of four loops of twine around the ‘nduja. Leave a little loop at the top for hanging. Repeat this for all of the ‘nduja balls.
- Now, you can place the ‘nduja in the curing chamber. The recommended humidity is 80% and temperature of 54°F. If you don’t have a curing chamber, you can hang the ‘nduja in the fridge for 2 weeks. The result, however, will be a fresher and wetter meat, which means that the meat must be cooked before eating.


