Energy bars are a great way to replenish the calories and nutrients you burn through during exercise. They are also a great way to keep yourself fueled up and ready to go during a long commute, a busy day at the office, or while you ride a boxcar across the rolling plains.
But aren’t you tired of choking down store-bought energy bars with names like Macadamia Coffee Butternut Waffle or Apple Maple Cranberry Fish Flake? Or maybe you’re fed up with paying $36.95 for each bar you consume? If so, then you need to seriously reevaluate your eating and shopping practices, because no one should be eating bars with a fruit and fish blend, and that price tag is wildly inflated.
Anyway, whether you’re looking for an alternative to mass market energy bars for taste, cost, or dietary purposes, or if you’re just looking for a fun culinary project that can give you fuel to burn on your next adventure, it’s not that hard to make energy bars at home. And the best thing about homemade energy bars? You don’t have to give them some name dripping with pretension like The Chocolate Marshmallow Journey Bar or Peter’s Pure & Pompous Peanut Protein Punch. On the other hand, maybe that’s the best part of the process …
The Classic Granola Bar
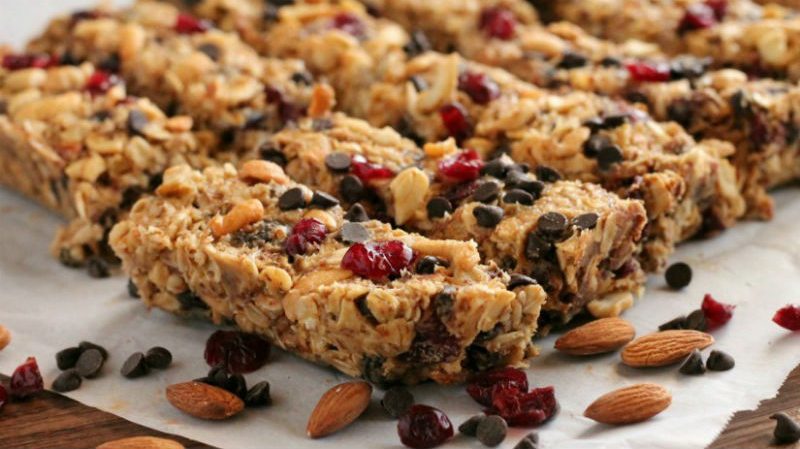
There’s plenty to be said for the good ol’ granola bar — you know, the one with dried fruit, chocolate, oats, and more. Right, that one. A good granola bar has plenty of carbohydrates for a lasting energy supply, simple sugars for a quick boost, and a tantalizing taste that people of all ages enjoy. This homemade take on the granola bar can be played around with as you’d see fit: swap the cranberries for dried blueberries or dried cherries, for example, or add chia seeds for a dose of Omega-3 fatty acids.
Ingredients:
- 2.5 cup rolled oats
- 0.5 cup nuts, choped (almonds and hazelnuts FTW)
- 0.5 cup dried cranberries, chopped
- 0.3 cup honey
- 0.25 cup butter
- 0.25 cup brown sugar
- 0.25 cup chocolate bits
- 0.25 tsp salt
- Dash of vanilla extract
Method:
- Heat that oven to 350 degrees Fahrenheit and coat the inside of a pan with cooking spray (coconut cooking spray works great here).
- Bake the nuts and oats on a separate tray for 10 minutes, then set aside.
- Mix butter, honey, vanilla, and sugar in a sauce pan over moderate heat. Cook and stir until the butter has melted and the sugar has dissolved.
- Mix together all of the ingredients except for the chocolate and mix. Then let everything cool for a while (maybe 20 minutes).
- Add the chocolate and mix again. Mix well, dammit!
- Spread the mixture out into a pan, creating a uniform layer of granola bar. Chill it all in the fridge for several hours.
- Cut the sheet into bars and start enjoying homemade granola goodness.
The Two-Ingredient Energy Bar
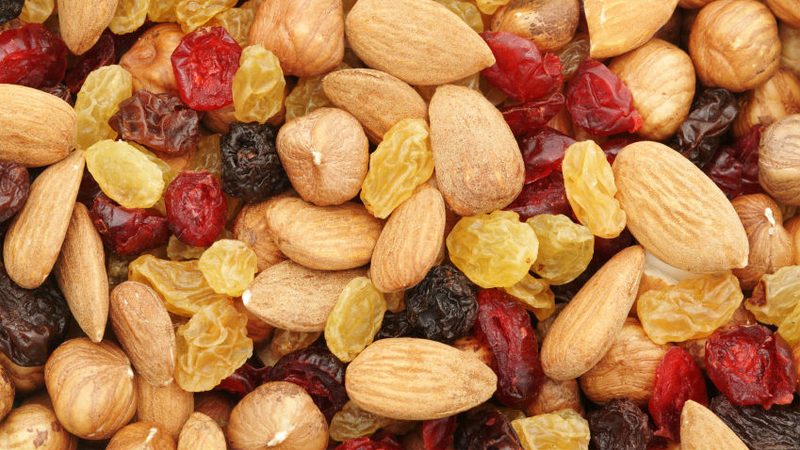
You read that right — this tasty, energy-rich snack bar is made with just two ingredients. Sort of. See, you could make it with two ingredients, but in fact you’ll probably want to use more like four. Or seven or eight depending on how you look at things. On its face, this bar is made with nothing more than dried fruit and nuts, and you could absolutely choose just dried cherries and pecans, for example, thus cleaving faithfully to the two-ingredient thing. But a better idea is to use a range of nuts including walnuts, almonds, and more, and to opt for a blend of dried fruits like cranberries and raisins and such. Also you should add a pinch of salt and, if you need to change up the flavor, some cinnamon or cocoa powder. These easy bars will keep in the fridge for at least two weeks and in the freezer for at least two months. Hooray.
Ingredients
- 1 cup nuts (mixed)
- 1.5 cup dried fruit (also ideally mixed)
- Spices and flavors, if you want ’em
Method:
- Grind the nuts in a food processor until they have broken down into crumbs.
- Add the dried fruit and keep on processing.
- Once the fruit and nut blend sticks together when squeezed, dump it out onto a piece of plastic wrap. Place more plastic over the top and press it down into a sheet of uniform thickness.
- Refrigerate the concoction for about two hours, then cut it into bars. You’re done!
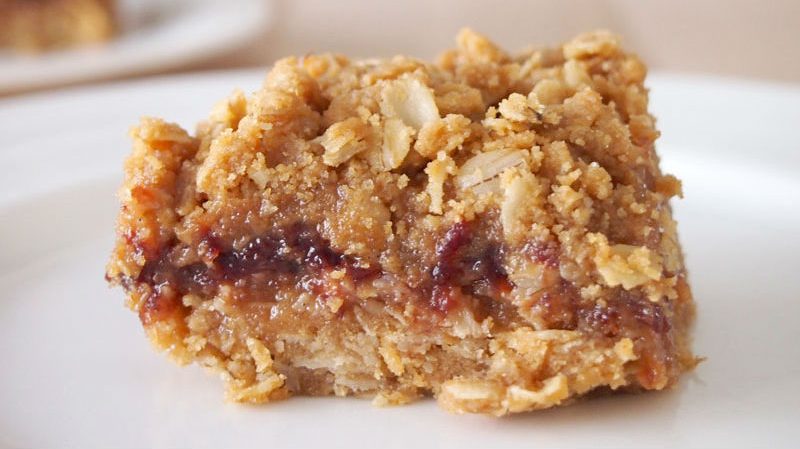
The DIY PB&J Bar
Anyone who says they don’t like a peanut butter and jelly sandwich can go home right now. If they want to. He or she is also welcome to stay here or to go anywhere else as well. In fact, I have to admit that given the choice between a PB&J sandwich and a sandwich made with just peanut butter, I’d take the latter.
Oh, but these bars? These bars are a different story. The “jam” flavor here comes from dried fruit and the blend of flavors is divine. Eat these for breakfast, a snack, or for fuel when you’re on the go.
Ingredients:
- 1.5 cup dates (pitted and soaked in warm water for 10 minutes prior to use)
- 0.5 cup dried cranberries
- 0.5 cup oats (cooked)
- 0.25 cup peanut butter (unsweetened and organic, ideally)
- 0.25 cup peanuts
Method:
- Put everything in a food processor and grind it all together.
- Put that mixture in a pan and flatten it out.
- Chill it for about an hour, then cut your PB&J slab into bars.
- Keep the bars in the fridge until shortly before you enjoy them which, FYI, you will.
My Wife’s Seed and Nut and Oat Bars
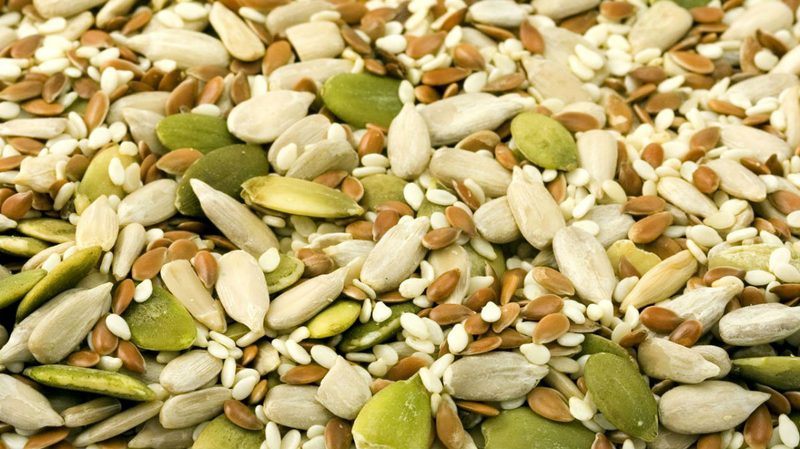
In my house, food is a pretty big deal. We eat it basically every day, and I find it really helps to keep us alive. While I do most of the cooking when it comes to meals, my wife and our son do most of the baking. And they bake batches of these homemade seed and nut energy bars quite often. These bars, which are actually energy discs as they are baked in a muffin tray, are tasty and filling and have plenty of carbs and protein. And once you have all your ingredients gathered, they’re pretty simple to make. Especially when “making” them usually involves getting out of the way while the other members of the family do the work …
Ingredients:
- 1.5 cup oats
- 1 cup walnuts
- 1 cup unsweetened coconut flakes
- .5 cup pumpkin seeds
- .5 cup roasted sunflower seeds
- .3 cup brown rice syrup
- .25 cup hemp seeds
- .25 cup flax
- 4 tbsp melted coconut oil
- 3 tbsp maple syrup
- 1.5 tsp vanilla extract
- .5 tsp cardamon
- .25 tsp salt
Method:
- Blend the walnuts, oats, and coconut flakes in a blender. Or a food processor. Give ’em 15 or 20 seconds.
- Mix all of the dry ingredients in a bowl.
- Dump all the wet ingredients into the bowl (make sure the coconut oil is fully melted and in fluid form).
- Stir all that stuff together vigorously, mixing it well.
- Coat a muffin pan with cooking spray, ideally with a coconut oil spray, and then fill each cup in the pan with the mixture.
- Bake at 350 degrees Fahrenheit for 12 to 15 minutes (less bake time means a more chewy center).