All great recipe ideas have two things in common: They taste great and they are easy to make. But that doesn’t mean your midday meal has to be a boring salad or sandwich. Back away from the sliced bread and make room for a more fun and filling lunch. Looking for ideas? We’ve got you covered. From the dreamiest panzanella to succulent shrimp, these are the best lunch recipes you’ll want to make every day of the week.
Related Guides
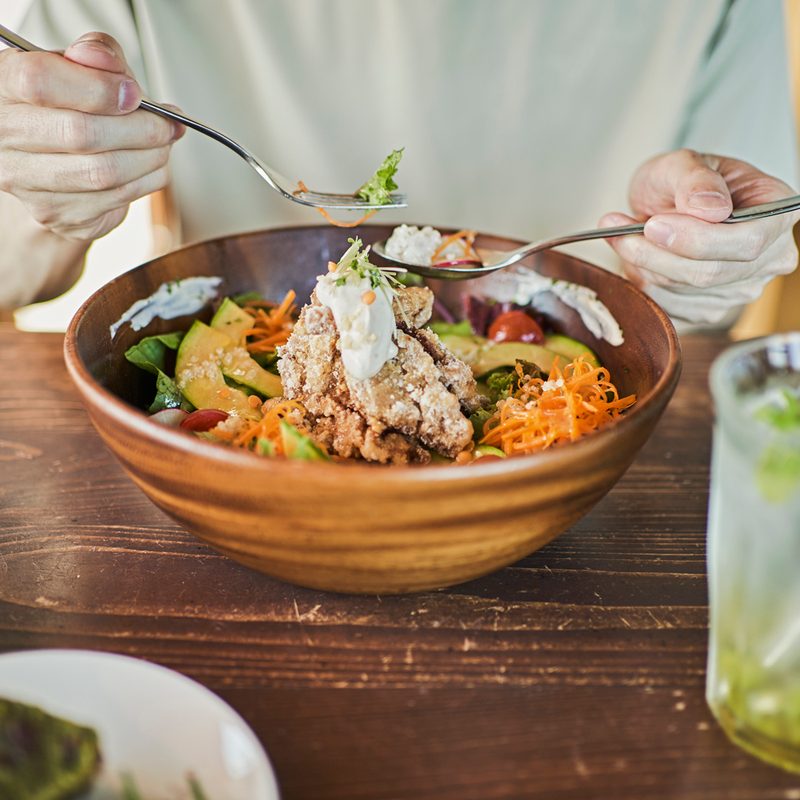
Chicken Caesar Wraps

(From A Taste of Home)
This Chicken Caesar Wrap is made of juicy, flavorful chicken, crisp lettuce, garlicky croutons, and creamy homemade Caesar dressing. The perfect quick lunch!
Ingredients:
- .75 cup Caesar salad dressing
- .25 cup grated Parmesan cheese
- .5 tsp garlic powder
- .25 tsp pepper
- 3 cups cubed cooked chicken breast
- 2 cups torn romaine
- .75 cup Caesar salad croutons, coarsely chopped
- 6 whole wheat tortillas (8 inches), room temperature
Method:
- In a large bowl, combine the dressing, cheese, garlic powder, and pepper.
- Add the chicken, romaine, and croutons.
- Spoon 2/3 cup chicken mixture down the center of each tortilla; roll up.
BLT Pasta Salad

(By Ashlea Carver, All The Healthy Things)
This gluten-free BLT Pasta Salad is full of crisp fresh veggies, perfectly cooked pasta, fresh herbs, crispy bacon, and the most delicious homemade ranch dressing. It’s the perfect option for a light lunch!
Ingredients:
- 2 cups dry pasta, farfalle/bowtie
- 6 strips bacon, cooked and chopped into small pieces
- 1/3 cup thinly sliced red onion
- 1.5 cups chopped romaine lettuce
- 1 cup multi-colored cherry tomatoes, sliced
- .5 large ripe but firm avocado, chopped
- 1 tbsp fresh dill, chopped
Ranch Dressing
- .25 cup mayonnaise
- .25 cup full-fat Greek yogurt
- 1 tbsp fresh dill, chopped
- 1 tbsp fresh chives, chopped
- 2 cloves garlic, minced
- .5 tbsp fresh parley, chopped
- .5 tbsp apple cider vinegar
- .5 tbsp lemon juice
- .5 tsp salt, plus more to taste
- .25 tsp black pepper, plus more to taste
Method:
- Cook the dry gluten-free pasta according to the package instructions. Once al dente, drain and rinse the pasta with cold water.
- Add the cooked pasta, crisped bacon, sliced red onion, romaine lettuce, cherry tomatoes, avocado, and fresh dill to a large mixing bowl.
- Next, make the dressing. Whisk together the mayonnaise, fresh dill, chives, garlic, parsley, apple cider vinegar, lemon juice, salt, and pepper until well combined.
- Pour the dressing over the salad and toss until well combined.
- Serve immediately or cover and refrigerate until ready to serve.
Read more: Most Essential Salad Recipes
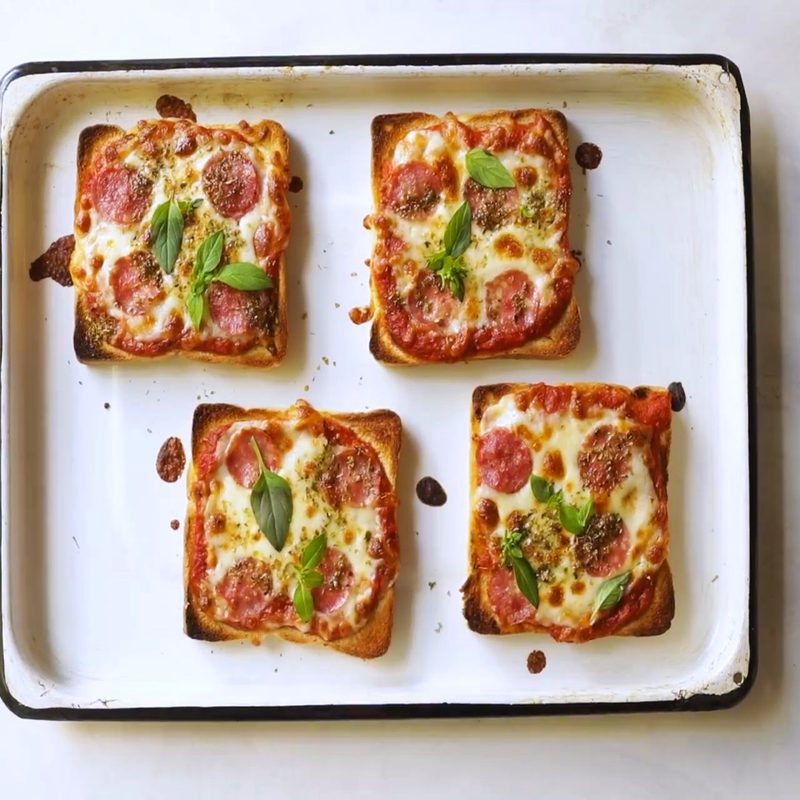
Pizza Toast
(By Alida Ryder, Simply Delicious)
This isn’t your typical midday slice. Just take a piece of sandwich bread, pizza sauce, and your favorite ingredients for a quick homemade pizza that takes 15 minutes from preparation to the plate.
Ingredients:
- 4-8 slices bread of your choice toasted
- 1 cup pizza sauce
- 1-2 cups grated mozzarella
- salami/toppings of your choice
- 1 tsp oregano
Method:
- Pre-heat the grill of your oven.
- Place the toast on a baking sheet and add a generous spoonful of pizza sauce. Spread with the back of the spoon to the corners.
- Top with a handful of grated mozzarella followed by the toppings of your choice.
- Sprinkle over a little oregano.
- Place in the oven and allow to cook until the cheese has melted.
- Remove from the oven and allow to cool for a few minutes before serving.
Read more: Neopolitan-Style Pizza Recipe Guide
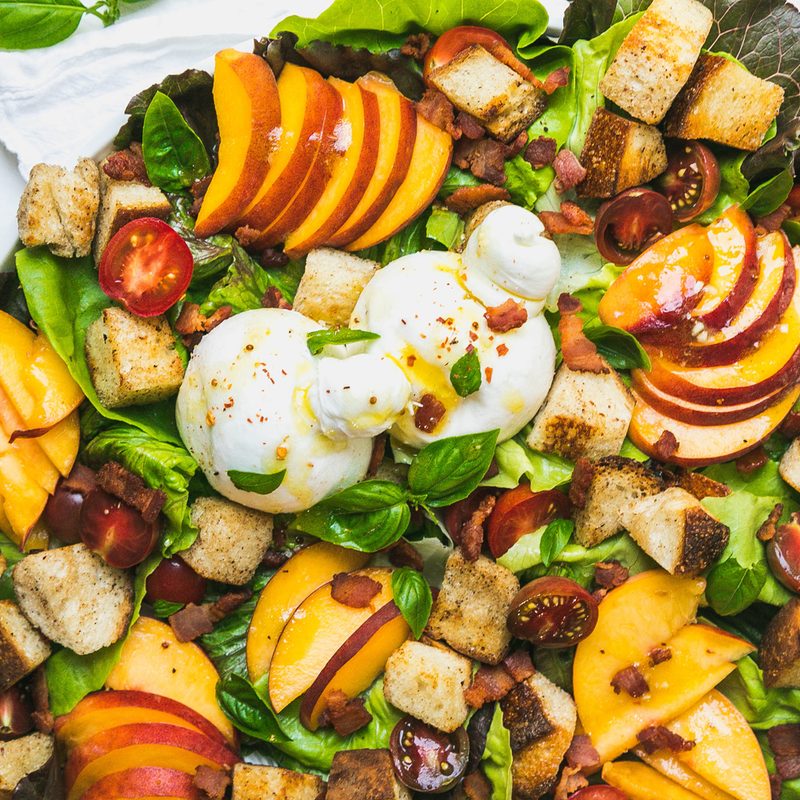
Peach Panzanella Salad with Burrata and Bacon
(By Heidi Larsen, Foodie Crush)
This recipe is not your classic, traditional Italian or Greek panzanella salad, because with sliced sweet peaches, savory bacon, and gooey burrata crunched with sourdough bread chunks and dressed in an easy to make golden balsamic vinegar dressing, this healthy-ish salad goes well beyond the regular old panzanella for a spectacular lunch salad.
Ingredients:
- 3-4 slices bacon
- 3 cups sourdough bread cubes
- 2 peaches thinly sliced
- Fresh lettuce leaves such as red leaf butter lettuce or arugula
- 8 ounces fresh burrata cheese
- Basil leaves for garnish
Vinaigrette
- .5 cup extra virgin olive oil
- .25 cup golden balsamic vinegar
- 1 tablespoon honey
- 1 tsp Dijon or seeded mustard
- 2 cloves garlic pressed
- .5 tsp crushed red-pepper flakes
- .25 tsp kosher salt
- .25 tsp freshly ground black pepper
Method:
- Fry the bacon in a large skillet over medium-high heat, transfer to a paper towel-lined plate to drain and cool, then crumble into pieces. Add the sourdough cubes to the same pan used to cook the bacon and toast the cubes on all sides until golden. Transfer to a plate or bowl to cool and sprinkle with flaky sea salt.
- To assemble the salad, place the torn lettuce, bread, peach slices, and burrata on a serving plate or bowl. Sprinkle with the bacon pieces and basil leaves and drizzle with the vinaigrette. Season with more kosher salt and pepper if you’d like.
Vinaigrette
- Add all of the ingredients to a jar fitted with a lid and shake well until emulsified. There will be extra dressing that can be stored in the refrigerator for 1-2 weeks
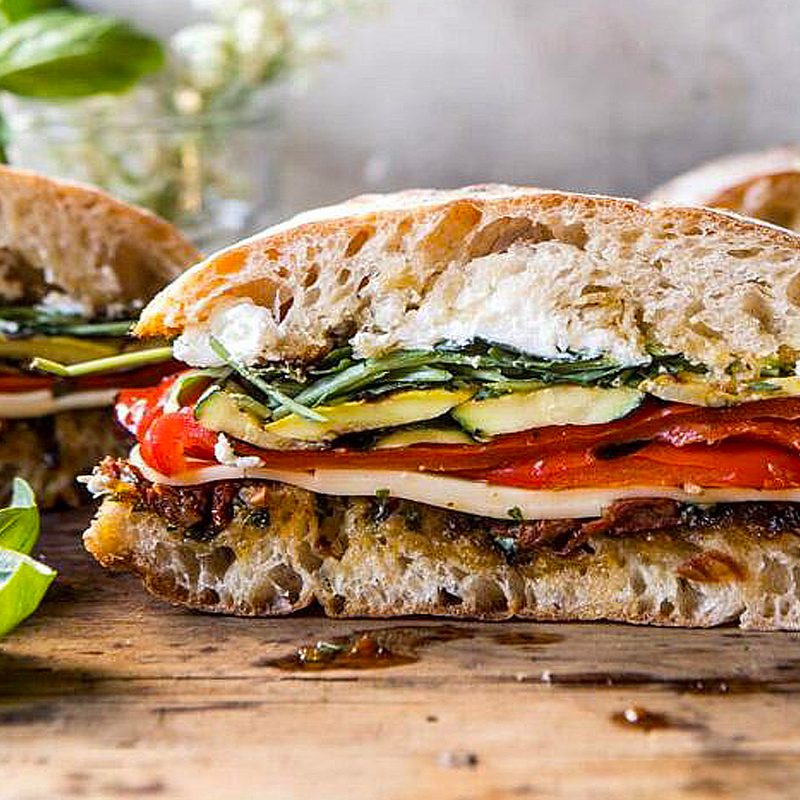
Marinated Veggie Cheese Sandwich with Sun-Dried Tomato Pesto
(By Tieghan Gerard, Half-Baked Harvest)
Marinated Veggie Cheese Sandwich with Sun-Dried Tomato Pesto. Better known as the best veggie cheese sandwich around. Grilled summer vegetables marinated in fresh herbs and spices, two kinds of cheese, homemade sun-dried tomato pesto, all sandwiched between crusty grilled ciabatta. Honestly, this sandwich is the best!
Ingredients:
- 2 tablespoons balsamic vinegar
- 1 tbsp fresh thyme leaves
- 2 cloves garlic, minced or grated
- 3 tbsp extra virgin olive oil
- 1 pinch crushed red pepper flakes
- kosher salt and pepper
- 2 zucchini or yellow summer squash, sliced thinly lengthwise
- 2 bell peppers, quartered
- 1 loaf ciabatta bread, halved lengthwise
- .5 cup sun-dried tomato pesto (recipe follows)
- 6 ounces creamy goat cheese
- 4 ounces provolone, sliced
- 1 cup baby arugula
- sun-dried tomato pesto
- 1 cup fresh basil
- .5 cup oil packed sun-dried tomatoes + .25 cup oil from jar
- 2 tablespoons toasted pine nuts
- 1/3 cup grated parmesan cheese
- zest and juice of 1 lemon
- kosher salt
Method:
- In a large bowl, whisk together the olive oil, vinegar, thyme, garlic, and a pinch each of crushed red pepper flakes, salt, and pepper. Add the peppers and zucchini, tossing to combine. Allow the veggies to marinate for 15 minutes or up to overnight in the fridge.
- Preheat the grill to high.
- Spread each half of the bread with a tablespoon of pesto. Grill, cut side down for 3-5 minutes or until light grill marks appear. During the same time, grill the peppers and zucchini until light grill marks appear, 3-4 minutes per side. Remove everything from the grill.
- Working with the bottom piece of bread, layer on the remaining pesto, provolone, grilled vegetables, and arugula. Sprinkle the goat cheese over the arugula. Add the top half of the ciabatta and gently push down on the sandwich.
- At this point, you can slice the sandwich and serve warm or wrap in plastic wrap and keep in the fridge for up to 1 day.
Sun-dried Tomato Pesto
- Combine all ingredients in a food processor and pulse until combined.
Read more: Satiating Sandwich Recipes
Thai Turkey Lettuce Wraps
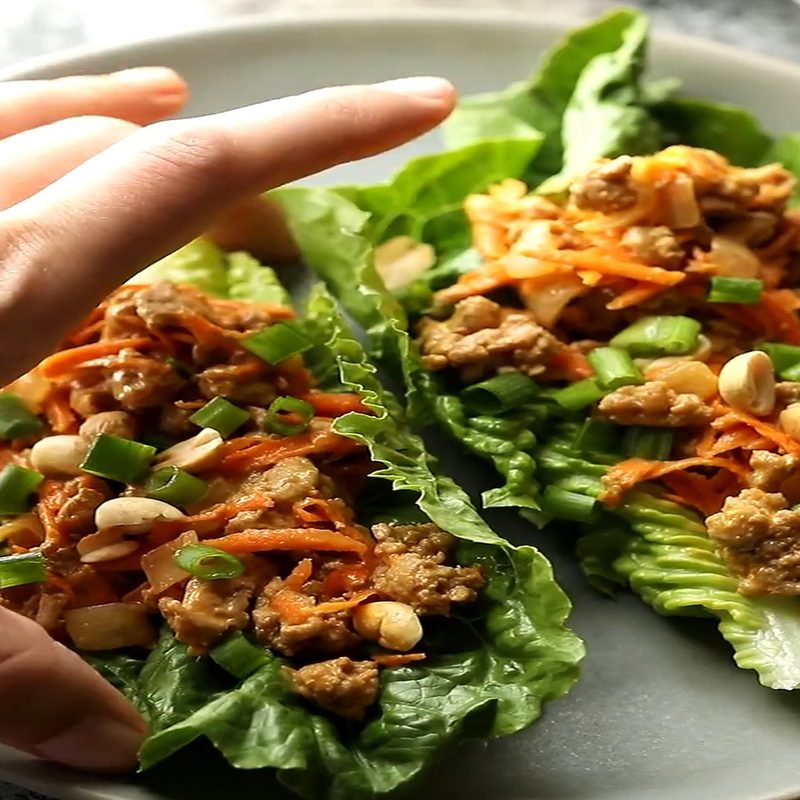
(By Denise Bustard, Sweet Peas and Saffron)
Simple and so flavorful, these Thai turkey lettuce wraps have a tangy and slightly spicy peanut sauce. Spoon the filling into crisp romaine lettuce leaves for an easy and delicious lunch option.
Ingredients:
Sauce:
- .25 cup peanut butter all natural
- 3 tbsp soy sauce see note 1
- 2 tbsp vinegar
- 2 tbsp water see note 2
- 1 tsp sesame oil
- 1 tsp lime juice
Filling
- 1 tablespoon olive oil
- 1 onion finely chopped
- 3 cloves garlic minced
- 1 tablespoon Thai red curry paste
- 1 lb. lean ground turkey
- 1 cup carrots shredded
To serve:
- Romaine lettuce leaves
- Green onions to garnish
- Peanuts to garnish
Method:
- Mix up peanut sauce – In a small jar or salad dressing shaker, add the peanut butter, soy sauce, rice vinegar, water, sesame oil, and lime juice. Shake it up until smooth.
- Cook the aromatics – (1) Heat oil in a large pan and add the onions, garlic, and Thai red curry paste. Stir until red curry paste is heated through and mixed in evenly with the onions (2-3 minutes).
- Turkey – Add the ground turkey and cook, breaking it up with a spatula, for 5-7 minutes, until no pink remains and the turkey is cooked through.
- Carrots & sauce – Stir in the shredded carrots, then the peanut sauce. Stir to combine. Toss until everything is evenly coated, then set aside to cool slightly.
- Serve – Spoon the filling into romaine lettuce leaves. Sprinkle with green onions and/or peanuts, and enjoy!
Baked Shrimp and Broccoli Foil Packs with Garlic Lemon Butter Sauce

(By Christina Cherrier, Eat Well 101)
This baked shrimp foil pack recipe makes quick and effortless individual meals that are perfect for a grab-and-go lunch! It’s everything you love with way less work.
Ingredients:
- 1 lb. medium raw shrimp (peeled and deveined, tail-on or tail-off)
- 2 tbsp butter, diced (or ghee, or olive oil)
- 1 tbsp minced garlic
- 1 tsp Italian seasoning
- .25 tsp onion powder
- 2 tbsp vegetable or chicken stock, divided
- Salt and pepper, to taste
- .25 tsp smoked paprika
- Red chili pepper flakes, optional
- Juice of 1/2 lemon
- 1 large head of broccoli, broken into florets
- Fresh chopped parsley, for garnish
Method:
- Preheat your oven to 425 degrees F (220 degrees C). Cut 2 sheets of 14 by 12-inch (35 x 30 cm) heavy-duty aluminum foil then lay each piece
- separately on the countertop.
- In a small bowl, combine the Ingredients: for the spice mix: Italian seasoning, onion powder, salt, pepper, and smoked paprika
- In a shallow plate, add shrimp and sprinkle with the spice mix, coating on all sides.
- Divide shrimp onto the aluminum foil near the center then place broccoli florets to one side of the shrimp.
- Add garlic over broccoli and shrimp, then sprinkle with lemon juice, red crushed chili pepper flakes (if using) and finish with salt and pepper. Divide butter pieces evenly among the shrimp foil packets, layering them over the shrimp and broccoli.
- Add a tablespoon of vegetable stock in each foil packet and wrap packets in and crimp edges together then wrap ends up. Don’t wrap too tight – keep a little extra space inside for heat to circulate.
- Transfer to a baking sheet and bake shrimp foil packets in the oven, sealed side upward until shrimps have cooked through, about 15 minutes.
- Carefully unwrap the baked shrimp and broccoli foil packets then garnish with fresh parsley and a slice of lemon. Enjoy!
Chickpea Tuna Salad
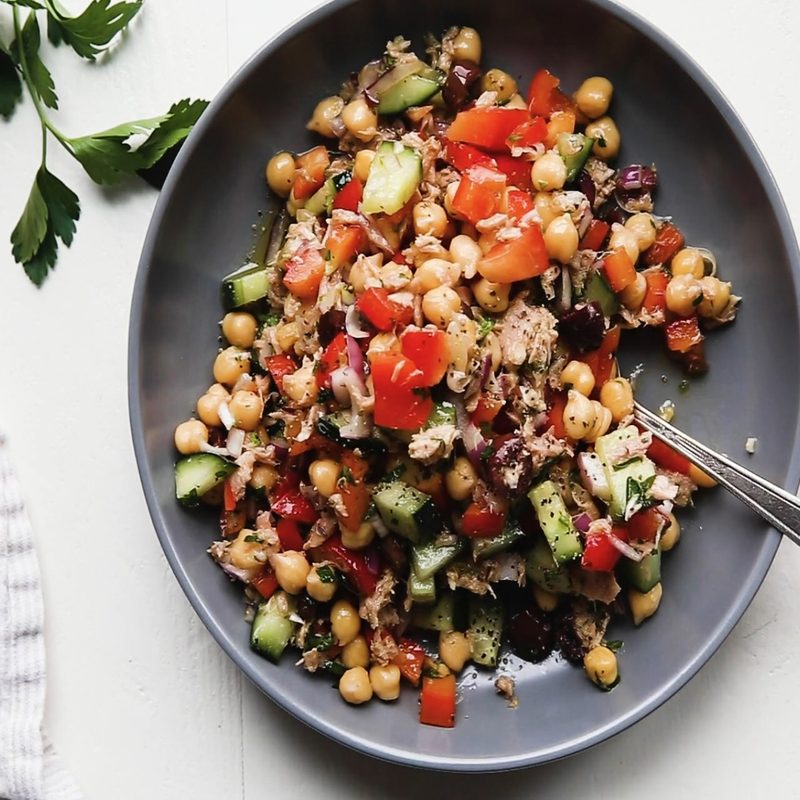
(By Erin, Platings and Pairings)
This Mediterranean Chickpea Tuna Salad is the perfect dish for when you’re trying to eat lighter but still want a delicious meal.
Ingredients:
- 3 2.3-ounce pouches tuna
- 1 15-ounce can chickpeas rinsed and drained
- 1.5 cucumber seeded and diced
- 1 red bell pepper diced
- .25 red onion minced
- .5 cup Kalamata olives pitted and minced
- .25 cup minced fresh parsley
Dressing
- .5 cup extra virgin olive oil
- .25 cup lemon juice
- 2 cloves garlic grated or finely minced
- 1 tsp dried oregano
- 1 tsp Dijon mustard
- 1 tsp kosher salt
- .5 tsp freshly ground black pepper
Method:
- Flake the tuna into a salad bowl and add chickpeas, cucumber, red pepper, onion, Kalamata olives and parsley. Toss gently.
- Whisk together the dressing Ingredients: and add them to the salad bowl. Toss everything together to coat and serve.
Italian Vegan Stuffed Peppers
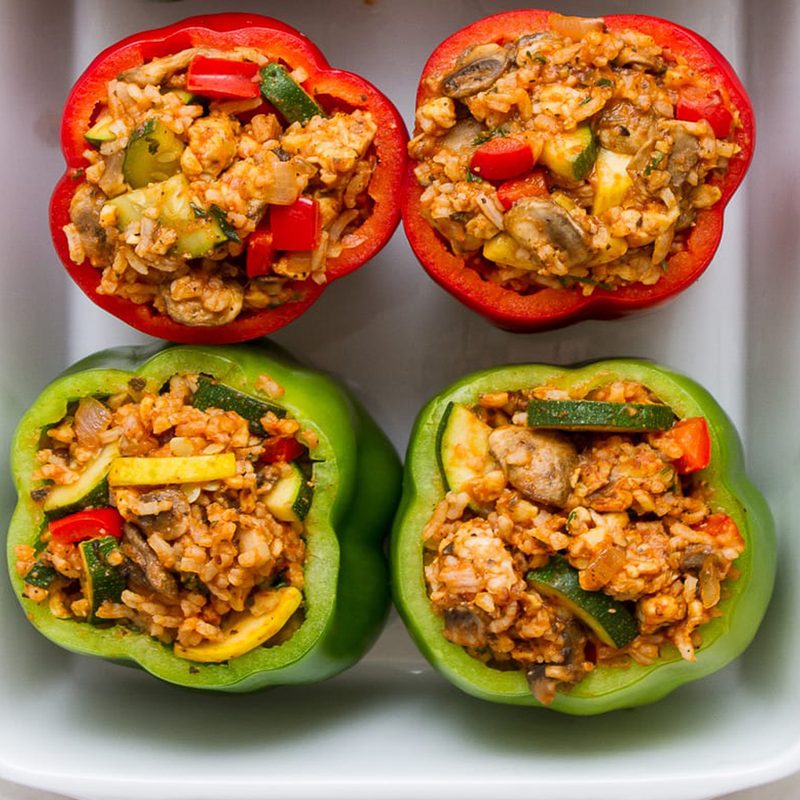
(By Julie, The Simple Veganista)
Italian Vegan Stuffed Peppers features a colorful mix of veggies, flavorful herbs, and protein-rich tempeh for a hearty and delicious lunch or meal prep idea!
Ingredients:
- 6 large bell peppers (any color), top cut off and seeds removed
- 1 tablespoon olive oil or ¼ cup water
- 1 medium onion, diced
- 3 – 4 cloves garlic, mined
- 2 (8oz) packages tempeh, crumbled
- 1 cup zucchini, diced
- 1 cup yellow squash, diced
- 8 oz. package mushrooms, sliced
- 1 tsp dried oregano
- 1 tsp dried basil
- Generous pinch red pepper flakes
- .25 cup fresh chopped parsley
- 1 can (14oz.) tomato sauce
- 1 cup cooked rice
- Mineral salt & pepper, to taste
Method:
- Preheat oven to 350 degrees F.
- In a large skillet, heat oil/water over medium heat, add onion, garlic and crumbled tempeh, sauté for 5 minutes. Add the zucchini, yellow squash, mushrooms, oregano, basil, red pepper flakes, parsley, salt and pepper, and tomato sauce, cook for 2 minutes or so. Add rice and mix to combine. Remove from heat.
- Fill each bell pepper with vegetable mixture, making sure to pack it well. These are hefty stuffed bell peppers. Sprinkle with optional vegan shredded cheese. Cover with lid or tin foil.
- Place dish on the center rake and bake for 35 – 40 minutes. Remove cover and bake for another 5 – 10 more minutes. Cooking times vary, adjust to suit your needs.
- Once done, let cool a few minutes and serve with a sprinkle of freshly chopped parsley.
- Store leftovers, covered, in the refrigerator for 4 – 5 days. To keep longer store vegan stuffed peppers in the freezer for up to 2 – 3 months. To freeze, simply let peppers cool completely and store them in freezer-safe containers. Let thaw before reheating.
Easy Chicken and Broccoli Stir-Fry
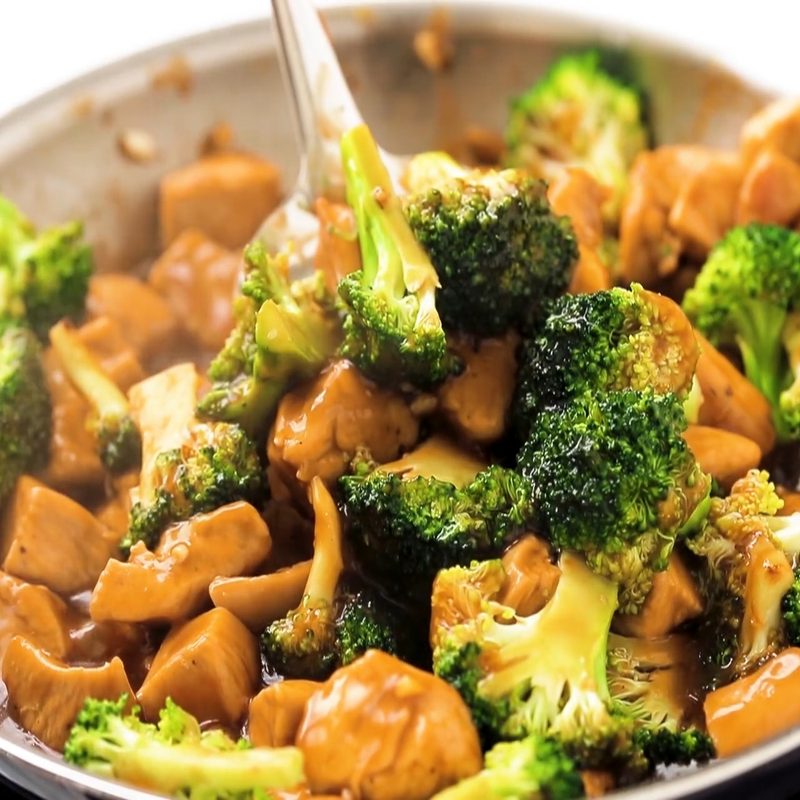
(By Ali Martin, Gimme Some Oven)
This quick Chicken and Broccoli Stir-Fry recipe is full of zesty flavors, it’s easy to customize so you can have a different style each day of the week!
Ingredients:
- 2 tbsp olive oil, divided
- 2 boneless skinless chicken breasts, cut into bite-sized pieces
- Salt and pepper
- 1 batch Stir-Fry Sauce (see below)
- 1 bunch broccoli, chopped into small florets, stems discarded
- 1 tsp toasted sesame oil
- Toppings: sliced green onions, toasted sesame seeds
Sauce
- 2/3 cup water
- 1/3 cup reduced-sodium soy sauce
- 3 tbsp rice vinegar
- 2 tbsp cornstarch
- 2 tbsp honey
- 2 cloves garlic, peeled and minced
- 1 tsp ground ginger
Method:
- Heat 1 tbsp olive oil in a large sauté pan over medium-high heat. Add chicken breasts, and season with a generous pinch of salt and pepper. Cook for about 5 minutes, stirring occasionally, until the chicken is browned and mostly cooked through.
- While the chicken is cooking, make your sauce. (See below.)
- Once the chicken is browned, add the remaining 1 tablespoon of olive oil and broccoli, and stir to combine. Continue cooking for an additional 3 minutes, until the broccoli is bright green. Stir in the sauce, and cook for an additional 1 minute until the sauce has thickened. Remove from heat and stir in the sesame oil until combined.
- Serve warm, garnished with green onions and toasted sesame seeds. Or transfer to a sealed container and refrigerate for up to 3 days.
- For the Sauce: Whisk all ingredients together in a small bowl until combined.
Mediterranean Hummus Bowls
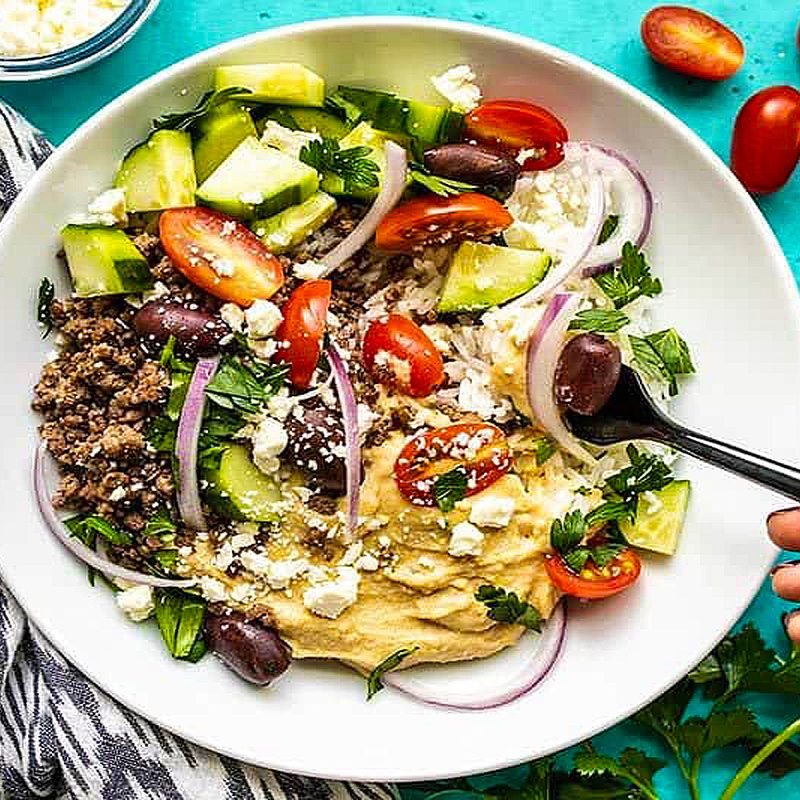
(By Beth Moncel, Budget Bytes)
Just about any protein or vegetable can be added to these filling and tasty Mediterranean Hummus Bowls to make them your own and use up your leftovers!
Ingredients:
- .5 lb. ground beef
- .5 tsp dried oregano
- .5 tsp cumin
- .25 tsp garlic powder
- .25 tsp salt
- 4 cups cooked rice
- 1 cup hummus
- 1 pint grape tomatoes
- .5 English cucumber
- .25 red onion
- 1 cup kalamata olives
- 2 oz. crumbled feta
- Handful fresh parsley, chopped
Method:
- Add the ground beef to a skillet, along with the oregano, cumin, garlic powder, and salt. Cook and stir the beef over medium heat until fully browned and evenly combined with the spices.
- To build the bowls, add 1 cup rice and 1/4 cup hummus to each bowl. Divide the remaining Ingredients: among the four bowls, or in any amount that you desire. Enjoy immediately or refrigerate until ready to eat.
Breakfast Burritos

(By Jenn Segal, Once Upon A Chef)
Filled with sausage, eggs, cheese, and fresh avocado salsa, these bodega-style breakfast burritos are delish any time of day!
Ingredients:
Salsa
- 1 large avocado, peeled, pitted, and diced
- .5 cup diced seeded tomatoes, from 1 to 2 tomatoes
- 1 small shallot, minced (about 2 tablespoons)
- 1 clove garlic, minced
- 1 jalapeño pepper, seeded and minced
- 1 tbsp fresh lime juice, from 1 lime
- .5 tsp salt
- .25 tsp ground cumin
- .25 cup fresh chopped cilantro
burritos
- 4 large eggs
- .25 tsp smoked paprika
- .25 tsp salt
- .5 lb. spicy sausage (such as chorizo, Italian, or anything you like), removed from casings
- 1-1/3 cups (6 oz) shredded Monterey Jack cheese
- 4 (10-in) burrito-size flour tortillas
- Vegetable oil
Method:
- Make the Avocado-Tomato Salsa: Place all of the ingredients in a medium bowl and mix to combine. Set aside.
- In a medium bowl, whisk the eggs with the smoked paprika and salt. Set aside.
- Heat a large nonstick pan over medium-high heat. Add the sausage and cook, stirring frequently, until browned, 4 to 5 minutes. Use a slotted spoon to transfer the sausage from the pan to a plate, leaving the drippings in the pan. Reduce the heat to low. Add the eggs and scramble until just cooked through. Transfer the eggs to a plate. Clean the pan (you’ll use it again).
- Assemble the burritos: Spoon about 1/4 cup of the avocado-salsa onto each tortilla (you’ll have a little leftover salsa; that’s for the cook!), followed by a quarter of the sausage, a quarter of the eggs, and 1/3 cup cheese. Fold in the sides of the tortilla over the filling and roll, tucking in the edges as you go.
- Lightly coat the pan with oil and set over medium heat. When the pan is hot, add the burritos, seam side down. Cook, covered, until the bottom of the burritos are golden brown, about 3 minutes. Flip the burritos over and continue cooking, covered, until golden, a few minutes more. Serve warm.
- Make Ahead: The burritos may be assembled a few hours ahead of time, wrapped tightly in plastic wrap and refrigerated, before cooking. To reheat leftover burritos, wrap in foil and warm in a 350 degree F oven for about 15 minutes. (They won’t be as crisp as they are fresh out of the pan, but they reheat well.)
Cilantro-Lime Sardine Salad in Avocado Halves
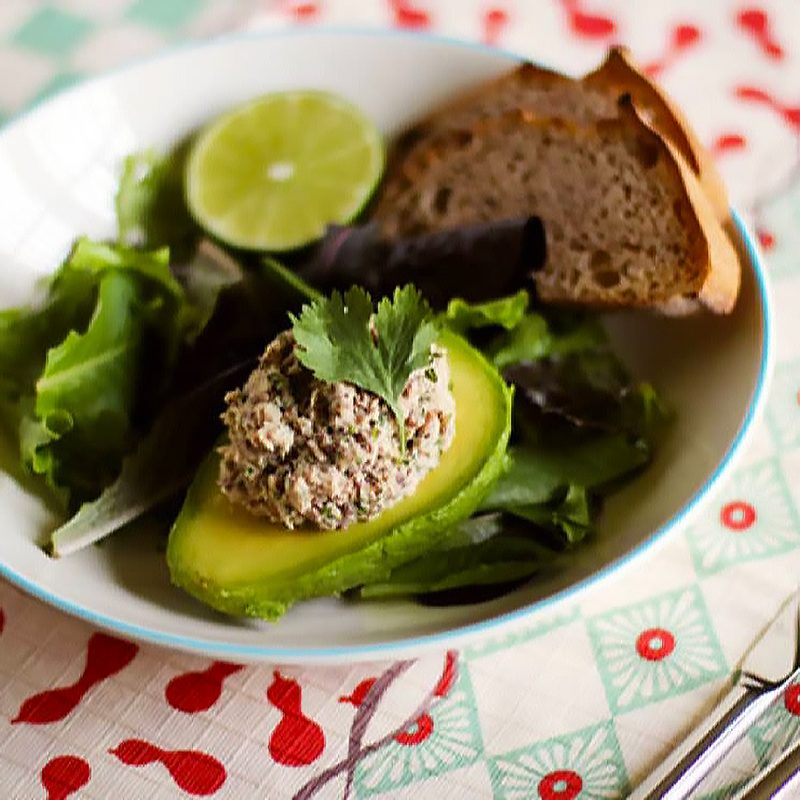
(By Anjali Prasertong, The Kitchn)
This simple salad of sardines, mayo, fresh cilantro, and lime juice is great in a sandwich or scooped on top of greens, but it’s especially nice stuffed into avocado halves.
Ingredients:
- 1 (3.75-ounce) can boneless skinless sardines packed in oil, drained
- 2 tbsp cilantro, finely chopped
- 1 tbsp mayonnaise
- 1 tbsp fresh lime juice, divided
- 1 ripe avocado
- Salt and pepper
- Salad greens, for serving (optional)
Method:
- In a small bowl, combine the sardines, cilantro, mayonnaise, and 2 1/2 teaspoons of lime juice. Mash together thoroughly with a fork and season to taste with pepper and a pinch of salt, if needed.
- Cut the avocado in half lengthwise and remove the pit. Using a large spoon with a wide, shallow bowl, scoop each avocado half from its skin: run the tip of the spoon around the edge of the avocado to loosen it, then plunge the spoon between the skin and flesh. Keep the back of the spoon as close to the skin as possible, and work from the wider to the narrower end of the avocado. Rub each half with the remaining 1/2 teaspoon lime juice.
- To serve, scoop half of the sardine salad into the hollow of each avocado. Serve over dressed salad greens if desired.