My mom makes the best pies on the planet but I don’t think she’s willing to share her recipes, nor is she really interested in the press. So we’ll do the next best thing and offer the best pie blueprints that are available to the public.
A good slice of apple, pumpkin, or Key lime pie is always good but there’s added comfort in the dessert come late fall and winter. Whether it’s a warm slab of a classic like strawberry rhubarb or a more debatable “pie,” it’s the post-meal stuff of the deities. And if you’re like me, you look forward to leftover pie at all hours. That could be with a nice hot toddy just before bed or the next morning as breakfast, trucker-style with a nice cup of coffee.
Not yet in the mood? Check out these masterpieces by Lauren Ko, who’s new book, Pieometry, should very much be your radar. We’re not saying you need to make something as artistic. But we are saying you could use some more delicious pie in your day-to-day.
Without further ado, here are the best pie recipes:
Apple Berry Pie
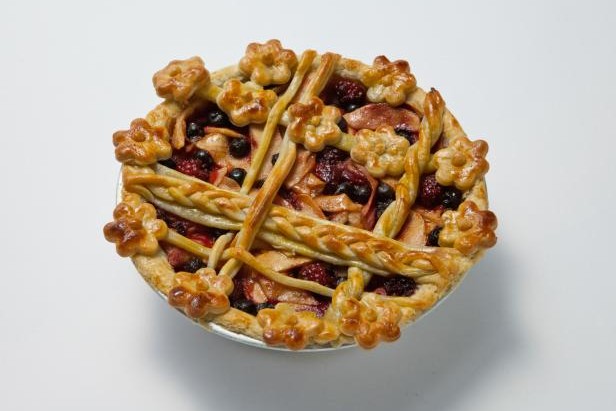
A delightful offering from U.K. pastry chef Lorraine Pascale, this berry pie is not too tricky to re-create and vibrant with fresh, fruit-forward flavors.
Ingredients:
Method:
- Combine the apples, sugar, cinnamon, nutmeg, and 2 tablespoons water in a medium saucepan. Cook over medium heat until the sugar dissolves and the apples release their juices, 4 to 5 minutes.
- In a small bowl, stir the cornstarch into 2 tablespoons water until smooth. Whisk the cornstarch mixture into the simmering juices in the saucepan until smooth. Simmer just until the juices thicken, about 1 minute. Stir in the blackberries and blueberries, return to a simmer, and then remove the pan from the heat. Let cool while you roll the dough.
- Preheat the oven to 375 degrees F. Set an oven rack in the bottom position.
- On a floured work surface, roll out 1 disc of dough to fit a 9-inch pie plate with about 1 inch of overhang. Roll out the second disc and cut strips or shapes. Pour the filling into the bottom crust. Top with a lattice or cut-out design. Brush the crust with the egg wash.
- Bake on a baking sheet (to catch any drips) until the crust is golden brown and the filling is bubbly, about 45 minutes. (Check halfway through; if the top crust is browning too quickly, loosely cover with foil.) Let cool.
Pumpkin Pie with Pecan Crumble
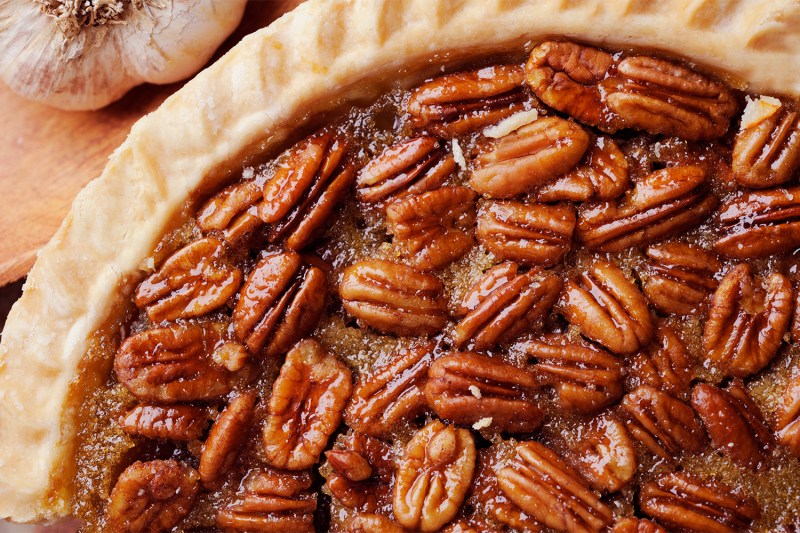
This cold-weather classic from Jamie Oliver is wonderfully satisfying, a nice balance of nutty, rich, and a bit earthy. Being a Brit, Olive also specializes in a bunch of savory pies, should you want to go go full pie mode and have one for dinner as well as dessert.
Ingredients:
Pastry:
- 2/3 cup unsalted butter (cold), plus extra for greasing
- 1 cup plain flour, plus extra for dusting
- .5 cup icing sugar
- 1 vanilla pod
- 1 large free-range egg
- semi-skimmed milk
Filling:
- 1 large butternut squash
- 1 whole nutmeg, for grating
- ¼ teaspoon ground ginger
- ¼ teaspoon ground cinnamon
- 1 cup soft brown sugar
- 2 tablespoons maple syrup
- .5 cup unsalted butter
- 3 large free-range eggs
Crumble Topping:
- .5 cup unsalted pecans
- 2 tbsp unsalted butter, (cold)
- .5 cup plain flour
- 1 tablespoon soft brown sugar
- 1 tablespoon maple syrup
Method:
- Preheat the oven to 400ºF. Lightly grease a deep, 9- or 10-inch loose-bottomed tart tin.
- To make the pastry, chop the butter into 1cm cubes and place in a food processor with the flour, icing sugar, and a good pinch of sea salt.
- Halve the vanilla pod, scrape out the seeds and add to the food processor, then pulse to fine crumbs. Crack in the egg, add a splash of milk, then pulse until it forms a rough dough.
- Pat and bring the dough together into a round, then wrap in clingfilm and pop in the fridge to chill for at least 1 hour.
- For the filling, quarter and deseed the squash, place on a baking tray, then add a generous grating of nutmeg. Sprinkle over the ginger and cinnamon, drizzle with the maple syrup, then cover the tray tightly with a double layer of tin foil and bake 1 hour, or until soft. Leave to cool.
- Reduce the oven temperature to 350ºF.
- On a clean flour-dusted surface, roll out the pastry until it’s around 1/5-inch thick, then loosely roll up around the rolling pin and unroll over the tart tin, easing it in and pushing it carefully into the sides.
- Trim off any excess pastry, patch up any holes, then prick the base with a fork, cover and chill in the fridge for 30 minutes (use any leftover pastry to make a few cheeky mince pies).
- When the time’s up, line the pastry case with quality clingfilm (non-PVC), then fill with rice, making sure you pack it right out to the sides. Bake blind for 10 minutes, remove the clingfilm and rice, and bake for a further 10 minutes, or until lightly golden, then leave to cool.
- Scoop the squash flesh and any bits from the tray into the food processor, add the sugar and maple syrup and whiz until smooth.
- Melt the butter and pour into the processor, then crack in the eggs and pulse to combine. Fill the cooled pastry case almost to the top with the mix and bake for 25 minutes.
- Meanwhile, make the topping. Place the pecans into the food processor (give it a quick rinse first) and pulse until roughly chopped
- Add the butter, flour, sugar and maple syrup, then pulse to a rough crumb.
- When the time’s up, remove the tart from the oven, sprinkle over the topping, then bake for a further 20 minutes, or until golden. Leave to cool before slicing.
- Delicious served with a dollop of boozy cream. I sometimes like to decorate my pie with extra toasted pecans just before serving, too.
Banana Cream Pie

A delicious and often underrated pie, the banana cream is a worthy add to the list. This one comes from esteemed pastry chef Gale Gand’s mother, Myrna.
Ingredients:
Pie Crust:
- 4.5 cups sifted all-purpose flour
- 2 teaspoons salt
- 2 teaspoons sugar (optional)
- 1.5 cups (3 sticks) cold unsalted butter, cut into pieces
- .5 cup ice water
- 2 teaspoons red wine vinegar
Filling:
- 8 cups whole milk
- .25 teaspoon salt
- 1 vanilla bean, split lengthwise
- 24 egg yolks
- 2 2/3 cups sugar
- 1 cup cornstarch
- 6 tablespoons cold unsalted butter, cut into pieces
- 6 ripe bananas, sliced into coins 1/4-inch thick
- Whipped cream for serving (optional)
Method:
- Make the pie crust: In the bowl of a mixer fitted with a paddle attachment, combine the flour, salt, and sugar. Mix 1 minute. Add the butter and mix just until the mixture resembles coarse crumbs.
- Stir the water and vinegar together, then gradually add to the flour mixture. Mix at medium speed just until a dough forms. Do not over-mix.
- Divide the dough in 2 and shape into round, flat disks on sheets of wax paper. Wrap separately and refrigerate 30 minutes.
- Lightly flour your rolling pin. On a lightly floured surface, roll the dough out into a large circle about 1/8-inch thick. Place your pie plate upside down on top and trim with a sharp knife, leaving about 2 inches extra dough all the way around.
- Roll the dough circle up onto your rolling pin, then unroll it into the pie plate; or, fold into quarters, transfer to the pie plate, and unfold. Gently press the crust into place, turning any excess dough hanging over underneath to create a thicker edge. Press the edge with the back of a fork to create a decorative edge. Repeat with the other pie crust, then refrigerate the crusts, covered, 30 minutes more.
- Preheat the oven to 375 degrees.
- Line each crust with a sheet of regular-weight aluminum foil, then pour in about 3/4 pound dried beans or pie weights. Bake the crusts 25 to 30 minutes, just until dry and set, then remove the foil and beans.
- Bake another 10 to 15 minutes, checking frequently to prevent over-baking, until just golden brown. Remove from the oven immediately and let cool on wire racks.
- Make the filling: Combine the milk, salt, and vanilla bean in a non-aluminum and heat over medium heat, stirring occasionally. As soon as the mixture begins to boil, turn off the heat and stir the mixture for 1 minute.
- Whisk the egg yolks and sugar together until thick and pale yellow, then gradually whisk in the cornstarch. Gradually whisk in half of the hot milk mixture.
- Pour the yolk-milk mixture back into the saucepan with the milk mixture and cook over medium heat, whisking frequently, until the mixture boils and begins to thicken. Reduce the heat to medium-low and cook, stirring, about 5 minutes more, until the mixture no longer tastes starchy. The mixture should become very thick, like a set custard. When cooked, turn off the heat.
- Stir in the butter until melted, then fold in the bananas. Pour the filling into the pre-baked pie shells.
- Push the bananas below the surface to prevent them from browning, then smooth the tops. Cover with plastic wrap, gently pressing the plastic wrap against the surface to prevent a skin from forming.
- Refrigerate at least 7 hours or overnight, and serve with whipped cream.
Key Lime Pie

An iconic Florida restaurant like Joe’s Stone Crab ought to know how to make a mean Key lime pie. And they do indeed, as this zesty recipe suggests.
Ingredients:
Graham Cracker Crust:
Filling:
Topping:
Method:
- For the graham cracker crust: Preheat the oven to 350 degrees F.
- Break up the graham crackers; place in a food processor and process to crumbs. If you don’t have a food processor, place the crackers in a large plastic bag; seal and then crush the crackers with a rolling pin. Add the melted butter and sugar and pulse or stir until combined. Press the mixture into the bottom and side of a pie pan, forming a neat border around the edge. Bake the crust until set and golden, 8 minutes. Set aside on a wire rack; leave the oven on.
- For the filling: (Meanwhile), in an electric mixer with the wire whisk attachment, beat the egg yolks and lime zest at high speed until very fluffy, about 5 minutes. Gradually add the condensed milk and continue to beat until thick, 3 or 4 minutes longer. Lower the mixer speed and slowly add the lime juice, mixing just until combined, no longer. Pour the mixture into the crust. Bake for 10 minutes, or until the filling has just set. Cool on a wire rack, then refrigerate. Freeze for 15 to 20 minutes before serving.
- For the topping: Whip the cream and the confectioners’ sugar until nearly stiff. Cut the pie into wedges and serve very cold, topping each wedge with a large dollop of whipped cream.
Georgia Peach Pie
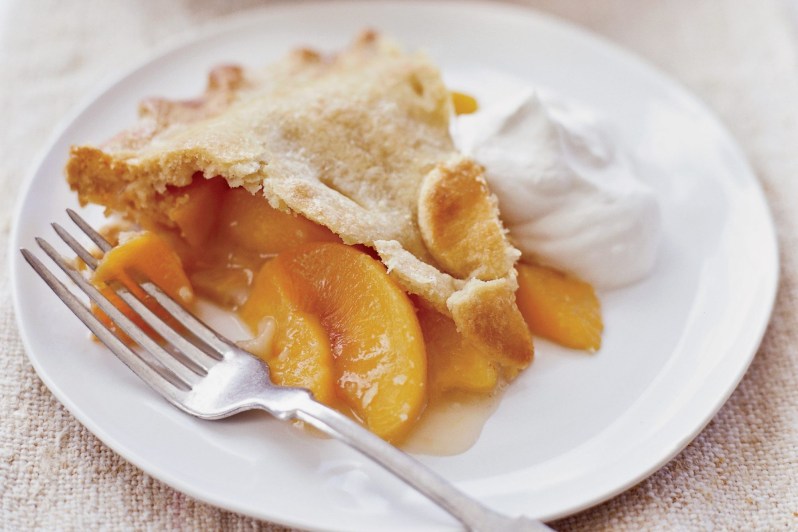
Perhaps the most satisfying of them all, peach pie puts an instant smile on your face. This one from baker and Food & Wine contributor Angie Moser is a gem.
Ingredients:
Crust:
- 2 2/3 cups all-purpose flour
- 2 teaspoons sugar
- 3/4 teaspoon salt
- 1 stick (4 ounces) cold unsalted butter, cut into 1/2-inch pieces
- 4 oz cold solid vegetable shortening
- .5 cup ice water
Filling:
- 8 large ripe but firm peaches
- 3/4 cup sugar
- 1.5 tablespoons fresh lemon juice
- .25 cup plus 1 tbsp all-purpose flour
- 1.5 tablespoons unsalted butter, thinly sliced
- Egg wash made with 1 egg yolk mixed with 2 tablespoons water
- Bourbon whipped cream, for serving
Method:
- In a food processor, pulse the flour with the sugar and salt until combined. Add the butter and shortening and pulse until the mixture resembles coarse meal. Transfer the mixture to a large bowl and sprinkle the ice water on top. Stir with a fork until a crumbly dough forms. Turn the dough out onto a work surface and knead 2 or 3 times, just until the dough comes together. Cut the dough in half and form into 2 disks; wrap in plastic and refrigerate until firm, at least 30 minutes or overnight.
- On a lightly floured surface, roll out each disk of dough to a 12-inch round. Ease one of the rounds into a 9-inch glass pie plate and transfer the other round to a baking sheet. Refrigerate the dough.
- Preheat the oven to 400°F. Bring a large saucepan of water to a boil and fill a large bowl with ice water. Using a sharp knife, mark a shallow X in the bottom of each peach. Blanch the peaches in the boiling water for about 1 minute, until the skins begin to loosen. Using a slotted spoon, transfer the peaches to the ice water to cool. Drain and peel the peaches and cut them into 3/4-inch wedges. Transfer the peaches to a large bowl. Add the sugar, lemon juice, and flour, toss well and let stand for 5 minutes.
- Pour the peaches and their juices into the chilled pie shell and scatter the butter slices on top. Brush the edge of the pie shell with the egg wash and lay the round of dough from the baking sheet on top. Press the edges of the pie shell together to seal and trim the overhang to 1/2 inch. Fold the edge of the pie dough under itself and crimp decoratively. Brush the remaining egg wash on the top crust and cut a few slits for venting steam.
- Transfer the pie to the oven and place a baking sheet in the bottom to catch any drips. Bake for 30 minutes. Reduce the oven temperature to 375°F, cover the edge of the pie with foil and bake for about 40 minutes longer, until the filling is bubbling and the crust is deeply golden on the top and bottom. Transfer the pie to a rack to cool completely. Serve with Bourbon Whipped Cream.