Feasting is our column dedicated to cooking, grilling, eating and discovering what’s on the menu across America and the world.
Anyone who’s immersed in the NYC dining scene, whether associated by career or love of eating out, knows how important Blue Ribbon Restaurants have been in shaping the culinary culture of this city. Helmed by brothers Bruce and Eric Bromberg, what began as the original Blue Ribbon Brasserie in 1992 on Manhattan’s Sullivan Street has grown into an empire with 19 properties in New York, Los Angeles, Las Vegas and London.
The Brombergs were no strangers to fine cuisine, as their upbringing involved trips to a small town in Provence, France where their love and understanding of French cooking began to grow and evolve. They both attended Le Cordon Bleu in Paris and worked at some of the top restaurants in France before bringing their talents to numerous kitchens in New York City. When they opened Blue Ribbon Brasserie in 1992, it introduced a new wave of dining with an eclectic menu, casual atmosphere and late-night hours (the restaurant famously stays open until 4 am) that draws chefs from all around the city after closing their own kitchens. Now their restaurants span across four cities and include favorites like Blue Ribbon Sushi, Blue Ribbon Fried Chicken and Blue Ribbon Bakery Market. Most recently, they opened The Ribbon in NYC’s Upper West Side neighborhood serving some of their classic fare with, of course, a raw bar, smoked fish and plenty of charcuterie.
So yeah, the Brombergs and Blue Ribbon know what’s up. Which is exactly why we asked them if they could give us some of their iconic recipes to try at home. Check out three of their favorites below and try your hand at mastering them in your own kitchen.
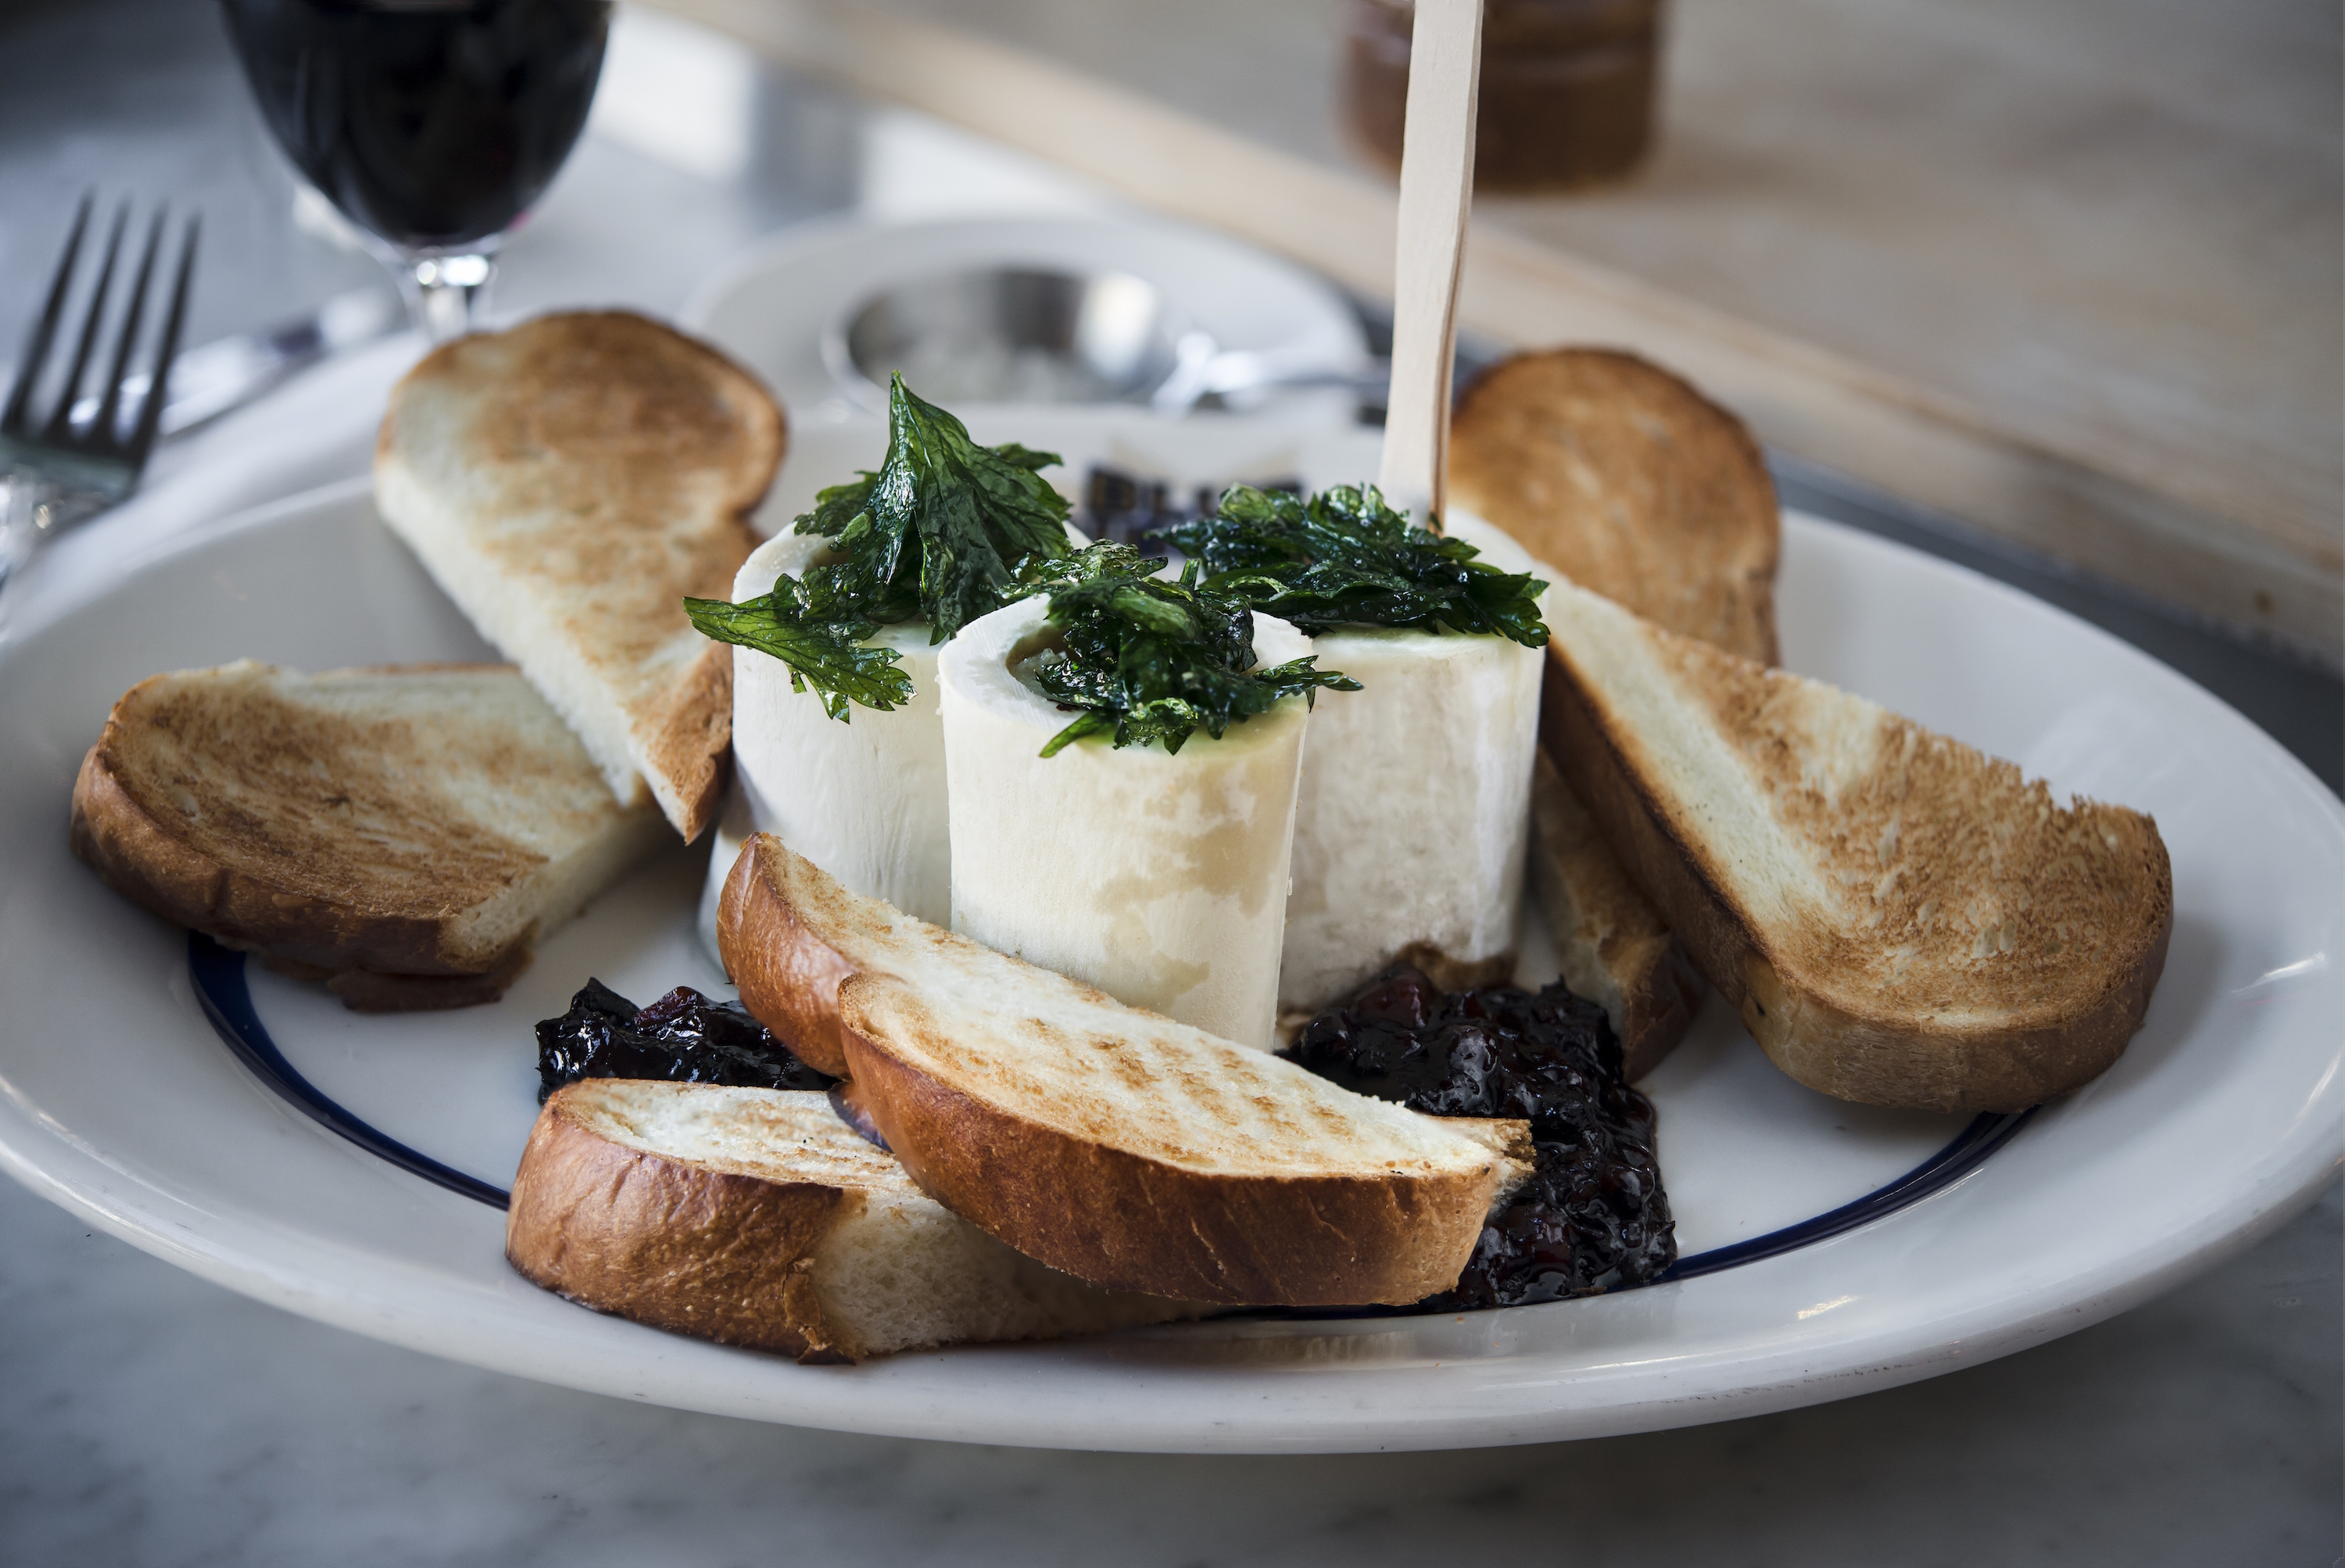
Beef Marrow Bones with Oxtail Marmalade
Serves 6
INGREDIENTS:
Marrow Bones
3 lbs. center-cut beef marrow bones cut into 2-inch pieces, tendons trimmed (ask your butcher to do this)
1/4 cup kosher salt, plus more if needed
Oxtail Marmalade
4 lbs. oxtail, trimmed of fat
6 cups port wine
6 cups dry red wine
4 qts. veal or chicken stock homemade or purchased
1 garlic head, halved crosswise
1/2 thyme, fresh bunch
1 tbsp. black peppercorns
8 tbsp. unsalted butter (one stick)
3 tbsp. all-purpose flour
1 1/2 lbs. carrots, peeled, trimmed and cut into 1/4 -inch cubes (about 4 cups)
1 lb. shallots, peeled and cut into 1/4 -inch cubes (about 4 cups)
1 1/2 tsp. kosher salt, plus more to taste
1/2 cup granulated sugar
1/2 cup packed light brown sugar
1 cup red wine vinegar
2 1/2 tsp. freshly ground black pepper, plus additional to taste
Final dish
3 slices challah bread, freshly toasted and still warm
Chopped fresh flat-leaf parsley leaves, for serving
Fleur de sel or another coarse sea salt, for serving
METHOD:
1. To soak the marrow bones, place the bones in a large bowl. In a large measuring cup, combine the salt with 4 cups of cold water; pour over the bones. If the water does not cover the bones, add a solution of 1 cup water to 1 tablespoon salt at a time, until the bones are covered. Soak bones in the refrigerator for 36 to 48 hours, changing the water three times, until the bones are bleached of color. Drain well.
2. To make the marmalade (you can do this up to two days ahead), combine the oxtail, 3 cups port, red wine, veal stock, garlic, thyme and peppercorns in a large pot. Bring the mixture to a boil, reduce heat and simmer for 3 hours. Transfer the oxtail to a bowl; once the meat is cool enough to handle, remove the meat from the bones and cut it into small cubes. Discard the bones and refrigerate the meat until ready to use.
3. Strain the oxtail liquid into a large skillet, discarding the solids. Bring the liquid to a boil over high heat; reduce heat to medium and simmer until mixture is reduced to 3 cups, 1 1/2 to 2 hours.
4. While it reduces, combine 3 tablespoons of the butter with the flour until it forms a paste. Whisk the paste, 1 tablespoon at a time, into the reduced liquid over medium heat. Cook until the mixture thickens slightly, about 3 minutes.
5. In a separate large skillet, melt the remaining 5 tablespoons butter. Add the carrots, shallots and a pinch of salt over medium heat until slightly softened, about 15 minutes. Stir in the sugars, remaining 3 cups port, vinegar, salt and 1 1/2 teaspoons of the pepper. Cook over medium-high heat until the liquid has completely evaporated, about 45 minutes. Stir in the oxtail meat, reduced oxtail cooking liquid and remaining 1 teaspoon pepper. Taste and adjust the seasonings if necessary. Set aside until ready to use, or, if not using the same day, transfer the marmalade to an airtight container and refrigerate until ready to use (before serving, reheat in a saucepan over medium heat until warmed through).
6. To cook the marrow bones, place the bones in a large saucepan and cover with water. Bring to a simmer over medium heat (do not let the water come to a boil or marrow will melt out of the bones). To test for doneness, place a thin metal knife in the center of the marrow and hold it under your lip to see if it’s hot. When hot, remove bones from the water.
7. To serve, cut the challah toasts into quarters. Transfer to a platter. Arrange the bones on the platter. Spoon the oxtail marmalade in between the bones (reserve remaining marmalade for another use). Sprinkle the platter with chopped parsley and coarse sea.
Related: Chef Angie Mar Makes a Pork Cake and Wins
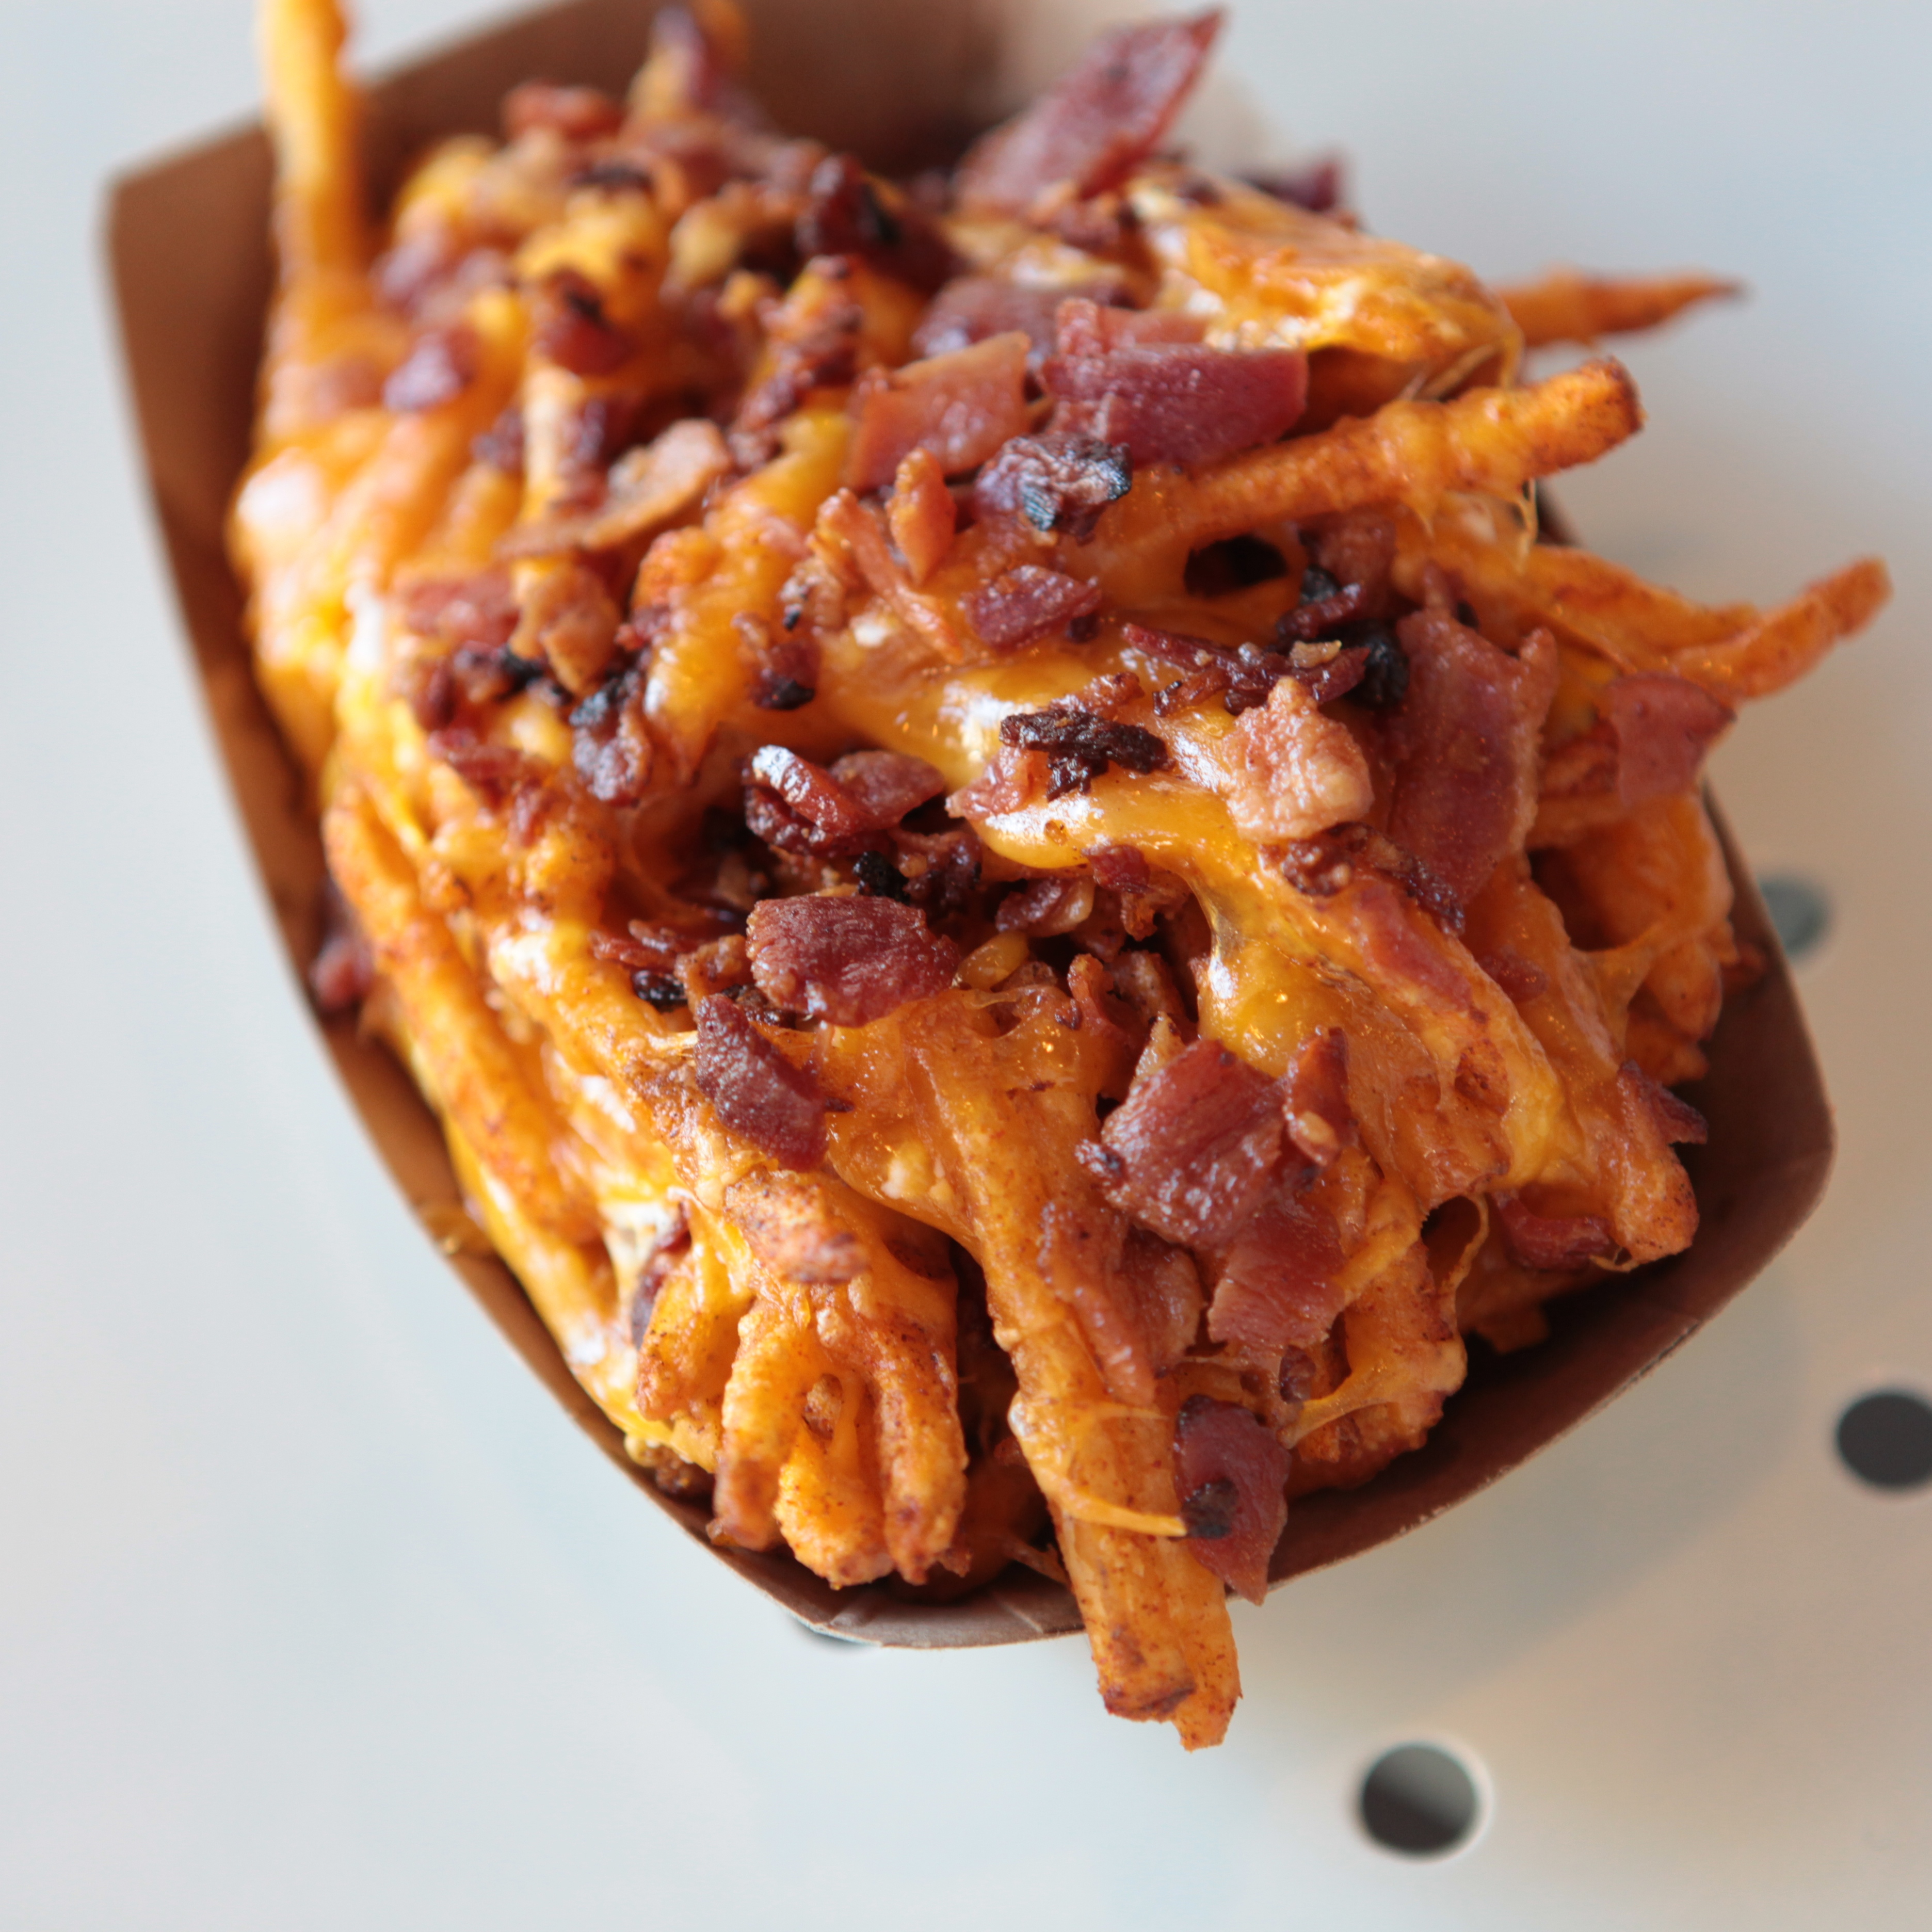
Fries with the Works
INGREDIENTS:
12 oz. frozen french fries, thawed and dried
Olive oil
16 oz. cheddar cheese, grated
8 oz. sour cream
8 bacon strips, cooked and chopped
METHOD:
1. Preheat your broiler on high.
2. In a large stainless steel bowl, lightly toss French fries in oil, salt and pepper. Place fries in a large aluminum foil tray and broil for 6 – 10 minutes or until golden brown.
3. Once fries are finished cooking, remove tray from oven and evenly drizzle sour cream over, then top with shredded cheese and cooked bacon. Broil another 2 – 3 or until cheese melts. Serve immediately.
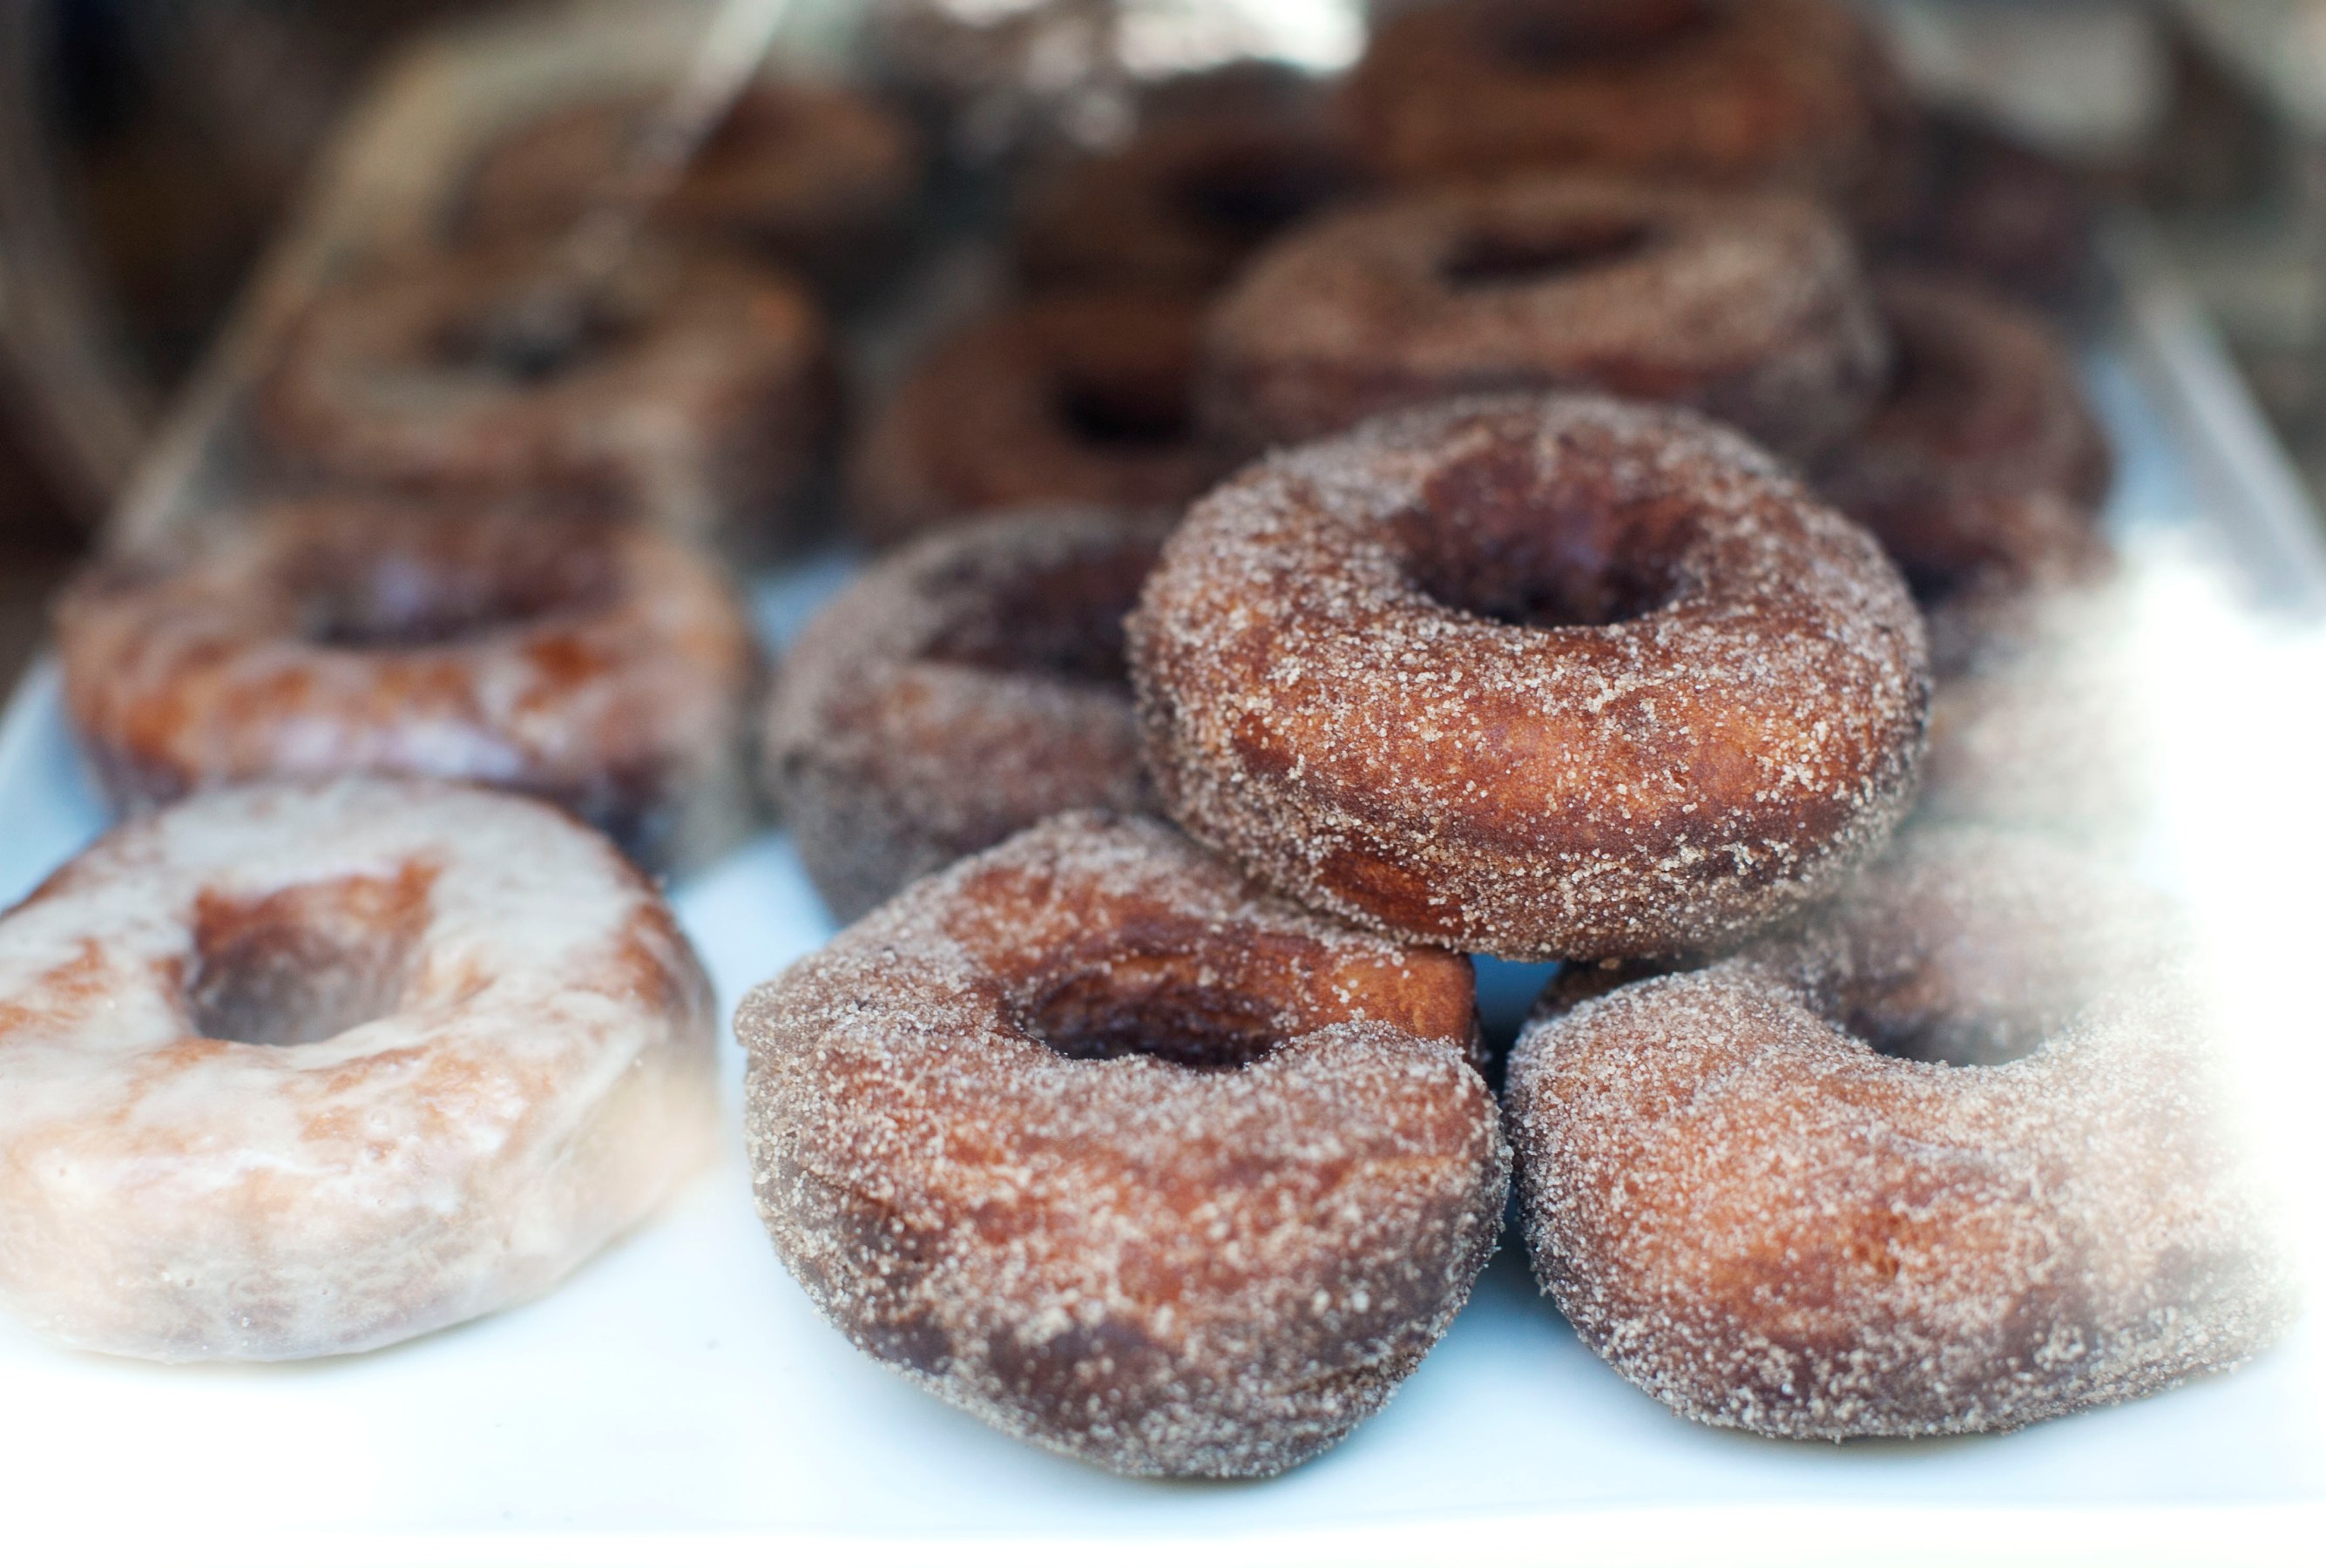
Challah Doughnuts
INGREDIENTS:
3 eggs
1 tsp. ground cinnamon
1 1/2 cups granulated white sugar
4 cups all-purpose flour
1 tsp table salt
1 oz. fresh yeast (crumbled)
1/2 cup whole milk
Vegetable oil for Frying
METHOD:
1. Whip three eggs in a small bowl. Set aside.
2. Mix together cinnamon and 1 cup of sugar in a small bowl. Set aside.
3. Sift flour, sugar and salt into a large mixing bowl.
4. Mound the flour and make a small well in the top. Add in fresh yeast, whole milk and eggs and begin mixing the wet ingredients within the well with your finger tips, slowly working in the flour.
5. Knead the dough for 10 minutes by folding the dough on itself and then rotating clockwise a quarter of a turn at a time.
6. After 10 minutes, place the dough in a floured mixing bowl and cover with plastic wrap. Allow the dough to ferment for 1 hour.
7. After the dough has risen, use a floured rolling pin and roll out a rectangle about 1” thick.
8. Using a 3” doughnut cutter, cut 20 doughnuts and place them on an oiled sheet pan.
9. Heat 1” of oil in a frying pan to 375F. Fry the doughnuts for 1 minute on each side in vegetable oil.
10. Cool the doughnuts on a wire rack and then toss in cinnamon sugar.
To learn more about the Brombergs and their empire, visit blueribbonrestaurants.com.


