Turn on any film that involves a plane crash, a jungle, and seemingly Dwayne ‘The Rock’ Johnson in some khaki-colored gear, and before long, they’ll pick up a stick to defend themselves or hunt for their dinner. Or perhaps just for comedic value. They probably use this stick in a ridiculous way — hurling it at a big cat to defend themselves, for example — but while their usage might be flawed, knowing how to make a spear out of rudimentary materials isn’t.
As a keen outdoorsman, you know that often, if you’re lost on the trail, the best thing you can do is to remain stationary. Unless you have a good idea where you are to begin with, or you have unnaturally good navigation skills, there’s a good chance you’re just going to make your situation worse.
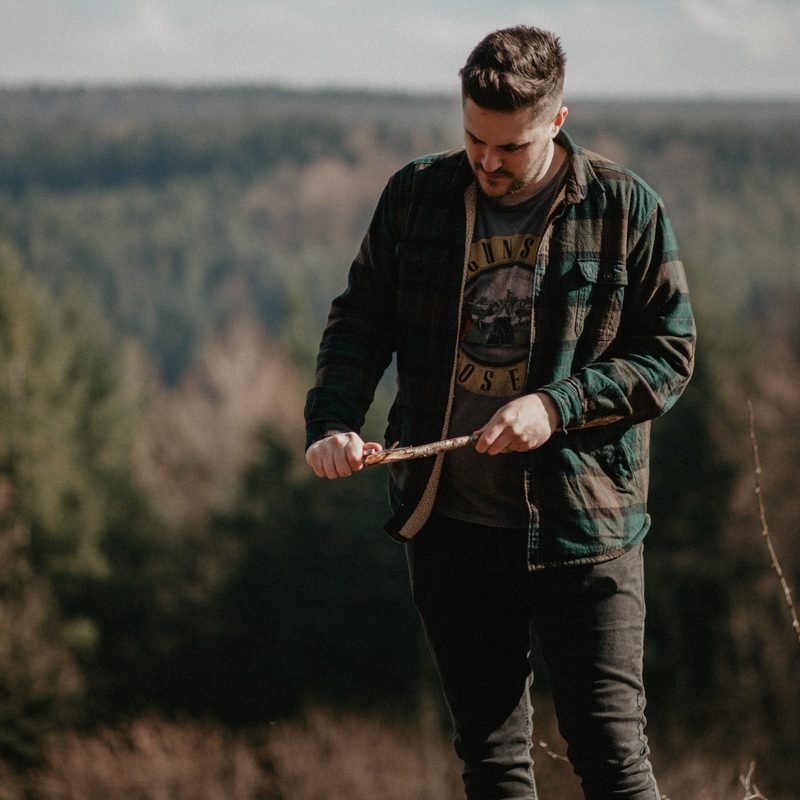
But waiting it out is daunting. What else is waiting with you? Good thing you’ve always got your survival knife and fire starter on you like a proper outdoorsman, right? With just these two tools — and a saw or hatchet if you happen to have one — you can make yourself a spear that can help you when it comes to protecting yourself, but also to hunt for food if you’re going to be stranded for a few days.
Here are my two favorite methods to make a spear.
What materials are spears made from?
To make your survival spear, you need a sturdy branch or a sapling that’s just a little taller than you are. Keeping your spear longer than you are tall means that when you stand it on end, you’re not going to have an accidental meeting with the sharp end.
For a strong and supple spear, your branch should be about the thickness of a broom handle and should still be green. Cutting living trees does go against leave no trace principles in the outdoors, but in a survival situation, we sometimes have to forego our preferred morals. If you work your stick right, you can end up with a tip harder than copper.
How to make a simple survival spear
The humble pointed stick. It’s been around for centuries, and there’s a reason for this. It’s easy to make, it’s reliable, and you know what you’re getting into. But there are ways to make it a little better, so follow these steps for a simple survival spear.
Step 1: Find your chosen branch or sapling and chop it off as close to the base as possible.
You can use your knife or a hatchet for this, but a folding saw will give you the cleanest cut. Use your knife to strip off any extra growth from your spear.
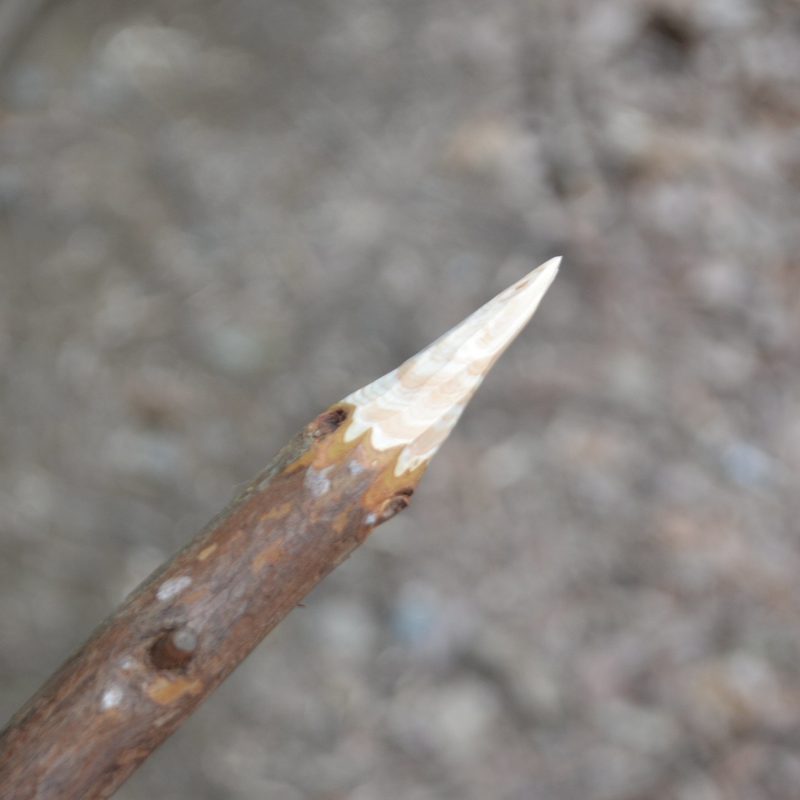
Step 2: Shave the bark from several inches at one end of your spear.
Once it is clean, use your knife to shave the end to a point. Hold your spear securely in one hand and always remember to sharpen the stick away from your body.
Step 3: When your spear is sharp enough, heat the sharp end in your campfire to harden the tip.
Heating the tip dries out the wood, hardening it so that it’s much stronger, less flexible, and will last longer. Remember, you’re toasting your spear slowly, not trying to burn the end.
If you have any grease on hand, like a tub of Vaseline or lip salve, you can grease the tip of your spear before you heat it and protect the wood. This stops the tip of your spear from charring as easily. If you don’t have any grease on hand, you can substitute pine sap.
Step 4: Your survival spear is ready to go. If you have time to burn and want to make the most robust spear tip possible, you can use a smooth stone to burnish your spear tip.
Rub the stone firmly over the spear tip to compress the fibers and toughen the wood until it almost looks glassy and feels as tough as steel.
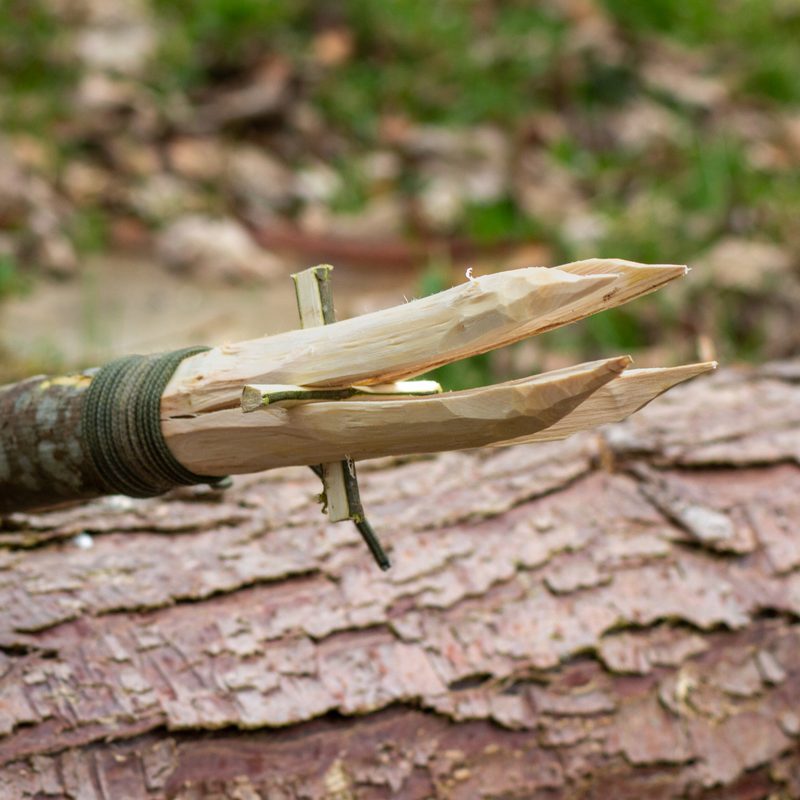
Making a four-pronged survival spear
The four-pronged spear is a popular alternative to the simple sharpened stick, especially for those hunting small animals or fish. The four-pronged spear gives you a wider area, and the gaps between the prongs are excellent for trapping animals. While it’s better suited to hunting, this spear method is less suited to defending yourself from predators.
Step 1: Find your spear stick.
This should be a couple of inches thick and as straight as possible. Try to avoid sticks with any knots near the end.
Step 2: Wrap your piece of wood 6 to 8 inches from the end using a piece of paracord or similar.
You can use a variety of knots to achieve this, so long as the cord is tight and secure. Be aware that if you’re using green wood for your spear, you may have to rewrap it once the moisture dries out.
Step 3: Split your wood in a cross shape using your bushcraft knife and a wooden block to hit it down.
You should split your wood to just above where you have wrapped your spear.
Step 4: Squeeze all four tips together and sharpen your stick to a point.
It can be tempting to sharpen your stick prior to splitting it, but this will make it more difficult to split accurately.
Step 5: To create the space between the prongs that makes this spear so good for catching animals, use two small sticks to wedge the gap open.
You may have to shave these down to fit the gap, and you can hammer them down with your wooden block if necessary.