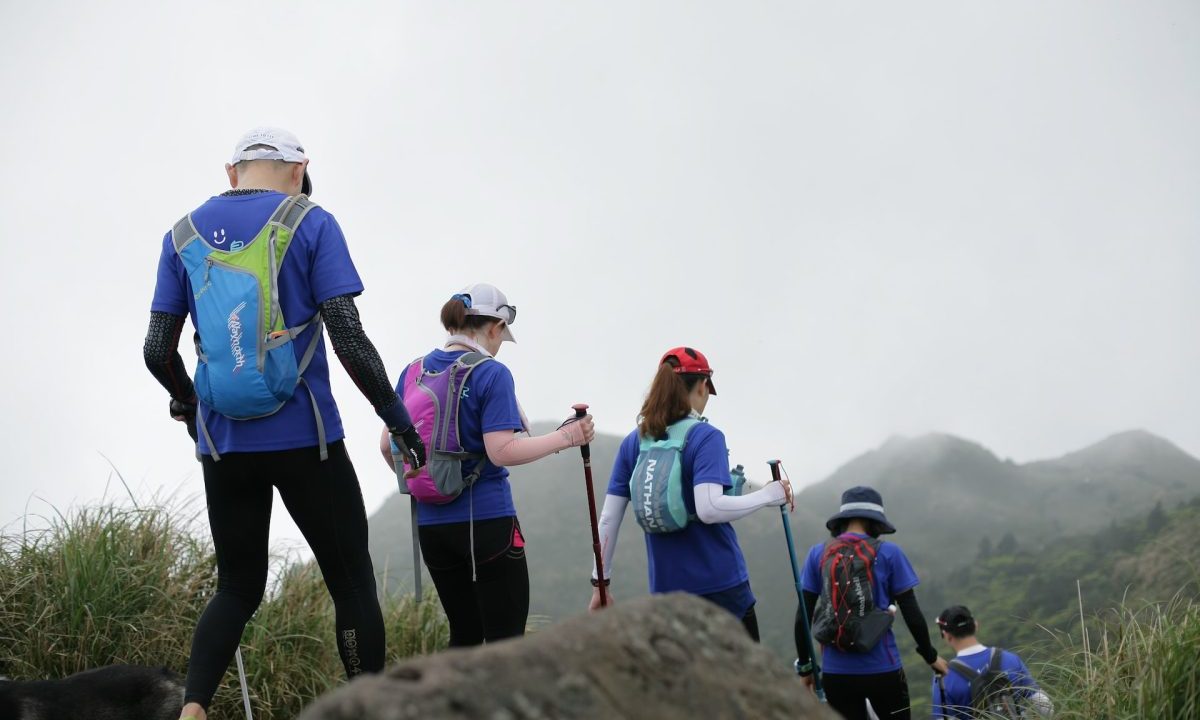
While hiking can certainly be a relaxing activity, it can also be quite a vigorous workout and athletic endeavor. If you find yourself wanting to up the intensity, duration, and terrain of your hikes, you may find yourself wondering how to train for hiking. Luckily, there are numerous exercises to do at home or in the gym to help strengthen your legs and make your trail time more effortless.
Strengthening your body off the trail will translate to improved hiking endurance, power, and protection against acute and overuse injuries. For example, improving your balance and building up the stabilizing muscles in your lower legs can help guard your ankles against sudden twists or sprains while developing the quadriceps can make long, steep descents nothing more than an opportunity to enjoy the scenery rather than an exhausting trek that leaves your legs feeling like Jello.
Some of these exercises can be done at home without equipment, though having access to a gym or basic workout gear will help. Spending some time in the gym or doing strength training at home to prepare for hiking is also an opportunity to address any muscle imbalances, build core strength, and develop your athletic foundation.
The goals of your hiking strength training program should be to increase your strength in the primary muscles (quadriceps, hamstrings, glutes, calves, and core) involved in
With these goals in mind, we’ve put together the ten best strength training exercises to prepare for hiking.

Goblet Squats
Goblet squats primarily target the quads and glutes, but they activate your hamstrings and adductors as well, making them an excellent exercise for hikers. As you get stronger, increase the weight you use or perform the squat atop a BOSU ball to add a challenge to your core and balance.
Equipment Needed: A heavy kettlebell or dumbbell. Optional: BOSU ball.
Step 1: Stand with your feet slightly wider than shoulder-width apart, with your toes pointing about forward or about 5-10 degrees outward. Your hips should also be externally rotated.
Step 2: Hold a kettlebell or dumbbell up at chest height.
Step 3: Inhale, pushing your hips backward as if reaching your butt back to sit in a chair. Make sure your core is engaged, your chest is up, and your back is straight.
Step 4: Exhale, pressing through your heels to return to the starting position.
Step 5: Repeat 10-15 reps per set.

Weighted Step-Ups
You would be hard-pressed to find a more functional hiking exercise than weighted step-ups. Step-ups are a multi-joint, compound exercise that works all the major muscles of the lower body while simultaneously providing a cardiovascular challenge. A weighted vest, your actual
Equipment Needed: Tall box or step, weighted vest or pack.
Step 1: Stand facing a bench, plyometric box, or step that is roughly knee height or slightly shorter. Relax your arms at your side.
Step 2: Engage your core and glutes while you step up onto the box with your right foot. Use your arms to drive your body upward.
Step 3: Bring your left leg up onto the box as well so that you are standing on top of the box.
Step 4: Step back down with your right foot first, then left.
Step 5: Continue leading with the right foot for 12 reps, and then switch sides.
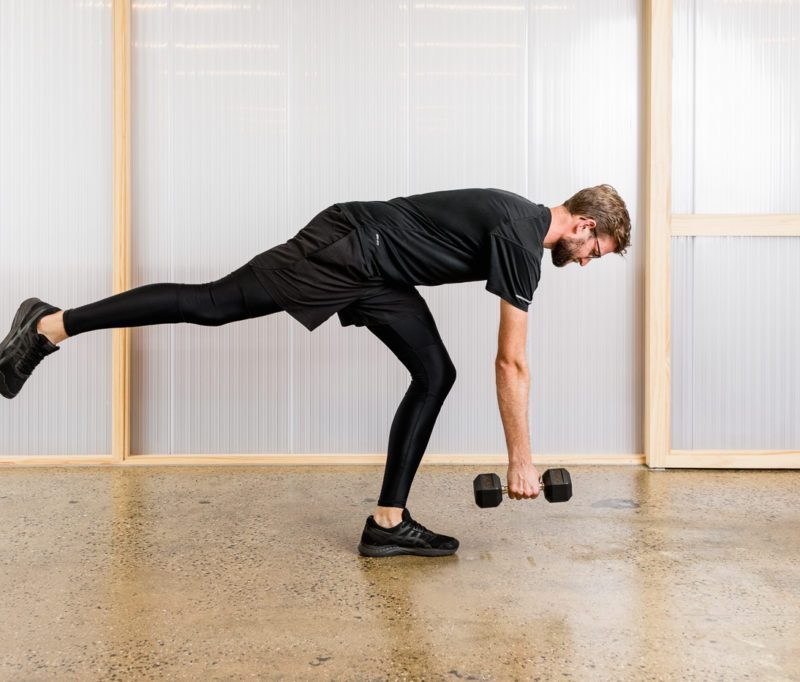
Single-Leg Romanian Deadlifts
Single-leg Romanian deadlifts provide all the excellent posterior chain recruitment benefits of standard deadlifts while being more functional for hiking since they improve your single-leg stability.
It can be a tricky move to master, especially if you tend to struggle with balance and coordination, but it should translate to safer hikes and more confidence on uneven terrain. As you get stronger, you can even stand on a cushion or BOSU to further increase the difficulty and core muscle recruitment.
Equipment Needed: A heavy dumbbell or kettlebell. Optional: BOSU
Step 1: Stand with your feet shoulder-width apart, knees slightly bent, chest up and proud, arms at your side, and a dumbbell in your right hand.
Step 2: Bring your left arm out to your side for balance and engage your core.
Step 3: Bend your left knee (the one on your standing/support leg) about 20 degrees to activate your hamstrings and glutes while you lift your right leg off the ground.
Step 4: Contract your glutes and hinge from your hips to bring your torso toward the floor, keeping your gaze on the floor to prevent hyperextending your neck. Your right leg should extend behind you as a counterbalance.
Step 5: Reach the dumbbell in your right hand down toward your left foot until you feel enough of a stretch in the hamstring of your supporting leg.
Step 6: Engage your core and glutes to come back up, extending your hips until they are fully locked out. If you need to regain your balance, you can touch your right foot back down to the floor; otherwise, keep it lifted and move into your next rep.
Step 7: Complete 10 reps per side per set.

Bulgarian Split Squat
Much like hiking, the Bulgarian split squat is a unilateral exercise, which means it requires coordination and balance while also placing a greater demand on your muscles. Split squats are great for strengthening your lower body, core, and spinal extensor muscles. This variation, which elevates your rear foot, increases the activation of your hamstrings, quads, and hips, which translates closely to
Equipment Needed: Weight bench or box, heavy dumbbell, or kettlebell.
Step 1: Stand about three feet in front of a bench, facing away, with the top of your rear foot up on the bench behind you.
Step 2: Your legs should be shoulder-width apart. Your front foot should be far enough forward that when you drop into a lunge, your front knee does not extend beyond your toes.
Step 3: You can load this squat by holding dumbbells in each hand with your arms extended down at your sides.
Step 4: Keeping your shoulders back and core engaged, bend your front knee to drop into a split squat/lunge.
Step 5: When the thigh of your front leg is parallel to the ground, press through your heel to return to the standing position.
Step 6: Complete 8-10 reps per leg per set.
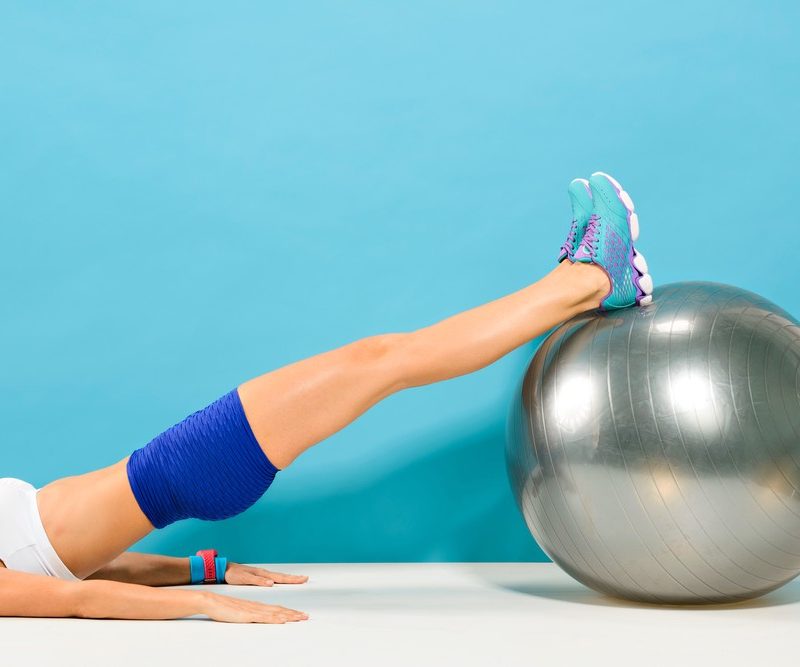
Stability Ball Hamstring Curls
The hamstrings are key players in all the uphill sections of your hike. This exercise also engages your abs, glutes, and hip flexors, which work synergistically to coordinate your stride and maintain your balance on the trail. This is a great exercise to build muscular endurance; you can easily bang out many reps and keep your hamstrings firing.
Equipment Needed: Large stability ball.
Step 1: Lie on your back with your legs straight and your heels up on a stability ball. Place your arms at your sides with your palms down on the mat.
Step 2: Engage your abs and glutes to lift your hips up so that your body is in a straight line from your heels to your head. Your shoulder blades should be down on your mat.
Step 3: Engage your hamstrings and press your heels into the ball.
Step 4: Bend your knees to bring the ball toward your butt.
Step 5: Return to the starting position.
Step 6: Complete 30 reps per set.

Jump Squats
Jump squats strengthen all the primary leg muscles involved in hiking, such as the glutes, quads, and hamstrings. Plus, they’ll give you a cardio boost that will make feeling breathless after steep uphill climbs a thing of the past.
Equipment Needed: None.
Step 1: Begin in a standing position with your feet shoulder-width apart.
Step 2: Lower your body into a squat by bending your knees and sitting your hips all the way back, as if reaching your butt back to sit in a chair. Engage your core, maintain a straight back, and keep your chest up and proud.
Step 3: Jump up vertically as high into the air as high as you can, reaching up toward the ceiling.
Step 4: As soon as you land, bend your knees to cushion the landing, transitioning immediately into a full squat to begin again.
Step 5: Jump as high and fast as you can for 60 seconds.
Step 6: Rest for 30 seconds and then repeat for three sets.
Single-Leg Pallof Press
The Pallof Press is an anti-rotational exercise that works your obliques, shoulders, and abs. By standing on one leg, you’ll also work on your balance while you strengthen the muscles stabilizing the ankle. Keep your core tight and engage your glutes to prevent your body from twisting or falling.
You can adjust the difficulty of the move with the width and thickness of the resistance band you choose — for an easier level, choose a thinner band, and for a more advanced progression, choose a wider and thicker band.
Equipment Needed: Anchored resistance band with a handle.
Step 1: Attach a resistance band with a handle to a pole or stationary object at chest height.
Step 2: Your starting position should be far enough away from the anchor point that there’s decent tension on the band.
Step 3: Stand on one leg and hold the handle of the band in toward your chest.
Step 4: Bracing your core and squeezing your glutes, straighten your arms by pushing them out away from your chest against the tension of the band.
Step 5: Hold the extended position for a full breath and then return your arms to your chest.
Step 6: Complete 15 reps and then switch sides and legs.
Single-Leg Calf Raises
The calves are predominantly involved in uphill hiking and can easily fatigue if not sufficiently trained. Fortunately, they are easy to target with this move.
Equipment Needed: A step, curb, or box to stand on. Optional dumbbell.
Step 1: Stand on one leg on a step or box with your heels hanging off the back. Hook your other foot behind the ankle of the supporting leg.
Step 2: Hold a dumbbell in the opposite arm.
Step 3: Drop your heel down so that you’re sinking down into the heel, and then raise up onto your toe so that you’re on your tiptoes.
Speed Skaters
Many hikers complain about sore knees after a long day on the trail, which is often caused by weak hips. When the hips are weak, your knees collapse inward, putting undue stress on the ligaments and cartilage of the knee. By strengthening your hips, adductors, and abductors through lateral training, you’ll not only reduce your risk of injury but improve your agility, coordination, and stability up and down uneven terrain. You’ll also get your heart pumping during this intense exercise. A portable slide board, such as the Brrrn Board, is ideal for this exercise, or you can use socked feet on a smooth floor.
Equipment Needed: Lateral training slide board such as the Brrrn Board or smooth floor
Step 1: Start at the right side of your Brrrn Board or slide board with a slight bend in your knees and hips and core engaged.
Step 2: Slide your left foot across the slide board to the left as you press your right foot against the right bumper of the board.
Step 3: When your left foot is about to touch the left bumper, lift your right foot off the slide board.
Step 4: Skate back and forth as fast as you can for 3-5 minutes.
Step 5: As you get more advanced, you can lean forward like a speed skater and reach across your body with your opposite hand to touch down at each bumper.
Heel Touches
One of the common ways hikers stumble and fall is when they lower their bodies off a boulder or elevated log. Stepping down under control can be very difficult, especially on tired legs or with a heavy pack, so this exercise works your glutes and quads to facilitate this motion.
Equipment Needed: Stair, box, or curb about 8 inches off the ground and an optional dumbbell.
Step 1: Stand on a step or curb facing the stair or ground below it.
Step 2: Lift your left foot off the stair so it’s just hovering right about the stair with the toes pointing toward the ceiling.
Step 3: Bend your right knee as if you’re going to step down onto your leg foot, but just hover the heel over the ground or stair below without touching it.
Step 4: Power yourself back up with the right leg.
Step 5: Complete 12 reps per side, moving in a slow and controlled fashion.