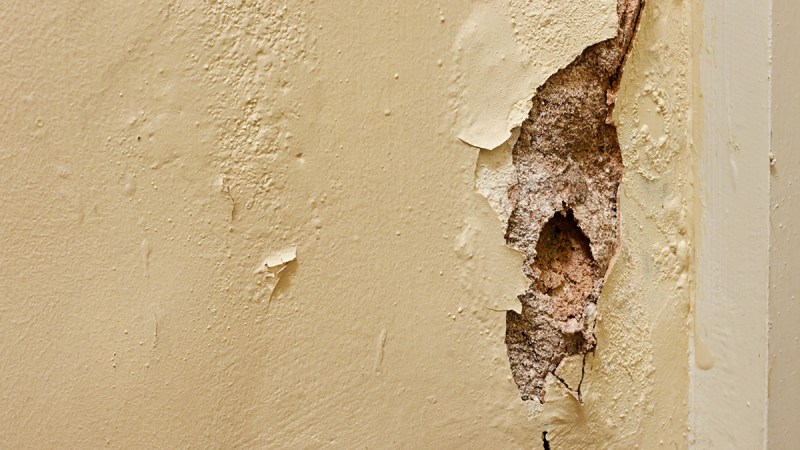
Whether you experienced an accident while moving into your new digs, went into a rage after a rough night, or want to create a start-up helping those who fall under the former credentials, walls and ceilings get gored more often than thought about. That’s why knowing how to fix a hole in the wall is a keystone skill in any man’s repair repertoire.
When you initially see the indent in your drywall, one of two things comes to mind: “(insert holy object) dammit” or “There goes my deposit.” Fortunately, it’s fairly easy to make a strong, almost invisible repair on a hole. So easy, in fact, all you need is a four-piece repair kit: some sandpaper, a half-pint of compounded vinyl spackling, and a self-adhesive mesh patch.
Now, there are many ways to go about repairing a hole in the wall, but we’re going to show you two easy, financially feasible methods. One will be for fixing minor cavities, while the other will suffice for craters larger than 6 inches. With that being said, let’s get to patching.
How to patch smaller holes
A small hole is no sweat. Even the non-DIYer can easily finish a quick patching made by a doorknob or fist, whichever is the culprit.
Materials required
DAP’s includes spackling, sandpaper, an aluminum adhesive patch, and a putty knife. The same kind of kit should be available at your local hardware store, too.
Step 1: Remove any excess paint shavings and fractured drywall. You can use a tool or your fingers — whichever works best.
Step 2: Sand the edge of the hole with sandpaper. The surface must be entirely smooth in order for the result to look as good as new.
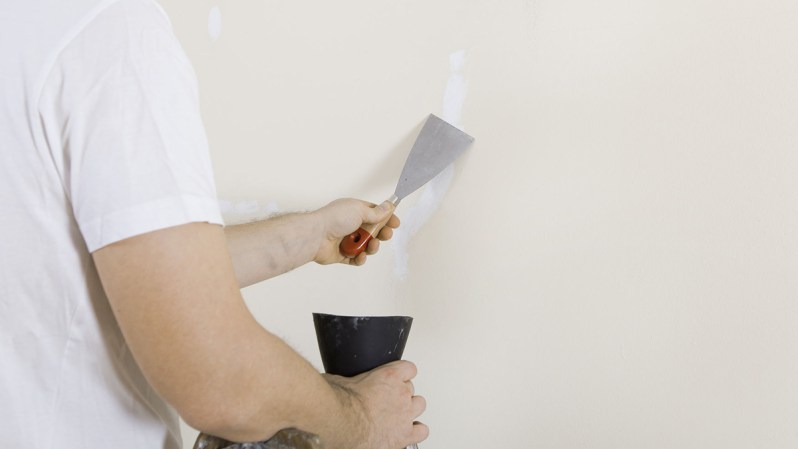
Step 3: Apply the self-adhesive patch with the hole as centered as possible. Then, make sure the edges of the adhesive are smooth and firmly stuck to the wall. You can use your putty knife, or fingers (again, a great tool), to do so.
Step 4: Use the putty knife to cover the patch with spackling in a crisscross pattern. Once the patch is invisible, feather the edges of the spackle so it blends well with the wall. You can do this by increasing pressure on the knife as you approach the edge of the covered area. You’re looking to minimize or thin the spackle on the drywall to make sure it doesn’t stand out like a pair of flip-flops at a business lunch.
You may need to let the sparkle dry and/or apply multiple coats to fully conceal the patch.
Step 5: Once it has fully dried, sand the spackle down to make it even smoother in preparation for our final task: paint. Hopefully, you have some color left from the last time you painted your house. If not, try matching the paint color with the selection at a local paint store — some might even have a paint-matching service that can optically scan a paint chip and whip you up a new can in no time. Either way, you’re bound to find the right shade.
How to patch big holes in the wall

These suckers take a little more planning. With that being said, you’ll need more materials to match the uptake in the workload you’re going to experience. Don’t be frightened, however, it’s still a fairly easy task if you have the right guidance.
Materials required
The size of the hole will gauge exactly how many materials will be necessary. If you can find a pre-made patch that will fully cover the hole, then you can use that and the other materials and methods listed above to complete the job. Otherwise, you’ll need to head to a hardware store and pick up the following:
- Drywall saw or knife
- Putty or joint compound with respective knife
- Tape measure
- Scissors
- Construction adhesive tape
- Sandpaper
- Drywall scraps
- Dust mask (recommended)
- Goggles (recommended)
(Note: This method also guarantees an invisible finish, as you’re essentially putting a slab of drywall back where it was removed.)
Step 1: Cut a piece of drywall into a square shape about 2 inches larger in width and height than the hole you need to repair. Then, mark those two extra inches off with a pen or knife to remove the gypsum, leaving only the paper backing.
Step 2: Next, you’ll need to enlarge the hole in the wall to match the new piece of drywall you’ve just measured and cut. Hold the new patch with the excess backing paper over the hole and trace around the square (Do not include the paper border in the tracing.)
Step 3: Cut the traced square on the wall with your drywall knife. After cutting, remove all paint shavings or fractured drywall. Sand down the rough edges of your fresh cuts when complete.
(Caution: Before cutting the drywall, check inside the hole for electrical wires.)
Step 4: Apply your putty or joint compound mixture to the paper backing. Fit the exposed square into the hole you cut, while pressing down hard on the coated paper edges so it firmly attaches to the exterior of the abutting drywall.
Step 5: Now, take your putty and cover the whole patch, following the feathering technique described in step four of the patch instructions for smaller holes above. Let dry, sand, and repeat until the patch is fully concealed and smooth, like a clean shave.
Step 6: Paint that sucker and grab yourself a beer for a job well done.


