How many psychiatrists does it take to change a light bulb? None. The bulb will change when it’s ready!
OK, I’ll wait for a few minutes to let you catch your breath. There you go … enjoy a good laugh and take your time. All joking aside, changing a light bulb is easy, and you should never put it off.
Now, what if it’s the light fixture itself you want to change? Oh boy, that’s, well, it’s actually pretty easy, too, as it turns out. Can you use a screwdriver? Can you twist a pair of wires together? Can you do that twice? Then you, can change a light fixture.
Whether it’s a ceiling-mounted fixture or a wall-mounted sconce, the steps involved in replacing a fixture are pretty much the same. (Note that some LED high hats or other more specialized units may require other steps, aka calling an electrician.) Frankly, you will probably only need the Phillips and maybe the needle-nose for firmly twisting wires together, though the twist-on wire connectors (the colorful plastic “caps”) usually do a fine job of that for you.
Here’s what you’ll need:
- Phillips screwdriver
- Flathead screwdriver
- Needle-nose pliers
- Wirecutter
- Wire stripper
Change a light fixture in seven easy steps

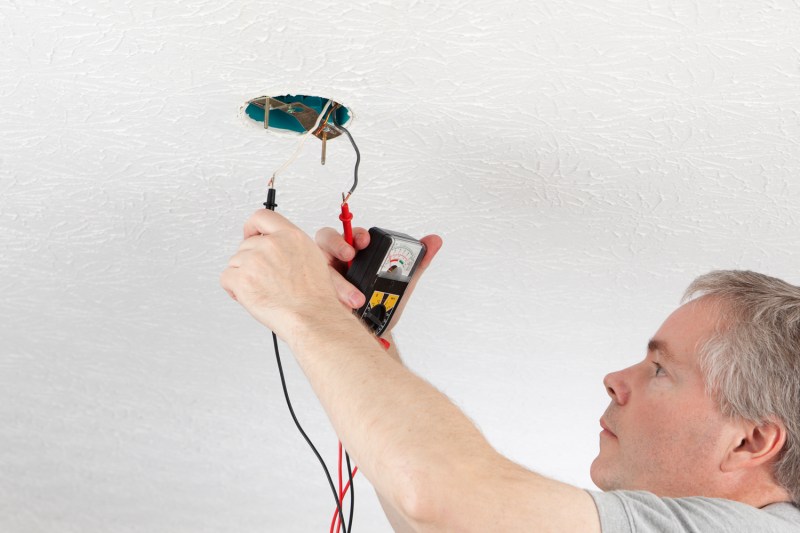
Turn off the power
Find the right circuit to power down, and if you can’t figure that out, shut down the electricity to the whole home. Being shocked is not fun (we’re not talking about getting a new watch and saying that you got G-Shocked, after all). I know from personal experience(s).
Remove the old fixture
This will likely first involve removing a glass globe, then unscrewing a few screws holding a plate against the ceiling or wall. Be ready to support that plate with one hand while using the other hand to twist the conical twist-on wire connectors (they’re usually orange or yellow) off the wires now hanging out of your wall or ceiling.
Note the wire colors and placement
Modern light fixtures typically have one black wire and one white wire, as well as one green grounding wire. If the wires sticking out of your ceiling are black and white, things just got easier. If your home has older wiring, often in the form of copper wires without differentiated coating, then you must carefully note the colors of the wiring in the fixture you just removed. Make sure when you attach the new fixture, its black wire connects where the old black wire was. You can (and should) temporarily mark the wires with painter’s tape.
Check the hardware in the ceiling
This is easy to do in two simple steps:
- Make sure the “electrical box” is in good working order. This means the box, which is often of a circular shape, is secure in the ceiling and that its wires are properly coated and have enough wire exposed at their ends to properly intertwine with the new fixture’s wires. That wire stripper can help here, and use the wire cutter to snip away a frayed or overly twisted wire tip.
- Make sure there are holes through which screws fitted to the new fixture can pass. Don’t be afraid to drill your own, and note you can also attach the new light fixture’s plate to wooden studs if need be.
Connect the wires
Here’s how to connect the wires:
- The black wire gets twisted together with the black wire. Ditto the white. Turn them in a clockwise manner.
- Then screw those little conical caps over the twisted-together wires, also turning them clockwise until they resist. (Lightly, no need to turn much past the first resistance.)
- Next, attach the green ground wire to the ground screw on the electrical box. It will likely be green itself or will say “ground.”
- Push the excess wiring up into the box area so it won’t be pinched by the fixture.
Connect the plate
In a perfect world, there will be holes in the electrical box that perfectly align with the holes in your new light fixture. In the real world, you might have to get creative here. You can screw into wood, drill your own holes into metal, and so forth — most light fixtures aren’t that heavy, just make sure the plate is secure and make sure not to screw with any wires, so to speak.
Attach the cover
Maybe it’s a glass globe, maybe it’s a wrought iron housing, maybe it’s vintage Tiffany’s glass. Whatever. Just follow your new fixture’s instructions to attach the part that covers the bulb to the plate you just secured. Did you forget to insert the light bulb? Take the cover back off, install your bulb, replace the cover … and let there be light! Now, time for a beer.
Changing a fixture in recessed lighting

Changing a light fixture in recessed lighting is a bit different from changing the fixture on a regular light. Here’s a general overview of the steps involved:
- Turn off the power.
- Remove the old light fixture. There will be screws holding the fixture to the electrical box in the ceiling. Remove those screws and carefully lower the fixture, disconnecting the wires from the house wiring.
- Prepare the ceiling for the recessed light. You’ll need to make a hole in the ceiling according to the size and template of your new recessed light. You can buy special drywall saw blades to make this cut.
- Remove the old electrical box. Depending on your situation and the type of recessed light you’re installing, you may need to remove the old electrical box. Consult the instructions for your specific light fixture.
- Install the new recessed light housing. This will involve connecting the wires from the recessed light to the wires from the house using wire nuts and making sure everything is secure within the light housing.
- Install the recessed light trim. The trim is the visible part of the recessed light that sits flush with the ceiling.
- Turn the power back on and test the light. Once everything is installed and secure, turn the power back on at the circuit breaker and test the light switch to make sure the new recessed light works properly.
Editors' Recommendations
- Spring cleaning time: How to organize (in 6 easy steps) and clean your closet like a pro
- The 7 best classic fantasy books to get lost in
- From Gilda Radner to Ali Wong, these are the best female comedians of all time
- Yeti Rambler vs Stanley Tumbler – the choice is clear
- The Stanley Tumbler is hot right now, but the classic Stanley Bottle is much cooler


