
How to make marshmallows: This recipe is the perfect Easter treat

Marshmallows: The homemade version of this popular Easter candy is easier to make than you think

Homemade Easter Marshmellow Peeps
McCormick

Marshmallow candies are as much a hallmark of the Easter holiday as chocolate, ham, and drinking Champagne until your burps come out speaking French. Of course, you can always go out and buy the beloved Easter marshmallows we all know and love, but making your own at home is actually a really fun activity for the holiday, especially if you have little ones at home.

We absolutely love this recipe from McCormick. Learn how to make marshmallows this Easter.

Recommended Videos

Easter marshmallow recipe

homemade easter marshmallow sugar dip
McCormick

Ingredients:

For colored sugar:

  • 1 cup granulated sugar
  • McCormick Assorted NEON! Food Colors & Egg Dye

For marshmallows:

  • 2 cups granulated sugar
  • 1 cup cold water, divided
  • .5 cup light corn syrup
  • 2 envelopes (.25 oz each) unflavored gelatin
  • 1 tablespoon McCormick Pure Vanilla Extract

homemade easter marshmallow sugar

Method:

For the colored sugar:

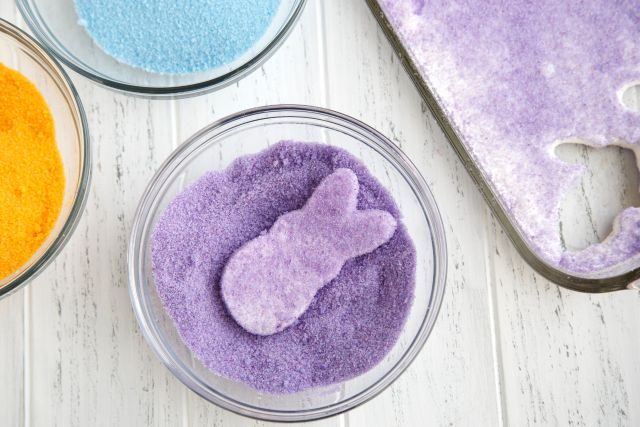
  1. Place sugar in a large resealable plastic bag. Select your desired Marshmallow Variation in the tips section below and add the designated amount of Food Color with the sugar.
  2. Seal the bag and knead gently until the color is evenly distributed.
  3. Spread colored sugar in a thin layer on a large rimmed baking sheet and break up any large lumps. Allow to dry thoroughly, about 15 to 20 minutes.
  4. Sift or press through the sieve, if needed. Spray 13 x 9-inch baking dish with no-stick cooking spray then coat with some of the colored sugar. Set aside.

For the marshmallows:

  1. Microwave .5 cup of the water, sugar, and corn syrup in a medium microwavable bowl on high for 7 minutes. Stir to dissolve sugar.
  2. Microwave on high for 5 minutes longer. (Mixture will have a slight yellow tint.) Carefully remove the hot bowl from the microwave.
  3. Place the remaining .5 cup water in a large mixer bowl. Sprinkle with gelatin. Let stand 5 minutes.
  4. Gradually beat in hot syrup mixture with a whisk attachment on medium-low speed. Beat 8 minutes. Increase speed to medium-high.
  5. Beat 10 to 12 minutes longer or until the mixture is fluffy, shiny, and has at least tripled in volume. Beat in vanilla.
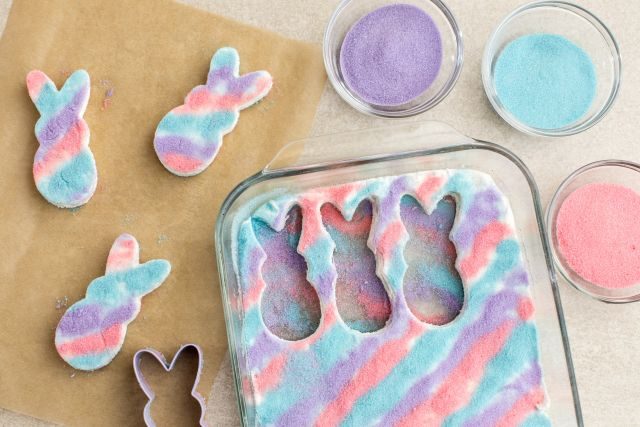
  6. Spread marshmallow mixture in the prepared dish. Smooth top with a spatula. Sprinkle some more of the colored sugar on top to coat. Let stand at room temperature overnight or refrigerate for at least 3 hours.
  7. Reserve the remaining colored sugar in a large resealable plastic bag or airtight container.
  8. Cut marshmallows with 1- to 2-inch Easter cookie cutters. Add marshmallows in batches to reserved colored sugar in the bag; toss to coat well. Shake off excess. Store marshmallows in an airtight container at room temperature for up to 3 days.

For marshmallow color variations:

  • Pink: For the colored sugar, add 10 drops of pink color with the sugar.
  • Purple: For the colored sugar, add 5 drops purple color and 8 drops blue color with the sugar.
  • Blue: For the colored sugar, add 15 drops of blue color with the sugar.
homemade easter marshmallow face
McCormick

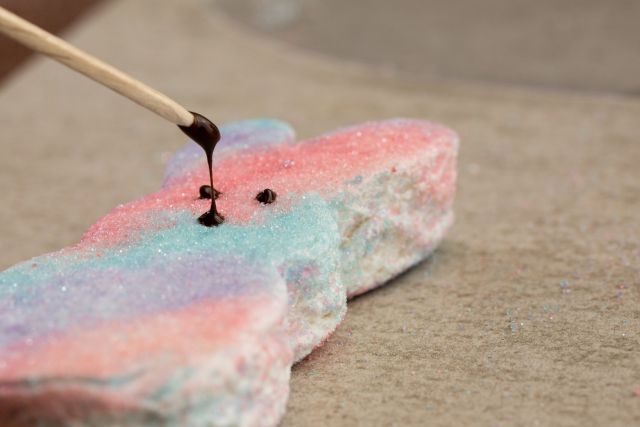
Note: To prepare marshmallows as seen in the photo, prepare the baking dish as directed, sprinkling the pink, purple, and blue colored sugars in stripes in the bottom of the dish. Prepare marshmallows as directed. Decorate the top of the marshmallows with stripes similar to the bottom. Cut into bunny shapes and sprinkle sides with remaining sugar. Melt chocolate chips as directed on the package and use to paint or pipe on the bunny face, if desired.

To prepare Colored Sugar using McCormick Nature’s Inspiration Food Colors, add .25 teaspoon desired color and 1 teaspoon water to sugar. Continue as directed.

Topics
Lindsay Parrill
Lindsay is a graduate of California Culinary Academy, Le Cordon Bleu, San Francisco, from where she holds a degree in…
How to steam milk: Perfect your technique for rich, creamy coffee drinks
Learn to steam milk like a Barista
steamed milk

As an aspiring barista, I've grown to understand the importance of steamed milk in making all of my favorite drinks. To learn how to make a cappuccino at home, I had to master the art of making steamed milk. Learning how to steam milk at home is difficult, but you'll need to commit to learning if you want to expand the types of coffee drinks you can make at home. Teaching yourself how to steam milk will allow you to experiment with all kinds of elaborate espresso drinks just like you order at the café -- from the cafe au laits to cappuccinos.
Steamed milk vs. frothed milk

As you experiment with how to steam milk, it's key to understand the slight differences between steamed milk and frothed milk. In the world of coffee-making, these two are often confused -- and I completely understand why. To help you know the difference, consider how you'd make a latte. The ratio of espresso to milk in a latte is usually 3:1, with espresso on the bottom, steamed milk on the top, and a light layer of frothed milk on the top.

Read more
How to use a milk frother: Simple tips and tricks to elevate your drinks
Here's how to use a milk frother with ease
Cappuccino

Once you've mastered brewing the perfect coffee at home, the next step in every home Barista's journey is to learn how to use a milk frother. You'll need frothed milk to enjoy specialty-type coffees from your kitchen, such as lattes and cappuccinos. At one point, I was intimated by the concept of frothing my milk, as it can sound more complicated than it is. Learning to use a milk frother is easy enough for coffee lovers of any skill level. Here are two of my favorite ways to froth milk for coffee at home, ideal for those who do not have an espresso maker with a steam wand attachment.
How to use a milk frother: Hand frothing

Using a handheld wand milk frother is one of the easiest methods for frothing milk at home. A handheld milk frother can be used in your mug and is an excellent option for those who don't have an espresso maker at home. Before I had an espresso machine with a steam wand at home, I found the handheld milk frother to be my go-to for frothing milk for coffee. I like this method because it requires minimal skill and clean-up (always a motivating factor when making coffee at home instead of ordering it out at a cafe).

Read more
Wine 101: What makes Cabernet Franc so special?
Meet Cabernet Franc, parent to both Cabernet Sauvignon and Merlot
Glass of wine in front of vineyard

Do yourself a favor and enjoy a bottle of Chinon in early spring, when the hardier trees are budding, but winter’s chill still lingers. I say this from experience: I once sat near the window of a slightly chilly wine bar after the electricity had gone out. The Chinon we ordered was a lighter color than I expected -- not much darker than a pinot noir -- but its taste was unique: red berries, bell pepper, and a tannic acidity so zesty it positively danced on my tongue. I’ve had wines that were elegant, even sassy, but this one was alive. I attribute this fact to two reasons -- a good producer and the wine’s sole varietal: the versatile black grape known as Cabernet Franc, co-parent to the wildly popular Cabernet Sauvignon and Merlot varietals. Red wines made from this grape can be as fresh as a Beaujolais or deep as a Bordeaux. It’s also used to make rosé and ice wines. 

The town of Chinon is located in the central Loire Valley and focuses on producing red wine made from Cabernet Franc. It’s been this way for a long time -- possibly since the 12th century, when the town's wines were served in the Plantagenet courts. In time, Cabernet Franc made its way to Bordeaux, where it became parent to both of that region’s mainstays, Cabernet Sauvignon and Merlot, as well as being a major player in certain red wines from Sainte Émilion. Now, Cabernet Franc can be found all over the world, either featured as a sole varietal or a dependable blending agent. 
Cabernet Franc: color, aroma, and flavor

Read more