We are fans of lamb here at The Manual. We love a good lamb chop as much as the next person, but in thinking about those delicious morsels of meat, we realized something: We didn’t know a whole lot about lamb. Sure, it’s great when it’s cooked and on the plate, but what about everything before that? To learn more, we talked to an expert, chef Hosea Rosenberg.
Rosenberg is the owner of Blackbelly Market, Boulder, Colorado’s only whole-animal, artisanal butcher shop and sole independent retailer licensed to make and sell its own cured and fermented meats. Before opening the butcher portion of his business (Blackbelly started as a catering company and also includes a full-service restaurant), Rosenberg worked under various chefs, including Wolfgang Puck, before being crowned Top Chef in season five of the hit Bravo show in 2009.
We sat down with Rosenberg to learn all we could as we get ready to cook lamb the right way for the first time:
The Manual: For people who have never cooked lamb before, what is the best cut to start with?
Hosea Rosenberg: The “easiest” cuts — which just happen to be the most expensive — would be lamb chops and/or loin. They are the mildest, with the best flavor and the most tenderness. Easy to grill, sauté, and slice up.
TM: What are some tips or tricks for purchasing lamb when you go to the butcher counter?
HR: First, always ask where the lamb is from. Colorado lamb is the best in the world and is what I would always recommend. Take a look at the meat and make sure it’s not too grey or dark — signs of oxidation meaning it’s been out for too long. Ideally, your butcher cuts it for you at the time of purchase. And always ask to look at your meat before they wrap it up. If it looks good and smells good, it is good.
TM: Do you have a preferred way of cooking lamb? Does it benefit from one method over another?
HR: Each cut of lamb is different and takes to different cooking techniques. The shoulders and legs benefit from slow, long cooking times (slow roasting, braising, or smoking), while the loins and the chops are always better grilled or sautéed. The rule of thumb is the lean meat should be cooked fast and on the rare side, where the tougher meat with lots of connective tissue should be slow cooked.

TM: How does a cut of lamb compare to, say, beef or pork when finished? What’s the minimum internal temperature you should be shooting for? Will you get sick from raw or undercooked lamb?
HR: Again, it depends on the cut and the way it was cooked. I love my lamb shanks cooked for eight hours and falling off the bone. But a nice, center-cut lamb chop is best rare to medium-rare. No more than medium! You will not get sick from raw lamb. We serve carpaccio and tartare and it never gets cooked!
TM: When grilling lamb chops, for example, what are some of your favorite things to serve with it?
HR: Garlic, mushrooms, spinach, peppers, eggplant, tomatoes, onions, red wine. Lamb has a strong flavor and is best with robust ingredients. You will never go wrong with rosemary and garlic.
Lamb has a strong flavor and is best with robust ingredients. You will never go wrong with rosemary and garlic.
TM: Why is mint jelly the traditional serving with a lamb chop?
HR: It’s a very “old school” condiment with lamb. Not my personal favorite, but I understand the thought behind it. Often times people associate lamb with gamey-ness. The mint jelly brings out the sweetness in the lamb. If you have Colorado lamb, though, you won’t want to hide the flavor!
TM: What would you say are the top three underrated cuts of meat on a lamb?
HR: Shank, neck, and shoulder. These cuts have the most connective tissues and membranes. They take more time and expertise to cook, but the results are extraordinary. Unctuous, savory, and utterly delicious!
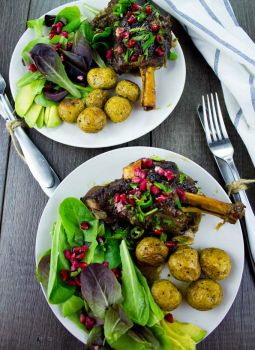
With that in our pocket, we then turned to the American Lamb Board to get a recipe to work with. Below, you’ll find a delicious recipe for pomegranate roasted lamb shanks, which was created by Two Purple Figs.
Pomegranate Roasted Lamb Shanks
Ingredients:
- 8 lb of American lamb shanks, trimmed
- .25 cup pomegranate molasses (see note)
- 1 tbsp kosher salt
- 2 tbsp black pepper, freshly ground
- 1 tbsp nutmeg
- 1 tsp cinnamon
- 2 tbsp olive oil
- 2 large red onions, sliced
- 8 cloves of garlic, smashed
- 1 cinnamon stick
- 1 cup of beef, chicken, or veggie stock
- Fresh pomegranate arils for sprinkling
- Fresh minced parsley leaves for shrinking
- Freshly sliced chili peppers for sprinkling
Method:
- Preheat the oven to 400 degrees Fahrenheit.
- In a large 3-quart oven safe dish, place the lamb shanks and season them with the pomegranate molasses, salt, pepper, nutmeg, cinnamon, and drizzle the olive oil.
- Use tongs (or your hands) to toss the lamb shanks very well with all the seasonings.
- Add the sliced onions and crushed garlic cloves to the baking dish and tons them with the lamb shanks, keeping most of the onions and garlic at the bottom of the dish so they act like a bed for the lamb shanks.
- Add in the cinnamon stick and pour the stock over the lamb mixture. Roast the shanks for one hour, and then cover the pan with foil (add extra stock if you’d like a saucy lamb shank). Roast (covered) for another 45 minutes to 1 hour until the shanks are tender.
- Remove the pan from the oven abd sprinkle some pomegranate arils over the lamb shanks. Sprinkle parsley and chili peppers, too. Serve and enjoy!
Note: Pomegranate molasses is available at the ethnic aisle of most grocery stores. It’s made out of pure pomegranate juice and some sugar and lemon juice boiled and reduced to a consistency of a syrup. However, you can find the homemade recipe below:
Homemade Pomegranate Molasses
Ingredients:
- 3 cups of pure pomegranate juice
- 6 tbsp of granulated sugar
- 2 tbsp of lemon juice
Method:
- Place all the ingredients in a medium-size pot over medium-high flame and bring to a boil. Reduce the heat to low and allow the mixture to simmer for about 50-60 minutes until it has a syrup consistency and has reduced to about 1 cup in total.
- Cool the molasses for about half an hour before storing it in an airtight container in the fridge for about 6 months.
- Use it on lamb, chicken, salads, drinks, sauces, and for baking!