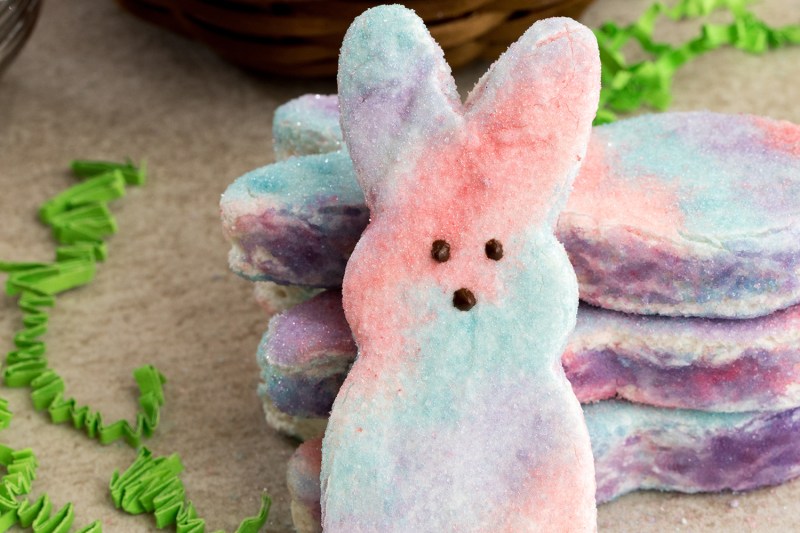
How to make marshmallows: This recipe is the perfect Easter treat

Marshmallows: The homemade version of this popular Easter candy is easier to make than you think

Homemade Easter Marshmellow Peeps
McCormick

Marshmallow candies are as much a hallmark of the Easter holiday as chocolate, ham, and drinking Champagne until your burps come out speaking French. Of course, you can always go out and buy the beloved Easter marshmallows we all know and love, but making your own at home is actually a really fun activity for the holiday, especially if you have little ones at home.

We absolutely love this recipe from McCormick. Learn how to make marshmallows this Easter.

Easter marshmallow recipe
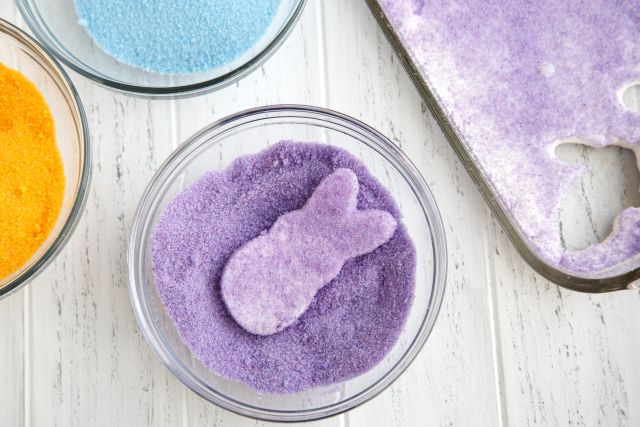
homemade easter marshmallow sugar dip
McCormick

Ingredients:

For colored sugar:

  • 1 cup granulated sugar
  • McCormick Assorted NEON! Food Colors & Egg Dye

For marshmallows:

  • 2 cups granulated sugar
  • 1 cup cold water, divided
  • .5 cup light corn syrup
  • 2 envelopes (.25 oz each) unflavored gelatin
  • 1 tablespoon McCormick Pure Vanilla Extract

homemade easter marshmallow sugar

Method:

For the colored sugar:

  1. Place sugar in a large resealable plastic bag. Select your desired Marshmallow Variation in the tips section below and add the designated amount of Food Color with the sugar.
  2. Seal the bag and knead gently until the color is evenly distributed.
  3. Spread colored sugar in a thin layer on a large rimmed baking sheet and break up any large lumps. Allow to dry thoroughly, about 15 to 20 minutes.
  4. Sift or press through the sieve, if needed. Spray 13 x 9-inch baking dish with no-stick cooking spray then coat with some of the colored sugar. Set aside.

For the marshmallows:

  1. Microwave .5 cup of the water, sugar, and corn syrup in a medium microwavable bowl on high for 7 minutes. Stir to dissolve sugar.
  2. Microwave on high for 5 minutes longer. (Mixture will have a slight yellow tint.) Carefully remove the hot bowl from the microwave.
  3. Place the remaining .5 cup water in a large mixer bowl. Sprinkle with gelatin. Let stand 5 minutes.
  4. Gradually beat in hot syrup mixture with a whisk attachment on medium-low speed. Beat 8 minutes. Increase speed to medium-high.
  5. Beat 10 to 12 minutes longer or until the mixture is fluffy, shiny, and has at least tripled in volume. Beat in vanilla.
  6. Spread marshmallow mixture in the prepared dish. Smooth top with a spatula. Sprinkle some more of the colored sugar on top to coat. Let stand at room temperature overnight or refrigerate for at least 3 hours.
  7. Reserve the remaining colored sugar in a large resealable plastic bag or airtight container.
  8. Cut marshmallows with 1- to 2-inch Easter cookie cutters. Add marshmallows in batches to reserved colored sugar in the bag; toss to coat well. Shake off excess. Store marshmallows in an airtight container at room temperature for up to 3 days.

For marshmallow color variations:

  • Pink: For the colored sugar, add 10 drops of pink color with the sugar.
  • Purple: For the colored sugar, add 5 drops purple color and 8 drops blue color with the sugar.
  • Blue: For the colored sugar, add 15 drops of blue color with the sugar.
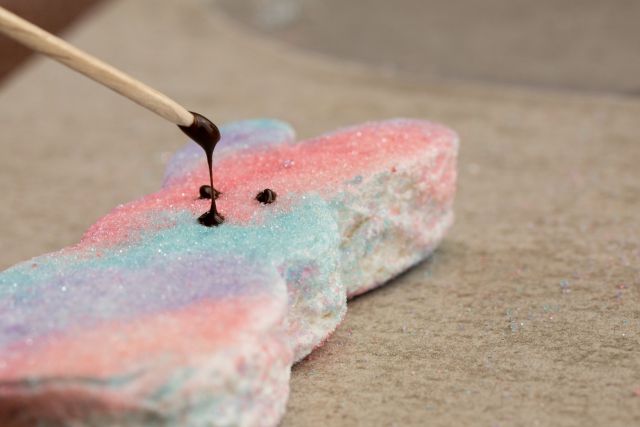
homemade easter marshmallow face
McCormick

Note: To prepare marshmallows as seen in the photo, prepare the baking dish as directed, sprinkling the pink, purple, and blue colored sugars in stripes in the bottom of the dish. Prepare marshmallows as directed. Decorate the top of the marshmallows with stripes similar to the bottom. Cut into bunny shapes and sprinkle sides with remaining sugar. Melt chocolate chips as directed on the package and use to paint or pipe on the bunny face, if desired.

To prepare Colored Sugar using McCormick Nature’s Inspiration Food Colors, add .25 teaspoon desired color and 1 teaspoon water to sugar. Continue as directed.

Editors' Recommendations

Topics
Lindsay Parrill
Lindsay is a graduate of California Culinary Academy, Le Cordon Bleu, San Francisco, from where she holds a degree in…
The 10 best brunch recipes for restaurant-quality meals at home
Skip long lines and getting hangry and whip up your own high-quality brunch
A person cutting up tomatoes for a healthy meal

Spring is here, so it's officially brunch season. Over the past couple of decades, brunch has become the meal of the weekend, the repast that lets you keep the party going from the night before with mimosas and Bloody Marys. The name implies that it should fall sometime between breakfast and lunch but can run anywhere from 8 a.m. to 3 p.m. Some restaurants have given up trying to put time restrictions on their brunch menu and serve it all day. Others have dedicated their whole concept to the "in-between" meal and only serve brunch-friendly foods.

So, what is considered brunch food? Originally, restaurants had brunch to use up ingredients that weren't used over the weekend. But now, brunch is such a busy shift (if not the busiest for some), restaurants must order special items for brunch to present creative, in-demand dishes.

Read more
How to reverse sear for a flawless steak every time
Trust us, you're going to want to try this method
Sliced steak on cutting board

It seems that every day, there's a new method of cooking that seems, honestly, pretty superfluous compared to the old-fashioned way of doing things. As a cooking purist myself, I sometimes find it difficult not to roll my eyes at many of the new techniques and culinary trends or methods that promise to be "easier than ever" or the "best" way to cook something. Usually, I like to cook the way my Grandmother did. Give me a wooden spoon, a good cast iron pan, an oven, and some fire, and I'll be good to go. Admittedly, I've been pulled out of this way of thinking once or twice - like the time I finally dropped my pride and tried sous vide ribs. Good lord. That one delicious experience showed me that - just maybe - there's still a little room for modern cooking upgrades every now and then. Reverse searing is one of those modern upgrades. And for those of us who still cringe a bit when trying out a new cooking gadget, worry not. Only the process itself is modern. This method requires absolutely no specialized equipment - just an oven and a good-quality pan.

Reverse searing steak allows for a better handle on temperature control, decreasing your chances of overcooking that beautiful ribeye. This method also creates a gorgeously caramelized crust on the outside of your steak. When placed in the oven first, the surface of the meat will dry more thoroughly and make for a better pan-sear later on.
How to reverse sear a steak

Read more
Don’t make this super common mistake when chilling wine in an ice bucket
Chill your wine easily without the need for any expensive equipment.
Rose wine in ice bucket

When it comes to chilling wine, there are countless ways to get the job done. The market is saturated with products made specifically for cooling wine down to the perfect drinking temperature, from luxurious wine refrigerators to elegant marble wine chillers. We can almost guarantee that the passionate wine lover in your life probably has a pantry full of these fancy contraptions, each one more exciting (and expensive) than the last. After all, wine is an art and enjoying it at the correct temperature is an absolute must. At the end of the day, though, even with all the bells and whistles, it's hard to beat a good old-fashioned ice bath - especially when trying to cool down that wine in a hurry. But, as simple as this wine-chilling technique may be, it is possible to get it wrong. That's why we've collected a few tips and tricks for getting that wine chilled exactly right every time.
Order matters when chilling wine

While the more aesthetically pleasing option may be to fill your favorite wine chilling bucket with ice and simply nestle in your favorite bottle or two, this method is actually pretty ineffective when it comes to chilling wine in a pinch. By dumping ice into a container and plopping the wine on top, only the bottom half of the bottle will actually chill. It's important to fully cover your wine (or other beverage) bottles with ice so that the entire bottle has a chance to actually get cold. Do this by putting your bottle(s) in the bucket first, and then topping with ice - not the other way around. The more the bottle is covered with ice, the better. While this might not get you the sexiest photo shoot of your wine luxuriously resting in an ice bath, it's the better way to get the contents cold.
Use water and...salt?

Read more