
The building it’s housed in has seen more than a half-century of change in Portland’s Cully neighborhood. One thing that hasn’t changed is the working-class ethos that binds an area mostly populated by families and old Portland roots. The shop’s rustic façade and bare-bones interior was a perfect match for Shepard two years ago as a left-turn in his career blossomed into a new full-time direction.
The process started three years before that. As the summer of 2010 approached, Shepard realized he wasn’t happy. “I was in a sales job (in Portland, OR) and was absolutely bored,” he says.
Sensing change ahead, he took an apprenticeship at a butcher shop on Vashon Island, Washington. For almost four months, he would make the 4-hour weekly drive to learn from a professional butcher and meat purveyor. Such a utilitarian move doesn’t make a lot of sense – until you talk with the native Bostonian and get to the core of his philosophy.
We sat down for our first conversation around his white oak butcher’s table that he made himself. It takes up about half of the front room and is covered with salt to draw out moisture and prevent bacteria from growing within the wood.
“Whiskey, beer, or both?” he asks, as he puts out a bottle of bourbon on the table. (I chose whiskey.) Our conversation spanned just about everything from how Portland has changed over the years, to his following of New York University professor Wendell Berry.
 He has begun the transformation of his rustic shop with self-installed lighting and wooden beams across the plastered ceiling. A few tables rebuilt from old store equipment add to the self-built luster. As the list goes on, you begin to understand that it’s not so much an issue of pride, but self-enrichment, and handiwork is just part of Shepard’s engine.
After his apprenticeship ended, he worked at the now-defunct Pastaworks, helping them start a “whole carcass” program. He and a co-worker began buying whole animals to butcher in-store and sell to the general public. However, the owners shared a conflicting philosophy. “They came from a more conventional, American background,” he says. “I was evolving, wanting to butcher in an agrarian, French way.”
He left Pastaworks and returned for a final stint in sales. While saving money in the industry he was ready to leave, he began renting space at Portland-area commissary kitchens to perfect his craft and begin selling meat. This lasted about seven months until Shepard realized he needed his own space.
“You just couldn’t do things at the level I wanted to in a shared space. Little storage, poor logistics, it just wasn’t an option,” he says.
In predictable fashion, Shepard spent the end of 2013 riding around town on his bicycle, jotting down any vacant building space that looked suitable for a shop of his own. In early 2014, he found the Fremont Street space and agreed on a lease later that year.
In the two years since, he’s slowly built a following of private clients. “I believe in having this human, person-to-person connection – it’s the way I want to do business,” he says.
He’ll head out to the Willamette Valley this weekend for meat roasts on two separate vineyards. On Monday, he’ll come back to the shop with his part-time assistant to continue butchering a whole female pig that was otherwise deemed unusable due to an inability to give birth.
“The animal is still perfectly good to eat. It’s still intrinsically beautiful and we want to restore and redeem her,” he says.
Shepard is now moving into that territory where the Portland food spotlight will start shining his way, but he wants none of it. The growth trajectory is noticeable and familiar – word spreads about his high product standards, the orders start coming in, and the event ideas start filling the inbox. However, in this age of celebrity chefs and nouveau-fashion culinary franchises, Shepard isn’t biting.
“When the time comes, I don’t want a ‘Proletariat LA, NYC, Boston’,” he says. “I just want to train someone and let them go off on their own.”
Shepard wants to simply pass on his knowledge and experiences – and that’s the beauty of Proletariat Butchery. The mastery happening inside these walls is a display of pure passion to connect with meat and the low-tech skills behind preparing it.
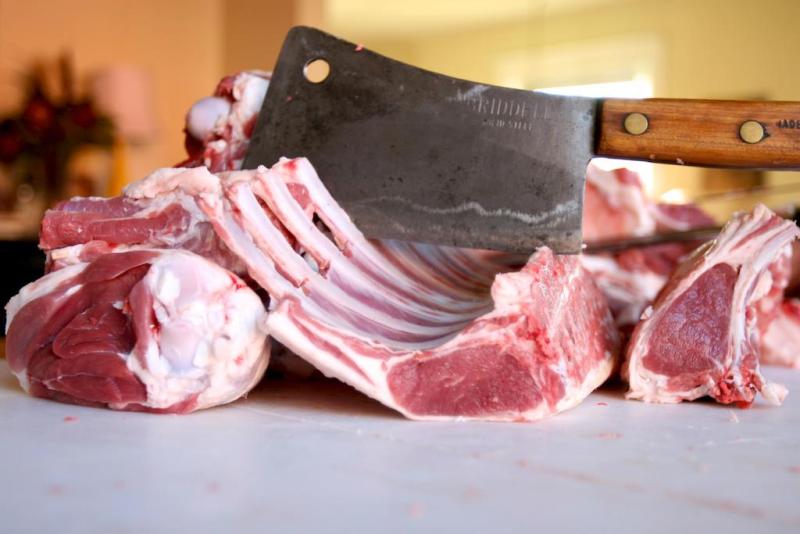
On my second visit, Shepard and his assistant were packaging chorizo and other sausages made from that female pig. He then showed off his grandfather’s cleaver and a few other high-carbon hand-me-downs he’s picked up along the way.
“I could have tried to get investors, but that’s not the model I wanted. This is all low-cost for a reason, so I can make this accessible to more people,” he adds.
But for now, it’s calculated growth and business as usual. There’s more meat to grind and ribs to sell.
Proletariat Butchery Brine & Ham (specs for 7-9 lb. ham)

Brine:
- 1 gallon of water per pound of meat
- 2/3 cup salt per gallon of water
- 1/3 cup sugar per gallon of water
- 1 head garlic
- ¼ cup cracked black peppercorns
- 10 dried bay leaves
Bring half of water to boil in stockpot. Add bay leaves, garlic, peppercorns, 1/4 sugar and 1/4 salt to stockpot as it heats up. Meanwhile, take other half of water and put it in large sanitized container. Once boiling, take stockpot off heat and let cool for 10 minutes. Then, add to container, add remaining salt and sugar and stir until completely dissolved.
Add ham to container, ensure it is covered, then place in refrigerator. A good rule of thumb is to let it sit 1 day for every 2 lbs. of meat. Three to give days is ideal.
Chef’s Note: This brine can be modified based on your own individual taste for salinity and sweetness.
Ham Procedure:
Ideally, the meat is cooked over a BBQ with an indirect heat source. Place wood chips or light burners on only half of the grill surface. Wait until it heats up, then place meat on cooler side of the grill. Check every hour until internal temperature reaches at least 145°F. Let meat rest 15-20 minutes before carving.


